The Sinew Series Part 1
The very word sinew caries connotations of antiquity. A material of a long-forgotten time. This amazing material has so much use to anyone practicing primitive crafts.
Sinew is extremely strong in tension. It is also flexible in any state and quite elastic when wet, tightening as it dries. Even when sinew is in its completely cured dry state it still possesses an element of elasticity which is one of the reasons that sinew is so effective as a bow backing material.
In addition to backing bows, sinew can also be used for wrapping arrow fletchings, nocks etc, it can be used for making cabling, and unlike many plant fibres strings, sinew is also plenty strong enough to make a great natural bow string. And to top it all off, as wet sinew dries it adheres to itself and whatever it is wrapped around making it the original duct tape!
As well as providing all of these functional benefits, sinew can also be used simply as a decorative material in the same way that rawhide was often used in a lattice of bow limbs throughout the ages.
Sinew is one of those fundamental materials that any budding primitive archer should have knowledge and experience of. But the reality is that supply is very often limited making sinew one of those rarer materials which few have ready access to. (A bit like Osage here in the UK!)
Sinew it is also one of those materials which many are put off using because of fears of complexity, long cure times, or as far as the raw state is concerned, many wish to avoid a messy and time-consuming acquisition!
But the truth is that sinew is easy to source, easy to process and easy to apply once you have a bit of experience.
Our hominid ancestors probably enjoyed this incredibly useful material since we came down from the trees. Indeed, it has likely shaped our evolution. We may not have got as far as we have if it had not been for the discovery of this materials many uses. Just imagine the evolutionary jump that our species would have experienced upon the discovery of a material which has all the properties of self-adhesive baler twine!
There is no doubt that the progression of primitive technologies was aided by the diverse utility of sinew.
This article will be the first of several articles aimed at dispelling many of the myths and fears that surround the use of sinew.
It is my hope that this series of articles will enable anyone to source it, extract it, dry it, process it, apply it, cure it and finally enjoy the functional and aesthetic attributes of one of nature’s special gifts. So, lets break down the basics so that by the end of this series of articles you’ll be able to start incorporating this incredible material into your next primitive archery project.
This first Article will cover; what sinew is, where you can source it, how to remove raw sinew from its source and how to dry sinew.
So first, what is this sinew stuff and where does it come from?
Strictly for the benefit of those who are completely new to primitive archery, sinew is basically dried tendon tissue from a dead animal. It’s that simple. Are all tendons created equally? No. Well at least not in my experience.
Nowadays I almost exclusively use deer leg tendons for bow backing and cordage (including bow strings), and I use deer back strap sinew for lashings/wrappings etc. I’ve tried using tendons from other species such as farmed ostrich, domestic cow, farmed boar and truly wild boar and have concluded that large wild deer sinew is superior to sinew from all of these other animals. Ostrich leg sinew comes a close second however and is lovely and long but the sinews I’ve tried from farmed stock aren’t nearly as strong or elastic as those from a truly wild deer.
Pig/boar feet are not long enough to produce usable tendons which only leaves the back sinew as an option. Personally, I find both domesticated pig and wild/feral boar back sinew to be rather greasy. Wild deer back sinew however rarely has this problem. In fact, I just use deer sinew for everything which requires sinew these days. It needs mentioning though that some deer are just a bit too small to produce the kind of fibre lengths which are useful to us primitive archery folk.
Here in the UK, I’d suggest using nothing other than Red deer, Fallow Deer or Sika stag sinew. The smaller deer such as sika hinds, plus all roe and muntjac are just a bit too small to be worth messing about with however if that’s all you can get, then by all means give them a try. Fibres from smaller wild deer will still have all the other great qualities we’ve already talked about. They’ll just produce shorter fibres.
In the USA Mule/whitetail deer and of course Elk/Moose would all produce excellent tendons of suitable length which will produce lovely long strong sinew fibres. Basically, any wild ungulate with a live body weight over say 50kg/110lb will produce excellent sinew for the purposes of primitive archery.
So where can I get sinew from?

Dry sinew
Dry Sinew can at times be difficult to find. Outside of Ebay there are a few craft shops here in the UK which sometimes stock odd amounts however most of these shops are out of stock for 9/10ths of the year. Ebay is your best bet and there are usually several sellers who can provide you with enough sinew for at least a single sinew backing project. Just search for “deer sinew” on Ebay to see if there is anyone selling sinew in your part of the world.
I myself typically have quite a good year-round stock of dried Red Deer leg sinew available for people to purchase here in the UK all year round. I sell dried sinew on a weight basis. If you would like to buy some sinew directly from me then please use the contacts page to get in touch.
Raw sinew

Raw trimmed sinew is as rare as hen’s teeth as no one in their right mind would go through the process of stripping out leg tendons or trimming and cleaning off back strap tendon unless they were intending on drying them immediately.
Like most bits of dead things, sinew spoils quickly unless it is dried as soon as possible. So, the only place you’re likely to find raw unprocessed sinew is on the animal, or parts of the animal, which grew it in the first place!
All of my sinew comes from Red Deer which have been culled in my local area. Fortunately, I am a deer stalker (and also know lots of other deer stalkers) so I’m very lucky to have access to lots of deer legs. By legs I mean the bottom section of the leg below the ankle joint. Deer foot is probably a better description of the body part of use to us. This is the bit that your average deer stalker/hunter will throw in the bin as there is nothing worth eating on the foot of a deer!
Back Strap Sinew

Back strap sinew only ever comes my way if I’ve shot a deer myself for my own consumption, as the back strap sinew lies directly on top of the back straps (AKA the sirloins). Since no one ever gives up the sirloins of a venison carcass you’ll be doing well to acquire the back sinew unless you shoot/hunt deer yourself.
Even if someone is generous enough to offer you a whole back strap then the silvery sinew sheet which lies across the length of the back straps upper surface will likely have been cut off during the filleting and trimming process.
So, my advice is to find some local deer stalkers/hunters and offer to take their unwanted deer feet away for them. You may have to buy them a beer (or more likely a coffee these days!) but as long as you’re willing to do the processing yourself then this will be the cheapest way to acquire the highest quality sinew material. And possibly for free! In the UK you may be able to locate a deer stalker near you through the forum: The Stalking Directory
Removing tendons.
For now, I shall focus on removing tendons from deer feet. I will do an article on removing, drying and processing back strap sinew in the future.
Here I will show a sequence of photos demonstrating the safe and efficient removal of all of the usable tendons which you will find on the foot of a deer. First things first, here’s a quick list of the tools and equipment you will need to get started:
- Easy clean work surface
- Sharp knife
- Knife sharpener
- Disposable gloves
- Kevlar/chainmail gloves
- Dehydrator (only really necessary in the colder more humid months)
- Cup of tea/coffee (optional!)

Step 1- Remove Skin.
The first step is to remove the skin from the cut end all the way down to the dew claws. This will require cutting away the skin from the bone/tendons/fascia which you will be holding in your free hand.
I’d strongly recommend wearing either a Kevlar or chainmail glove as you will be cutting towards your hand and wrist at times. I prefer to use Kevlar gloves which extend beyond my wrists for extra protection. I wear kevlar gloves on both hands as they also help a great deal in gripping the otherwise slippery skin and bone when it comes to the pulling phase of the skinning process.
In the interest of hygiene, under my Kevlar gloves I wear a pair of disposable gloves.

With the back side of the foot facing up towards you, start the skinning process by pinching the skin away from the large tendon running down the back side of the foot. Begin to slice away a strip of skin that sits directly on top of the tendon. (See pic below)


Next peel away the skin from around the top and front of the foot to expose the whole top of the bone. Be careful here not to cut the front tendon away onto the skin which runs down the front/shin of the leg bone.


Once you have cut a large enough flap of skin free to take a firm grip of the skin, hold the bone in one hand and the skin in your other hand and pull down hard on the skin to free it from the rest of the bone. (See pics below)


Step 2 – Remove tendons.
Once the skin has been pulled down to the same level as the dew claws at the back of the foot, find the thin tendon which runs all the way down the front of the bone. Find a spot about 3” up from the bottom of the skinned section of bone and pinch up this tendon away from the bone. Now insert the end of your knife under the tendon between the tendon and the bone. (See pic below)

Now whilst pulling the tendon upwards and away from the bone, draw the knife under the tendon all the way to the end severing it away from the bone where it terminates. (See pics below)


Now do the same thing to the bottom end of the tendon cutting down about an inch past where the tendon forks across towards the toes. (See pics below)


Some might say that cutting the tendon off at the first fork instead of trimming it out all the way down to the toes wastes a couple of inches of usable sinew. To some extent they would be right. That said though, the sinew beyond the initial fork is intertwined within itself making it difficult to separate out after drying.
Personally, I’m more than happy to make do with the 7-9inches of untangled sinew which is obtainable from tendons removed as per the picture above. I usually revert to using back strap sinew when I need fibres to be longer than 9 inches.
Now flip the deer foot over and repeat the same process to remove the larger thicker tendon located on the back of the foot. (See pics below.)


Step 3 – Remove tendon sheaths.
At this point you will now have two whole tendons, one of which will be skinny and floppy, the other one will be thicker and stiffer. The thin floppy one needs no further attention and can be put to one side ready for drying.
The thicker, stiffer tendon now needs to be separated out into individual tendons after first separating them from the tendon sheath. The removal of the tendon sheath surrounding the inner tendons speeds up drying and also makes the pounding and separating process much easier at a later stage.
To remove the tendon sheath first insert the tip of your knife into the thinner end of the tendon sheath and slip the blade tip between the outer layer of the sheath and the largest of the visible tendons within the sheath. Now cut up towards the thicker end of the tendon. You’re basically trying to cut the sheath open end to end without cutting the tendon on the inside.


Step 4 – Separate the tendons.
Now take your fingers and separate out the tendons from the sheath. On front feet there is one round thick tendon plus two thin tendons. On back feet there will be one thick round tendon plus one thin tendon. Grip the individual tendons one at a time and rip them away from the tendon sheath.
The Kevlar gloves help a lot to provide enough grip to get them all separated out easily. (See pics below.)


Whilst the tendon sheaths do contain some tendon material, processing it away from all the other fascia is a great deal of work so nowadays I save all my tendon sheaths up until I have a bunch of them and then I cook them up into sinew glue.
Sinew glue that I use for backing my bows. I’ll do an article on sinew glue at some point in the future. Until then just remember to keep your tendon sheaths either dried or frozen because they really do make excellent sinew glue!

Step 5 – Dry your tendons.
A quick word about using a dehydrator to dry tendons/sheaths. Dehydrators are only really necessary when temperatures are low and/or humidity is high.
Most of my deer feet become available to me in the winter months. The winter months in the UK are notoriously wet and cold. Not ideal for drying anything! As such I’ve found a small dehydrator to be extremely useful for drying all my tendons quickly and efficiently.
Being a highly perishable item, tendon needs to be thoroughly dried as quickly as possible. Failure to dry quickly will result in a rotting stinking useless mess. Letting your tendons get even a tiny bit high will result in weakened sinew and a permanent whiff which will win you zero credibility!
If you live somewhere like Arizona however, you’ll likely air dry your tendons adequately by simple hanging then somewhere airy, out of the sun and away from dogs, rats and flies.
Deer tendons are fairly thin so should be dry in good air-drying conditions within a couple of days. A good place to air-dry your tendons in colder climes would be up high above a stove. Make sure you don’t cook your tendons though (see comments below re dehydrating).
If you do choose to air dry your tendons, then avoid letting them get fly blown. Maggots will quickly render your efforts useless.
If using a dehydrator makes more sense to you then heed this warning before embarking on dehydrating your precious tendons! It is very easy to be tempted to crank the thermostat up on the dehydrator to speed the drying process. Whilst this will certainly speed up the drying time it will also cook your tendons rendering them useless for all but glue.
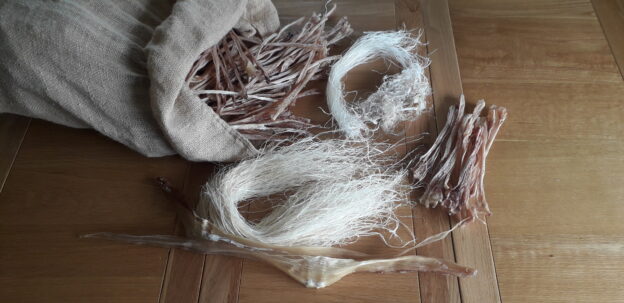
You’ll know when you’ve accidentally cooked a tendon because when you come to pound it and separate out the fibres, your sinew will break apart into short stiff lengths of brittle useless splintery chaff instead of nice long, soft, fluffy, white, stringy lengths of sinew. Too high heat damages the proteins which make up your sinew and maintain the structural integrity of your end product.
You’ll want to dry your tendons using the lowest temp that you can get away with. I set my dehydrator to 130℉/55℃. No higher and no lower. At 130℉/55℃ my tendons are completely dry in 12 hours. No damage, no smell. Just beautiful, dry, stiff, odourless sinew ready to be pounded into wonderful soft fluffy white fibres.

In the next article we will run through the processing of dried tendon into sinew fibres ready for use in your next sinew bow building project. Until then I suppose you’re now wondering what to do with a bucket full of skinned out deer feet.


Until next time!