The sinew series part 2 – Processing dry Sinew
In this next sinew series article, I’ll attempt to show you how to take the dry tendon material which we created in the previous article and process it into usable sinew.
If you’ve arrived here before reading Part 1 of the sinew series which can be found here: https://southmoorbows.com/the-sinew-series-part-1/ then it may be worth going and reading that article first. If, however, you already have a bunch of dry leg tendon material which you are eager to convert into something which you could back a bow with etc then read on!
Step 1 – Organise you tools and your environment.
First, three tool which you will need:
- Hammer (most types will do)
- Wooden stump/round of timber for anvil
- Blunt knife, or strong thumb nails!
If you wanted to go totally old-school, then replace the hammer with a smooth rounded stone about the size of a large baking potato.
A quick note on your working environment. You want to keep your tendons, anvil, hands and your tools dry and clean at all times. This is not a job that you want to do outside in the pouring rain amid mud, dust and general outdoor detritus. Find a spot under shelter or at least pick a dry day and work in a dry, relatively clean space.
Step 2 – Pound your tendons:
The tough, hard, stiff, dry leg tendons which we made in the previous article will now need to be separated out into thin string like sinew threads. Before this is possible the tendons will need to be softened and separated enough so that the tendons can be pulled apart from one another. The simplest way to soften a dried tendon is to pound it. You don’t have to go nuts and batter the thing into oblivion, but they will need at least a looking at with a hammer or stone before you will be able to pull a tendon apart.
In all seriousness though, if you beat the living daylights out of your tendons then you will damage the stringy structure of the inner sinew. You will know if you have been too heavy handed with the pounding process as over beaten sinew will fall apart into short bits of woolly chaff as opposed to nice long strong stringy threads which are about the same length as the tendon was before you started pounding it.
I find that using a wooden anvil helps to protect the sinew from excessive damage. I only revert to pounding onto a metal or stone/concrete anvil when I’m trying to break up the ends of tendons which have the notoriously stubborn forks in them (read below for details).
On a similar note, if using a hammer as your pounding tool of choice, do make sure you strike the tendon square on. Don’t strike the tendon with the edge of the hammer as this will likely chop at the tendon damaging the inner sinew. What is actually desired is to simply soften the tendon up so that you’re then able to separate out the fibres which are currently entwined together.
Regarding using stones as your pounding weapon of choice, the same rules apply. Sharp edges on your hammer stone will destroy your sinew. Keep your hammer stone smooth and rounded. And if you do choose to use stone/concrete as your anvil, make sure this is also smooth.
Since we have already removed the outer sheaths from the larger thicker tendons, we have significantly reduced the work involved in breaking these tendons apart into usable sinew. If you have dried your tendons with the sheath left on, then you are in for a fair bit of extra work. Tendons dried with the sheath on will need a fair bit more pounding. The tendons used in this demonstration have been separated out from the tendon sheath before drying so minimal pounding will be required.

Take one tendon at a time and hold it by the end. Start by gently pounding away at the middle of the tendon.
The middle section will generally be a little more rounded than the ends which is why I start the pounding in the middle. As I gently pound the middle of the tendon, I will roll the tendon in my fingers so that each hammer stroke makes impact with a slightly different face on the tendon, but in approximately the same section. This will start to break the fibres apart in this area. You may also notice the outer membrane begin to detach from the inner sinew.

Now, whilst continuing to rotate the tendon between your fingers, start to pound away from the middle up towards the end which you are not holding. What this will help to do is avoid creating a flat spot on the tendon.
Flat spots are often how the ends present themselves. These flat areas are difficult to strike at from the side. This makes it harder to break up the ends unless you work up to the ends from the middle. When you work up to the ends from the middle you will transfer the roundness of the middle up into the ends helping to break them up better.

If the tendon you chose that you are pounding has a large fork in one end, then this fork will require a bit more work than the rest of the tendon. The fibres in the fork are interlocked which makes the separation process a bit more challenging. The fork is usually hard to strike at from the side too which adds to the difficulty of loosening this area up.
Just do the best that you can for now and if need be, you can always come back to the hammer again later if the fork fails to break apart once the pulling apart process starts.


Step 3 – Remove outer membrane.
Once you can see and feel that the tendon is softened and beginning to separate you can begin the pulling apart process.
If the tendon is one of the larger types, then there will be an obvious membranous material hanging half on half off at this point. Pull this away from the sinew. Don’t throw this membrane away as this is tendon fascia, and it contains quite a high amount of collogen. It can therefore be added to your pile of sinew scraps which don’t make the grade. All of these sinew scraps and tendon fascia make excellent glue. Save it all!
Step 4 – Begin to pull the tendon apart.
I generally start the pulling apart process at either the end without the fork, or in the middle. Whichever is the loosest. Try first to divide the tendon in to two halves. I usually do this by inserting my thumb nails into the middle and working the sinew apart with my fingertips in order to form a hole roughly in the centre of the tendon. If your thumb nail isn’t doing the job for you then you could try starting the hole with a blunt knife tip of even a small, slotted screwdriver.
Once you have formed a hole then you can push your fingers through it and rip the sinew in two, straight down the middle of the tendon. If the tendon is too well bound together to allow you to do this, then start at the none forked end of the tendon and begin to pull this end apart into 4 – 8 pieces. Rip these individual pieces apart from one another. If they detach from the rest of the tendon completely then excellent. Put these detached pieces to one side ready for further processing later.
If your tendon had a fork in the other end, then the likelihood is that your efforts to separate out the pieces comes to an abrupt end once the piece comes up against the fork.

When I find that all the pieces of tendon remain tightly bound together at the fork, I usually end up returning the whole tendon back to the hammer and anvil. After a bit more pounding of the fork itself, (not where the pieces meet the fork but the fork itself) I will try and tug at each of the separate pieces individually to see if one of them is starting to release.
Once one piece starts to come free then the other pieces will soon follow. Further gentle pounding of the unseparated parts of the fork may continue throughout this process.

Step 5 – Break down your tendons into workable pieces.
Once the fork starts to break apart then it is usually no more of a problem. Simple keep pulling on each of the already separated pieces until one of the pieces pulls completely free from the fork. At this point the fork is usually ready to come completely apart.

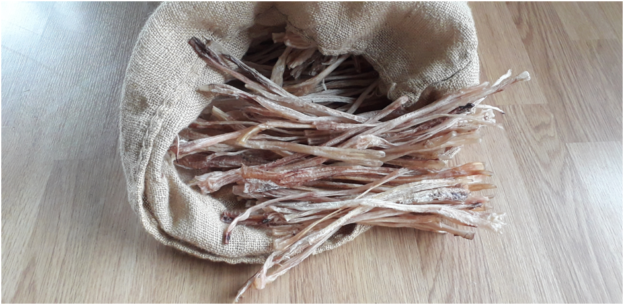
Now the fork has lost its grip on the other pieces, begin to pull each individual piece apart from the others. A thick tendon should break apart into about a dozen straw thick pieces.
At this point most, if not all, of the membrane will have detached from the sinew leaving you with a pile of coarsely separated sinew fibres and a small but not insubstantial amount of fascia and chaff.

Take all of your sinew pieces and put them to one side as you move onto the next tendon. Keep running through the same process as before until all of your tendons have been pounded and pulled out into strips of coarsely separated sinew.
To give you an idea of how many tendons you will need to back a bow then let me give you a very rough guide. A long bow, say 66″, I would expect to use at least 3oz of fully processed finely stripped out leg tendon sinew. Maybe aim for 4 oz if you are planning 3 layers.
On a long bow, 2 layers of sinew should suffice as a long bow doesn’t need much assistance in the tension plane. This is because the long length of the bow spreads the tension load well enough without the need for additional support. To be honest, I only ever sinew/rawhide back long bows if it’s a real character bow with a ton of potential weak spots like knots etc.
On a short bow like a plains style bow, there is much more stress on the bow due to the short working section of the limbs. So, on a short bow I’d suggest aiming for 3 layers of sinew.
Even though a short bow has less surface area to back when compared to a long bow, since you are adding an extra layer to a short bow, you will probably still want at least 3oz of dry sinew.
So, the general rule is aim for at least 3oz of fully processed sinew. That normally works out to be about the amount of sinew that you will remove from 8-10 red deer feet.
Step 6 – Reducing your sinew down to final thickness.
Once you have pulled apart all of your tendons you should have a fair pile of very coarsely separated sinew. Keep it dry and clean until you’re in a position to start the finer processing.
I usually save my fine sinew processing for a rainy day at home in front of the fire (AKA YouTube!). Put the kettle on and get yourself comfortable.
Grab a piece of sinew and find the middle of it. As you did before, insert your thumb nail or a blunt knife tip through the middle of the piece. Now tease it apart so that you have two roughly equal pieces. By now these two pieces will probably be about the thickness of baler twine.


Now take one of the two halves and do the same again. Find the middle, part it into two halves and separate them out into two pieces.

Take one of these pieces and do the same again.

Keep going like this until your sinew pieces get down to about the thickness of spaghetti. They will not all be especially round however so don’t be concerned if your sinew looks more like waxed nylon thread. Actually, it is worth mentioning here that white waxed nylon string/thread is a great fake sinew! B50 bow string material is also a good gauge of thickness to go for when splitting sinew.


Step 7 – Straighten your sinew for easy storage and use.
Most of your final sinew pieces will have curled up a fair bit due to the pulling apart process. This makes them awkward to lay flat and pile up neatly. A simple solution to this is to pinch each final piece between your finger and thumb and scrap your thumb nail down the flat side of the sinew piece. Then spin it over and do the same on the other side. This will straighten each piece out nicely so that they will now lay together much flatter. This little tip will help you to arrange all of your finished sinew into nice tidy piles. This helps a lot latter when you come to apply your sinew.
So, there you have it! By now you should be able to take your dry deer leg tendons and process them down into a nice big pile of usable sinew.
In the next Sinew Series article, I will show you how to take all of the sinew/fascia scraps which you will now have, (or the tendon sheaths saved from the first article) and make a glue which you can use to stick your processed sinew to your next primitive archery project.

Until next time!