This is one of the many “lockdown bows” which I made through 2020/21. Having been furloughed for a couple of months I took the opportunity to tinker with a pile of difficult staves which I’d had kicking about for years. A good time to try and sort the potential staves from the firewood!
This bow came from one such stave. It was nothing more than a branch to be honest but was still one of the better potential staves in terms of its overall shape. That said, It was still flawed to some extent with masses of pin knots on what would be the back side of the stave. It also had quite a lot of deflex across the entire length of the back. Especially in what would be the bottom limb.
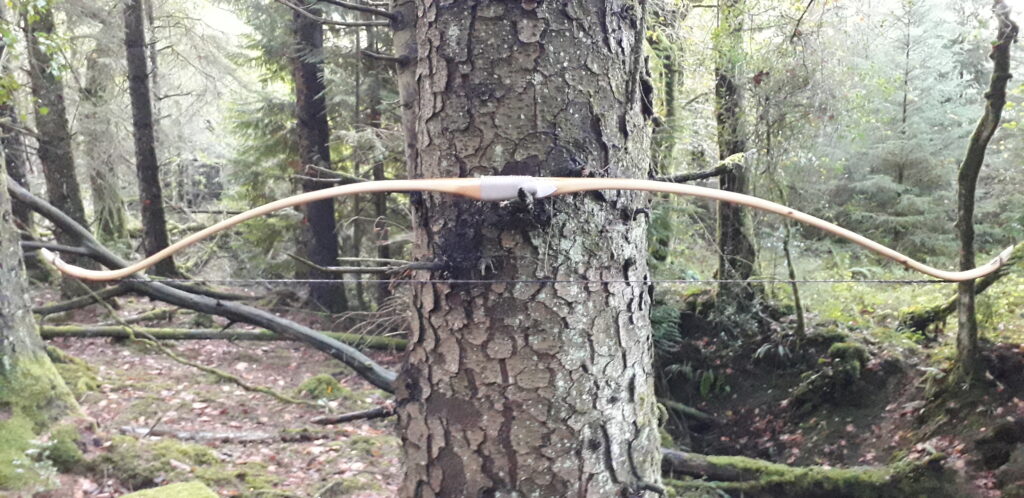
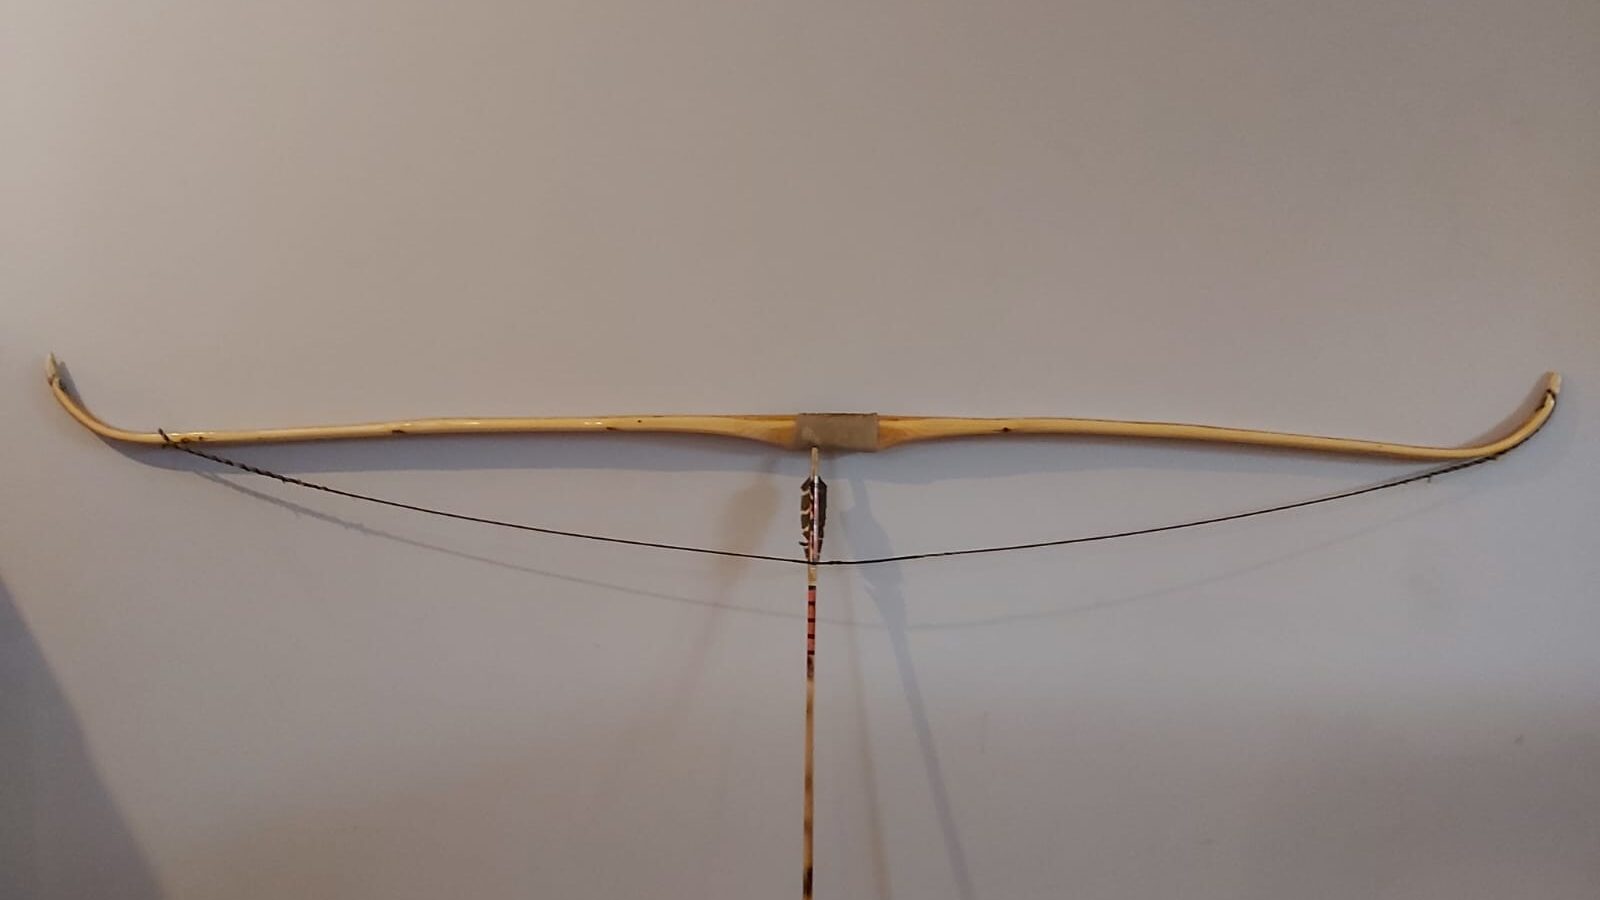
Despite the imperfections I committed to making a bow from this stave and had long since promised to build a mate of mine a yew recurve. So I made it my mission to honour my promise using this far from optimal Yew branch. The basic plan was to build a 66″ nock to nock” 50-55lb recurve flatbow.
The stave had nice tight growth rings of between 1-2mm thickness but unfortunately carried little heartwood. The sapwood on what would be the back was too thick at around 12mm thick, but due to all the tiny raised pin knots, it would be impossible to properly chase a ring down to a better sapwood thickness without violating the back around all the tiny raised knots.
A trick which I have used many times before in this situation is simply to accept the violation of rings on the back but mitigate against limb failure by sinew backing. So that’s what I decided to do with this bow.
The stave was only 3″ wide so the crown was moderate. Rather than try and reduce the sapwood thickness in a rounded fashion as would be necessary to mimic the natural crown, I decided to just flatten the whole back with a rasp. In doing this I was able to work down to approximately one sapwood growth ring right down the centre line of the bows back and follow that from one end to the other maintaining a totally flat back profile.
Now that I had nearly 50% of the limb represented by heart wood, I roughed out the general limb thicknesses and finalised the face profile. In order to counter the significant deflex I recurved the tips with steam and performed a small amount of dry heat correction to line up the tips and correct some small string alignment issues. Then it was on with 3oz of deer leg sinew, glued on with my own home made sinew glue.
After the backing was completed I wrapped the whole thing up for a few days in cloth strips to keep the sinew from peeling away from inside the recurves and around the handle.
Once I could see that the sinew was dry I unpeeled the wrapping so I could take a peek. To my disappointment some of the sinew had dried out to form some small fissures. I put this down to one reason. Taking way too long to apply the sinew!
I’d timed the sinew application with the kids getting home which invariably led to a pile of requests, Dad jobs and other frivolous distractions all when I’m trying to slap on my glue soaked sinew bundles. Lesson learnt!!
Anyone who has done any amount of sinew backing will tell you that the best sinew jobs are done quickly and smoothly whilst the glue is still warm and not allowed to set up in between bundle applications. Each fresh bundle of sinew wants to be laid down alongside its neighbour before the neighbouring bundle has started to “Gel”. That’s where I’d gone wrong.
All the distractions had led to me applying bundles as and when I got chance as opposed to in one fast fluid operation. This meant that by the time my next sinew bundle got applied it’s neighbour has gelled up reducing the ability of the fresh sinew bundle sticking to it’s neighbouring bundle.
The result is bundles of sinew separating apart from one another when the bundles start to shrink during the drying process. I should add however that the adhesion between the glue soaked sinew and the bow’s back is not affected by this phenomena.
As disappointing as the end result was, the imperfections that I was seeing in the dried backing were only aesthetic. The functionality of the bow’s backing was completely unaffected.
So onwards we went. After the cloth wrappings had been removed and re-tightened several times over the initial drying period (a week), the wrappings came off and the stave was set aside for nearly a year to cure thoroughly.
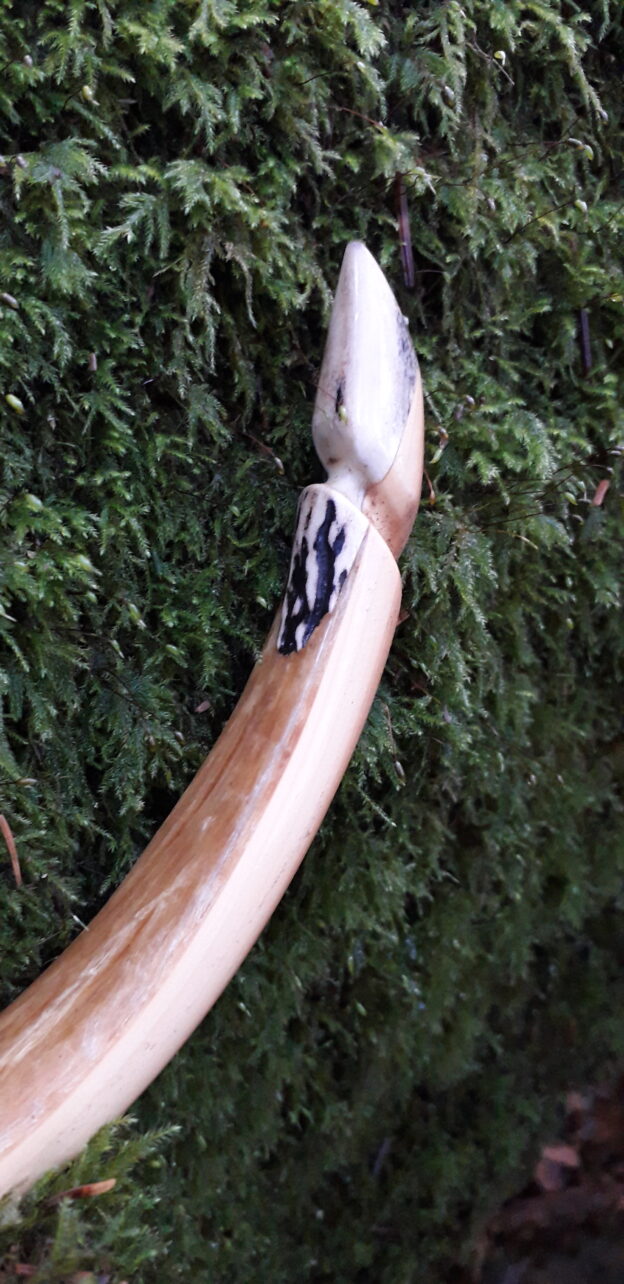
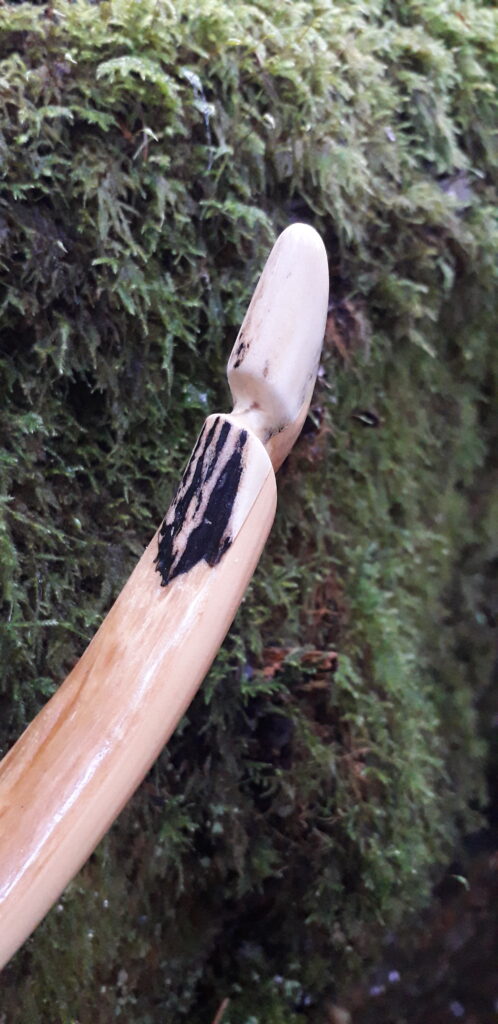
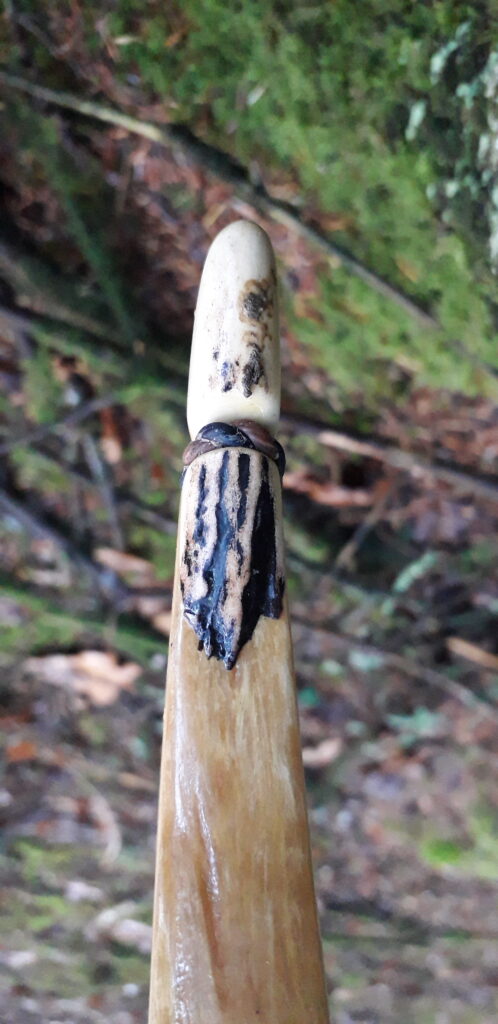
I’d kept the limbs asymmetric to try and mitigate for the lower limb deflex which was now substantially less than it was. This was due to the sinew backing pulling the stave back about 1 & 1/2″. Now the deflex was only about 3/4″ in total which was a massive improvement as before backing the natural deflex was about 2 “. After coming out of hibernation, deer antler tip overlays were fitted over the top of the sinew and the tillering began.
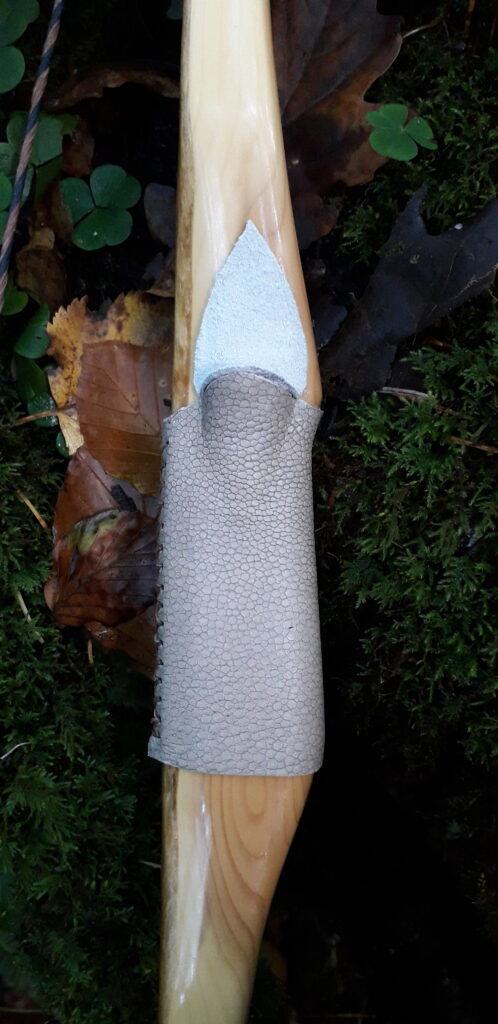
In order to preserve as much heart wood on the belly as possible I opted to create a slightly rounded albeit mainly flat belly. An arrow shelf was added in the form of a scrap piece of deer antler.
The bow was quick and easy to tiller and looked nice pulled down to 28″. At this point the weight was 58lb which was about right for the guy who would be getting this bow.
Before finishing the bow I shot stumps with it for a couple of weeks then re adjusted the tiller slightly to weaken the top limb just a tad bit more then called her done at 55lb at 28″ with a neutral tiller. (The owner of this bow shoots three under.) To finish I coated the sinew with a good covering of Titebond III so seal and smooth out the sinew. After sanding it was on with 8 coats of Truoil to finish.
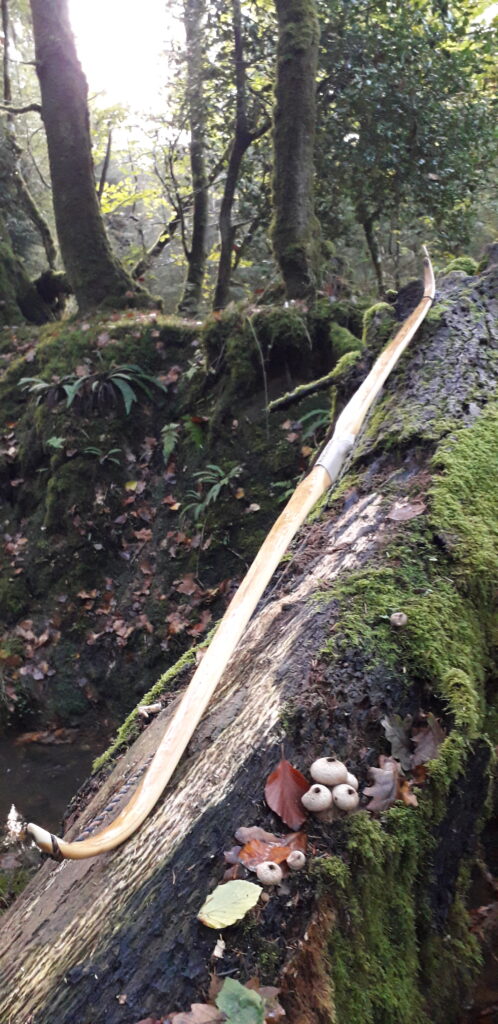
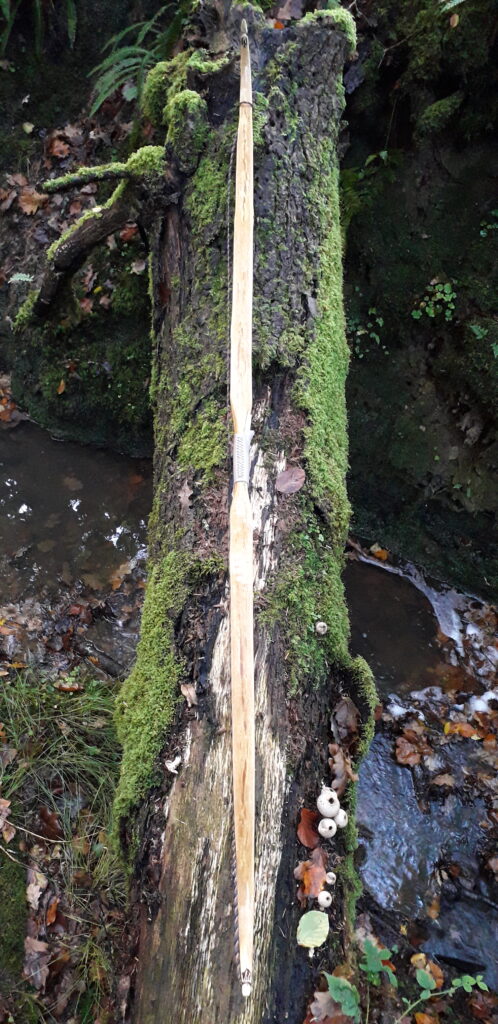
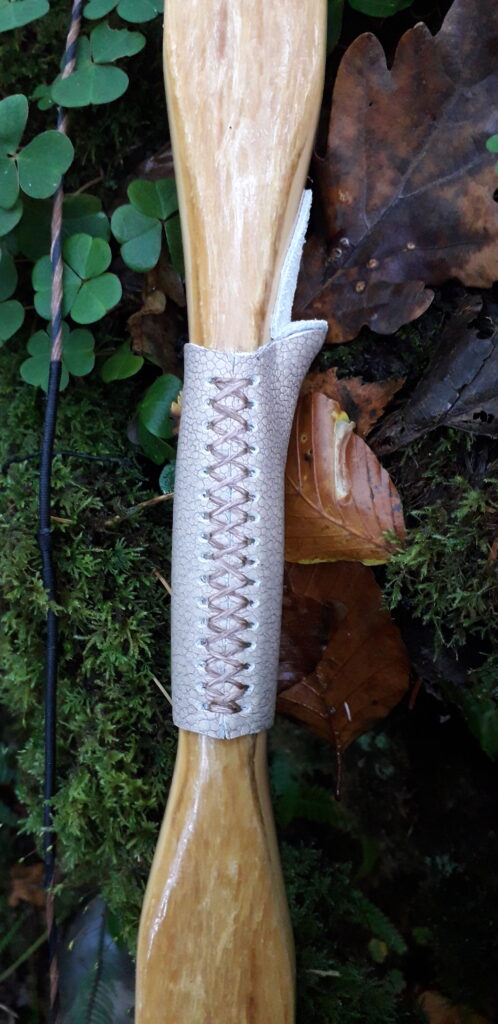
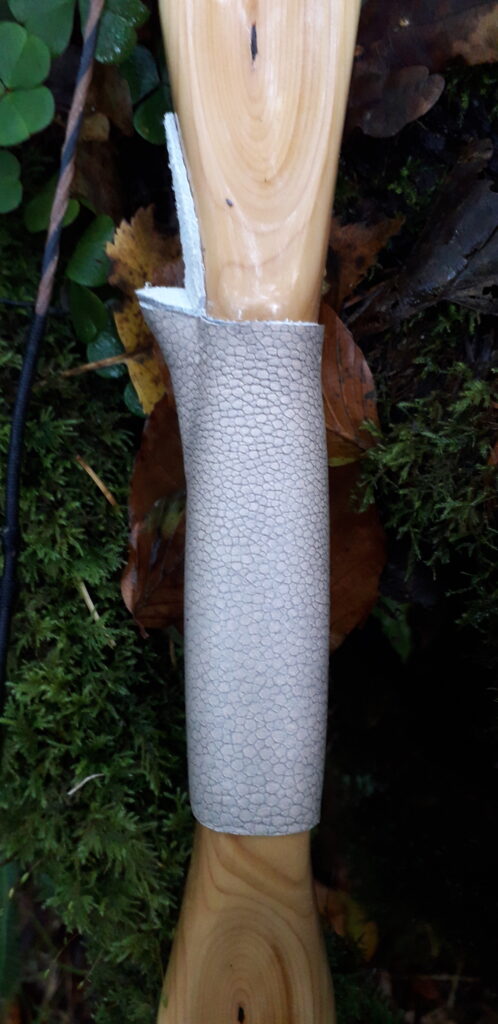
The handle was covered with a piece of scrap leather and the same leather in reverse was used to protect the arrow pass.
I really like this bow. It’s a bit heavy in the hand (630Grams) due to the extra weight from the sinew but isn’t really noticeable once you get in the swing of shooting her. The limbs are an even tapper from 1″ 3/8ths at the fades down to 1/2″ at the tips.
This bow made for a snappy shooter which I really enjoyed shooting. I shot her over the chrono to see if she was quicker than usual and, whilst hardly getting blown away by the speed, I was quite happy with the 162ft/sec average that I got with a 500 grain arrow. That’s not bad for a stick and string bow!
In the previous two Sinew Series articles we went through the various processes of sourcing, extracting, drying and processing deer leg tendon into usable sinew material which you can use for your next primitive archery project. If you haven’t yet read these previous two articles, then you can find them here:
If you have followed along through these first two articles, then by now you will have a nice pile of perfectly prepared sinew material which will be pleading with you to find a permanent home for it!
If your intention was to use your sinew for making cordage/bow strings etc then you might need to wait until the next article where I will cover making strings from leg sinew. If, however, your intended use for your carefully processed sinew is to back a bow then you will next need some hide glue, or better still, sinew glue.
In this article I will show you how I make my own sinew glue.
I’ve messed about with “animal glues” for several years only to conclude that simple sinew glue is strong enough, flexible enough and easy enough to make for it to be my go-to adhesive for many primitive crafting projects. It’s a good all-round glue for sticking things to wood, including sinew.
Sinew glue is also great for sticking down leather, rawhide, fletchings, wrappings, points etc although I think that pitch is a better option for arrow construction for reasons which we will discuss in a moment.
I’ve personally never tried to use sinew glue for bone/horn/antler tip overlays etc so I don’t know how well it would bond to these semi porous materials however I’m sure it would probably work well enough, as long as the glue joint was kept dry and away from high humidity.
On the subject of moisture, we should discuss the weaknesses of sinew glue before trying to use it for everything. Moister is the enemy of all animal glues, including sinew glue. I can’t imagine sinew glue, or any other type of animal glue, having much application in a very wet or humid climate unless the exposed sinew glue has been very well sealed from moisture.
The downside to sinew glue, and all animal glues for that matter, is that they are very water soluble. Unlike pitch, without some kind of water proofing, all animal glues will begin to dissolve if exposed to water or even just high humidity.
Making any animal glue also requires a bit of time and effort, however it is not at all difficult to make, and the time factor is mostly as a consequence of the cooking process which requires minimal input once cooking commences.
Nowadays I only really use sinew glue for sinew backing and for that purpose it is excellent. I seal all of my backed bows and keep my bows in an indoor environment which has very consistent temperature and humidity so I never have to worry about moister ingress damaging any bonding achieved through the use of sinew glue.
Many primitive bowyers report better shrinking and subsequent reflexing of sinew backed bows when sinew is bound to the back of a bow with sinew glue rather than hide glue. Personally, I haven’t experienced much difference between hide glue and sinew glue in this regard.
The main reason I tend to use sinew glue over hide glue is that I’ve always had a surplus of sinew scraps and sinew rich tendon sheaths at my disposal. Since after processing out all my sinew I end up with all this scrap material anyway, I might as well make use of it and make it into sinew glue.
One thing I will say is that the purest, cleanest and possibly strongest sinew glue is made from pure clean sinew minus all the chaff and connective tissues which often ends up in the pile of sinew scraps. All this none sinew chaff gets created when the pounding and splitting of dried tendons take place.
Tendon sheaths also contain a lot of fasciae and other none sinew connective tissues too. Some of this none sinew material contains little to no collagen so will provide no real benefit to your glue. It is the collagen content that makes sinew and hide glue a strong, flexible adhesive.
As with hide glue, the less fascia/connective tissue/muscle tissue that ends up in the sinew glue the better the purity and corresponding quality of the final glue product. All that said though, for our purposes, small amounts of contamination don’t appear to reduce the strength of the final product by much. So don’t be afraid to cook up your scrap tendon sheaths whole. I’ve never noticed any measurable reduction in a glues performance even when I’ve known the glue to be full of impurities.
Dried deer leg tendon sheaths make great sinew glue.
Hide glue is a great alternative to sinew glue and the making process is essentially the same. The only thing to consider is that the raw hide which is required to make hide glue requires processing first. Making rawhide is a lot of work, whereas sinew glue can be made from all the sinew scraps and tendon sheaths.
If I’ve been processing a pile of sinew to back a bow, then I will have already created a bunch of tendon sheaths and sinew scraps as a by-product of all the tendon processing. Which I’m going to be doing anyway hence the need for a backing glue in the first place!
So on with the program, let’s make some sinew glue. First you will need the following materials/equipment:
2 0z of dry sinew scraps or a dozen dry/raw tendon sheaths (see sinew part 1 article).
A slow cooker/crock pot with a low setting (approx. 85- 90℃)
One litre of water.
Tubs/jars for glue storage.
A dehydrator (optional).
A blender/coffee grinder (optional).
Step one:
Place your dry or raw sinew scraps/tendon sheaths and the water into your slow cooker/crock-pot. Make sure that the temperature which you set your slow cooker to is less than a simmer. If the sinew is boiled, then the collagen proteins, which give sinew glue its strength, will break down reducing the strength of the glue considerably.
A small amount of very gentle bubbling around the edges of you cooking pot is fine but a simmer is definitely not. A rolling boil will completely destroy your glue so be warned!
Approx 12 deer feet produced this much tendon sheath.
Step two:
Let the sinew slowly and gently stew for at least 12 hours. I don’t time mine, but I do leave it cooking at least overnight. I leave my slow cooker out in the garage as the smell of slow cooked sinews are not to everyone’s liking!
I use a small slow cooker. The low setting keeps the contents below a simmer which is perfect.
Step three:
First thing in the morning, lift the lid on your sinew stew and check the water isn’t simmering. If all looks good take a pair of scissors and snip your sinew scraps/tendon sheaths up as small as you can manage. This should be easy now that the sinew has had chance to cook the tendon sheaths down to a tender state. Cutting your sinew up will expose even more of the sinew’s surface area to the hot water further extracting the sinew’s collagen out into the cooking water.
Once you’ve snipped up your sinew nice and fine replace the lid and continue cooking for another three or four hours. Longer will be fine if you accidently forget about it!
Tendon sheaths all snipped up ready for a bit more cooking time.
Step Four:
Once your tendon sheaths/sinew scraps have had at least 12 hours of cooking, turn the cooker off and allow the sinew stew to cool for half an hour with the lid on. Your sinew stew should stay warm enough to move on to the next step but if you’ve left it too long and the mixture has gelled then simply warm it up enough to turn the mixture back into a liquid form. (Careful not to let it reach a simmer or worse still a boil!)
Step Five:
Your sinew stew should have a viscosity which is something like warm syrup. If it is very watery then it will likely need reducing a bit. This can be done by continuing with the cooking process with the cooker lid removed. It can also be done by drying the gelled liquid at a later stage. We will cover this later.
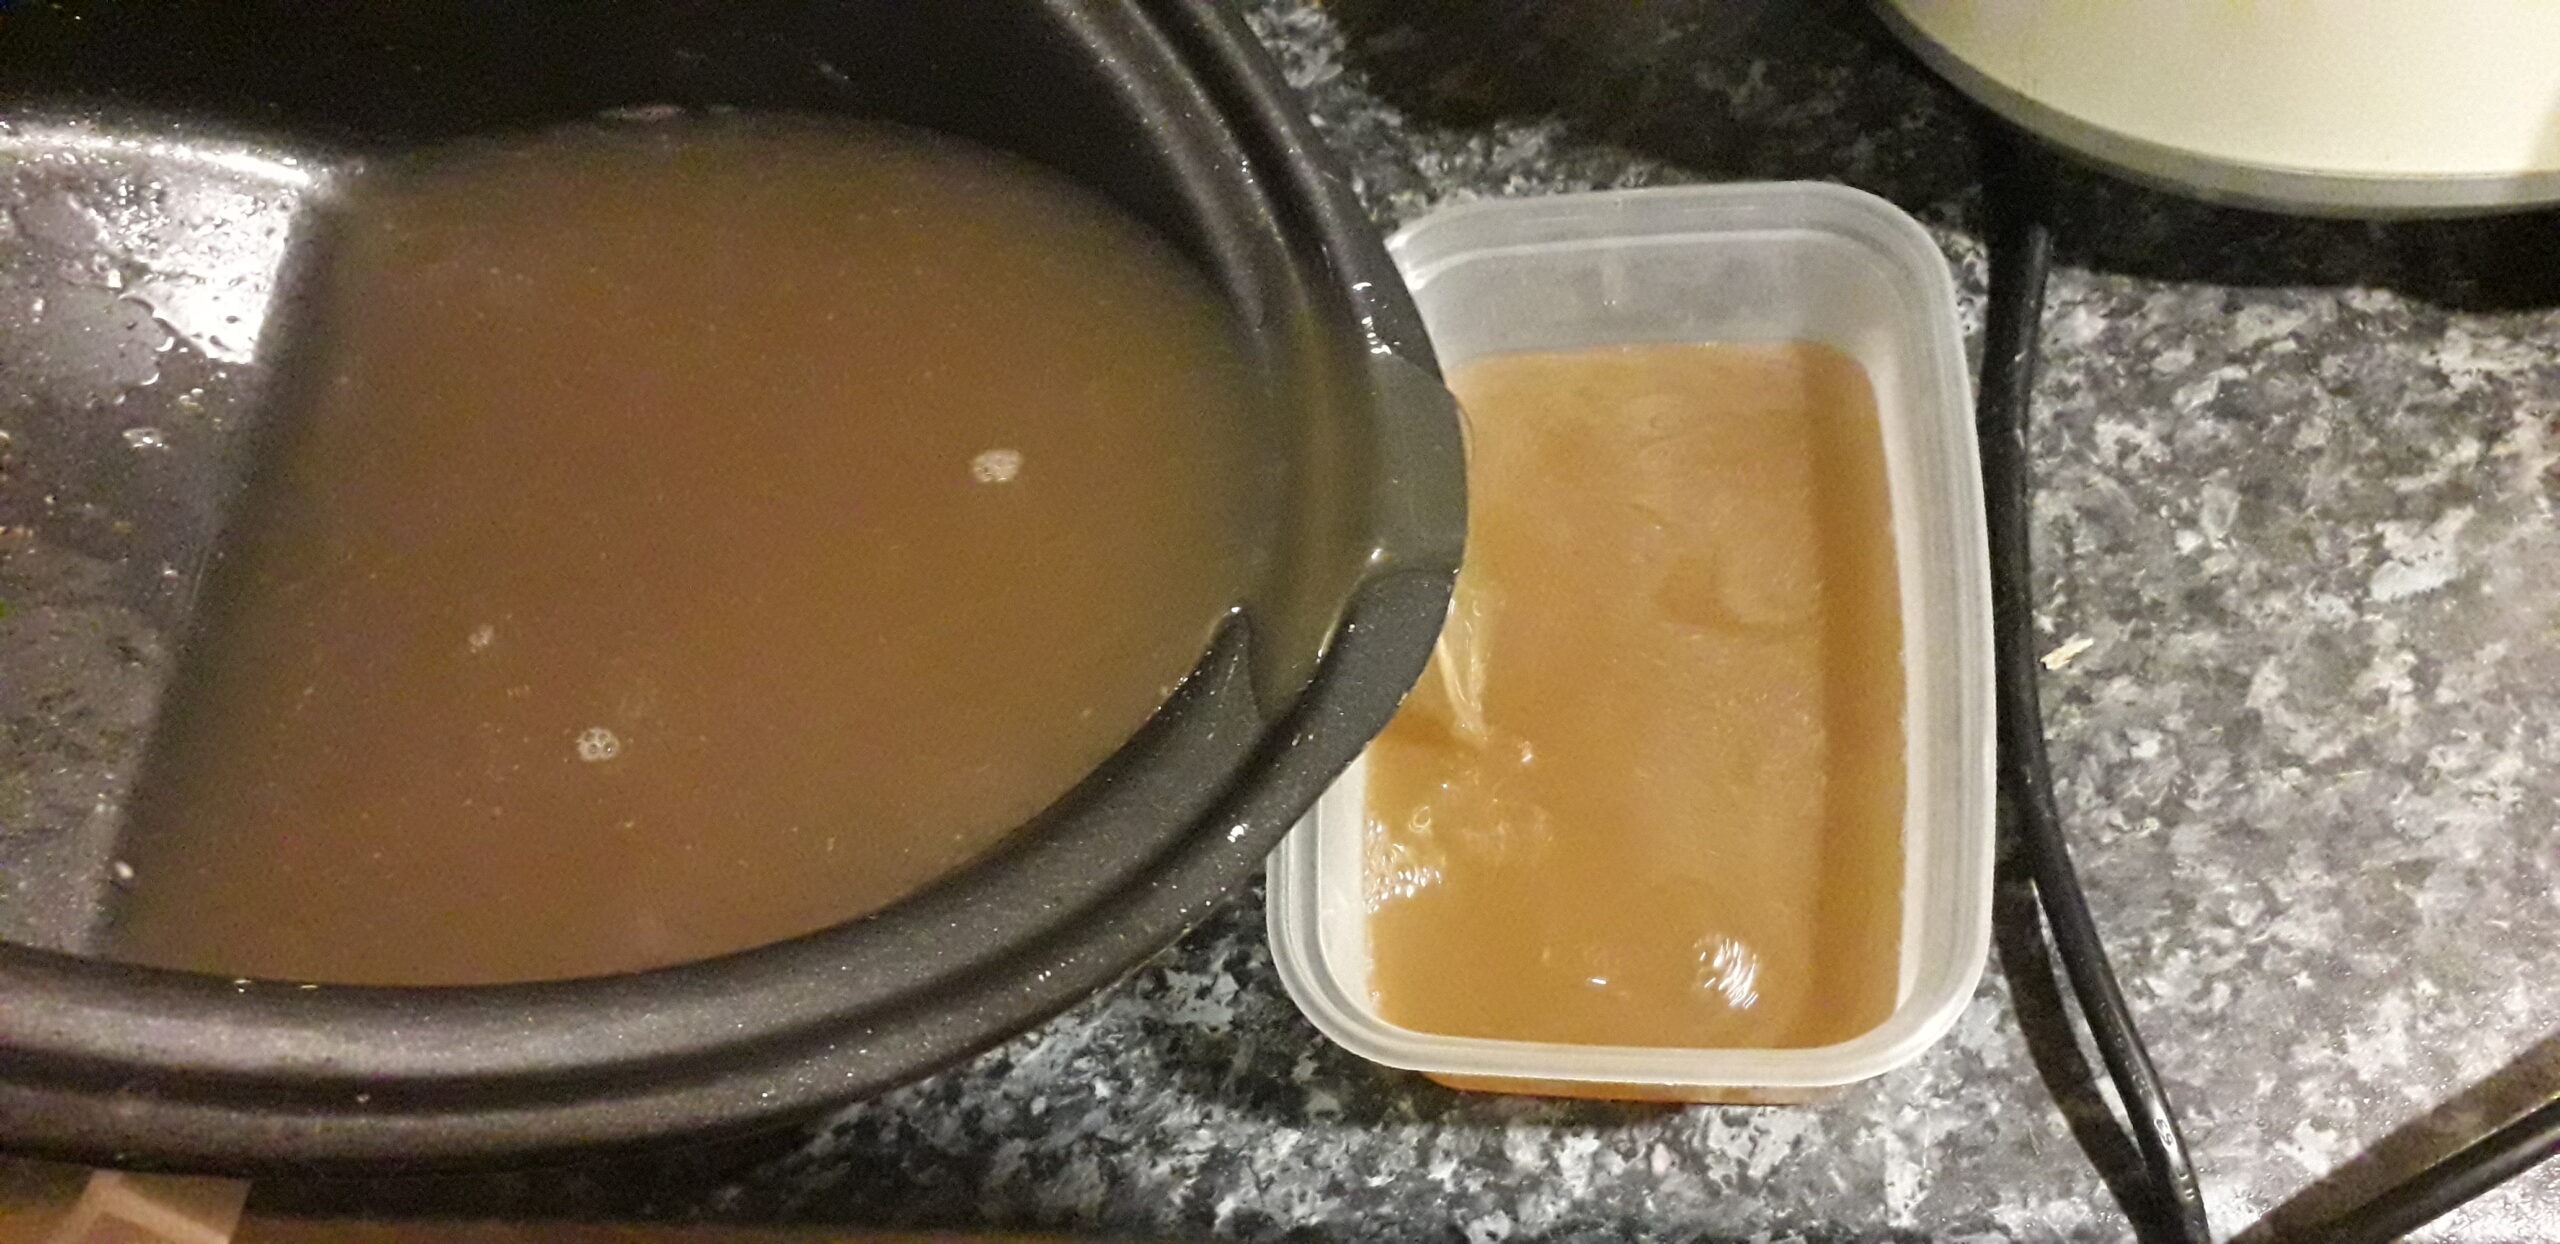
Place a metal sieve/colander over the top of a bowl and place both items in you sink. Pour the sinew stew into the sieve/colander and let the stew juice pour through into the bowl below. Remove the sieve/colander and dispose of all the bits which the sieve/colander has caught.
Pouring the juice through a colander to separate out the tendon sheaths.I find a good squashing with a potato masher helps force some of the juice out.
Step six:
Now you will have a bowl full of relatively clean translucent light brown liquid. If it looks clouded up with tiny particles, then you could pass the liquid through a fine sieve or a muslin cloth to remove the last few bits of gunk.
Still looks a bit bitty!I would typically expect one of these takeaway type tubes to be more than enough glue for a complete sinew backing project.
Step Seven:
Now test the gelling quality of your glue. If your glue gels well then it will make a good, strong and flexible glue. To test the gelling quality of you glue, take a teaspoon full of your glue and drip it onto a cold clean plate to form a small puddle of glue. Leave it at room temperature for ten minutes. After ten minutes, test how well your glue has gelled by pushing your fingertip into the edge of the glue puddle you made. If the viscosity of your glue has stayed the same then, ask yourself if the room temperature might be a little too warm to let the glue gel up.
If you feel that the ambient temperature is perhaps too hot to allow the glue to gel up, then place the plate into your refrigerator for another ten minutes then try the same procedure again. If your glue has now started to set up into a gel and can be pushed up into a ridge of jelly, then your glue is good.
Test the gelling quality of your sinew glue. Pour a spoon full of your glue onto a cold plate and leave for ten minutes.After 10 mins try pushing up the edges of your glue puddle. If it has gelled up all is good.
Step Eight:
If your glue is gelling up fine, then the next job is to arrange your glue for storage. Pour your still warm liquid glue into a large enough tub, bowl or tray and leave to set into a gel. You may place it in your refrigerator if it is a hot day.
Once your glue has set up into a gel you can either freeze it if you’re planning on using it soon or you can dry it down to a solid form which can be rehydrated when needed at a later date.
This batch of glue has gelled up completely after leaving for an hour at a room temperature of 20℃
Step nine:
If you wish you dry your glue into a solid form for long term storage then take one of your trays of gelled glue and cut all the gel up into small cubes.
Spread the cubes out on a large tray and allow to air dry in a clean and airy location. This can take a few days depending on drying conditions however if you have access to a dehydrator then you can speed the process up by placing the gel cubes into shallow impermeable trays and drying them in a dehydrator set to the very lowest temperature setting.
Remember that heat will revert gelled glue back to a liquid so make sure that the tray which the gel is placed into is not likely to leak your liquid glue out into the inside of your dehydrator. With my dehydrator set at 38℃/100℉ I can get my gelled glue down to a thin sheet of solid glue in about 12-16 hours.
Step Ten:
Once your glue is in a solid form then you can store it like this, or you can take it one step further and break the sheet of dry glue up into pieces which you can then grind down into a powder using a blender or a coffee grinder.
I store my glue powder in glass jars kept in a cool dark place. Keeping the glue powder in glass jars keeps the contents from being eaten by rodents and insects, both of which will dine on your hard work with glee!
Be warned, rodents will also make a meal of your sinew and raw hide too so always keep these materials away from hungry critters. And by critters I also mean dogs!
Step Eleven:
To rehydrate your glue simply add enough glue powder to half a litre of hot water to re-create a viscosity which is akin to that of warm syrup. By “hot water” I mean at about the temperature which you can just about put your fingers into without getting burnt. Hot but not too hot!
Simply place two or three dessert spoons of your glue powder into your hot water and mix thoroughly.
Remember, you’re aiming for a consistency of warm syrup before application. If your glue is still too thick and you’re sure that your water is hot enough, then add more hot water. If your glue is too thin, then add more glue powder. If you do not have more glue powder, then you will have to slowly reduce the water content by warming your glue over a low heat until the viscosity looks right.
Just a quick note on working with all animal glues including sinew glue. If you are embarking on a gluing up project which might take a fair while to complete such as sinew backing a bow, you will need to keep your glue at a temperature of around 40-50℃ throughout the whole process. If you don’t keep your glue warm, then it will start to set up into a gel again. I keep my glue in a liquid state by placing my liquid glue in a shallow metal tray which I place on top of my oven’s plate warmer. This keeps my glue at the perfect temperature for application.
So there you are. Go and give sinew glue a try. If you only have raw hide at your disposal then follow the exact same procedure with good clean rawhide instead of sinew and you will produce very high quality glue fit for many of the purposes useful to a primitive archer.
Alternatively, if you can’t be bothered with making glue but want to get your hands on some ready-made glue then I do sell jars of dehydrated sinew glue powder. Give me a shout via the contact page if you’d like to buy some. I also sell by weight, dried red deer leg tendons which you can be processed into sinew. I also sell dried leg tendon sheaths for glue making if you wish to give glue making a go from scratch.
Keep your eyes open for one of my next articles where I will go into detail and explain how to go about taking your dried, processed sinew and your glue and backing a bow to produce the original primitive composite bow!
In this next sinew series article, I’ll attempt to show you how to take the dry tendon material which we created in the previous article and process it into usable sinew.
If you’ve arrived here before reading Part 1 of the sinew series which can be found here: https://southmoorbows.com/the-sinew-series-part-1/ then it may be worth going and reading that article first. If, however, you already have a bunch of dry leg tendon material which you are eager to convert into something which you could back a bow with etc then read on!
Step 1 – Organise you tools and your environment.
First, three tool which you will need:
Hammer (most types will do)
Wooden stump/round of timber for anvil
Blunt knife, or strong thumb nails!
If you wanted to go totally old-school, then replace the hammer with a smooth rounded stone about the size of a large baking potato.
A quick note on your working environment. You want to keep your tendons, anvil, hands and your tools dry and clean at all times. This is not a job that you want to do outside in the pouring rain amid mud, dust and general outdoor detritus. Find a spot under shelter or at least pick a dry day and work in a dry, relatively clean space.
Step 2 – Pound your tendons:
The tough, hard, stiff, dry leg tendons which we made in the previous article will now need to be separated out into thin string like sinew threads. Before this is possible the tendons will need to be softened and separated enough so that the tendons can be pulled apart from one another. The simplest way to soften a dried tendon is to pound it. You don’t have to go nuts and batter the thing into oblivion, but they will need at least a looking at with a hammer or stone before you will be able to pull a tendon apart.
In all seriousness though, if you beat the living daylights out of your tendons then you will damage the stringy structure of the inner sinew. You will know if you have been too heavy handed with the pounding process as over beaten sinew will fall apart into short bits of woolly chaff as opposed to nice long strong stringy threads which are about the same length as the tendon was before you started pounding it.
I find that using a wooden anvil helps to protect the sinew from excessive damage. I only revert to pounding onto a metal or stone/concrete anvil when I’m trying to break up the ends of tendons which have the notoriously stubborn forks in them (read below for details).
On a similar note, if using a hammer as your pounding tool of choice, do make sure you strike the tendon square on. Don’t strike the tendon with the edge of the hammer as this will likely chop at the tendon damaging the inner sinew. What is actually desired is to simply soften the tendon up so that you’re then able to separate out the fibres which are currently entwined together.
Regarding using stones as your pounding weapon of choice, the same rules apply. Sharp edges on your hammer stone will destroy your sinew. Keep your hammer stone smooth and rounded. And if you do choose to use stone/concrete as your anvil, make sure this is also smooth.
Since we have already removed the outer sheaths from the larger thicker tendons, we have significantly reduced the work involved in breaking these tendons apart into usable sinew. If you have dried your tendons with the sheath left on, then you are in for a fair bit of extra work. Tendons dried with the sheath on will need a fair bit more pounding. The tendons used in this demonstration have been separated out from the tendon sheath before drying so minimal pounding will be required.
I prefer to use a hammer with no sharp edges and a timber round for pounding deer leg tendons.
Take one tendon at a time and hold it by the end. Start by gently pounding away at the middle of the tendon.
The middle section will generally be a little more rounded than the ends which is why I start the pounding in the middle. As I gently pound the middle of the tendon, I will roll the tendon in my fingers so that each hammer stroke makes impact with a slightly different face on the tendon, but in approximately the same section. This will start to break the fibres apart in this area. You may also notice the outer membrane begin to detach from the inner sinew.
Start pounding the tendon in the middle. Notice the colour change of the tendon. Unpounded tendons are amber, after pounding they go a cream colour.
Now, whilst continuing to rotate the tendon between your fingers, start to pound away from the middle up towards the end which you are not holding. What this will help to do is avoid creating a flat spot on the tendon.
Flat spots are often how the ends present themselves. These flat areas are difficult to strike at from the side. This makes it harder to break up the ends unless you work up to the ends from the middle. When you work up to the ends from the middle you will transfer the roundness of the middle up into the ends helping to break them up better.
Flat end made round by rolling the tendon whilst pounding up from the middle.
If the tendon you chose that you are pounding has a large fork in one end, then this fork will require a bit more work than the rest of the tendon. The fibres in the fork are interlocked which makes the separation process a bit more challenging. The fork is usually hard to strike at from the side too which adds to the difficulty of loosening this area up.
Just do the best that you can for now and if need be, you can always come back to the hammer again later if the fork fails to break apart once the pulling apart process starts.
The tendon fork is a particularly tough spot. Come at it from the sides as best you can. You might have to come back to it once the pulling apart phase begins.
Here you can see some of the outer membrane coming away.
Outer membrane removed.
Step 3 – Remove outer membrane.
Once you can see and feel that the tendon is softened and beginning to separate you can begin the pulling apart process.
If the tendon is one of the larger types, then there will be an obvious membranous material hanging half on half off at this point. Pull this away from the sinew. Don’t throw this membrane away as this is tendon fascia, and it contains quite a high amount of collogen. It can therefore be added to your pile of sinew scraps which don’t make the grade. All of these sinew scraps and tendon fascia make excellent glue. Save it all!
Step 4 – Begin to pull the tendon apart.
I generally start the pulling apart process at either the end without the fork, or in the middle. Whichever is the loosest. Try first to divide the tendon in to two halves. I usually do this by inserting my thumb nails into the middle and working the sinew apart with my fingertips in order to form a hole roughly in the centre of the tendon. If your thumb nail isn’t doing the job for you then you could try starting the hole with a blunt knife tip of even a small, slotted screwdriver.
Once you have formed a hole then you can push your fingers through it and rip the sinew in two, straight down the middle of the tendon. If the tendon is too well bound together to allow you to do this, then start at the none forked end of the tendon and begin to pull this end apart into 4 – 8 pieces. Rip these individual pieces apart from one another. If they detach from the rest of the tendon completely then excellent. Put these detached pieces to one side ready for further processing later.
If your tendon had a fork in the other end, then the likelihood is that your efforts to separate out the pieces comes to an abrupt end once the piece comes up against the fork.
Pieces of ripped out sinew still bound tightly together at the fork.
When I find that all the pieces of tendon remain tightly bound together at the fork, I usually end up returning the whole tendon back to the hammer and anvil. After a bit more pounding of the fork itself, (not where the pieces meet the fork but the fork itself) I will try and tug at each of the separate pieces individually to see if one of them is starting to release.
Once one piece starts to come free then the other pieces will soon follow. Further gentle pounding of the unseparated parts of the fork may continue throughout this process.
After a bit more pounding the fork gives up and splits down the middle.
Step 5 – Break down your tendons into workable pieces.
Once the fork starts to break apart then it is usually no more of a problem. Simple keep pulling on each of the already separated pieces until one of the pieces pulls completely free from the fork. At this point the fork is usually ready to come completely apart.
Whole tendon split in half.
Now the fork has lost its grip on the other pieces, begin to pull each individual piece apart from the others. A thick tendon should break apart into about a dozen straw thick pieces.
At this point most, if not all, of the membrane will have detached from the sinew leaving you with a pile of coarsely separated sinew fibres and a small but not insubstantial amount of fascia and chaff.
One whole tendon pulled apart into a dozen or so pieces.
Take all of your sinew pieces and put them to one side as you move onto the next tendon. Keep running through the same process as before until all of your tendons have been pounded and pulled out into strips of coarsely separated sinew.
To give you an idea of how many tendons you will need to back a bow then let me give you a very rough guide. A long bow, say 66″, I would expect to use at least 3oz of fully processed finely stripped out leg tendon sinew. Maybe aim for 4 oz if you are planning 3 layers.
On a long bow, 2 layers of sinew should suffice as a long bow doesn’t need much assistance in the tension plane. This is because the long length of the bow spreads the tension load well enough without the need for additional support. To be honest, I only ever sinew/rawhide back long bows if it’s a real character bow with a ton of potential weak spots like knots etc.
On a short bow like a plains style bow, there is much more stress on the bow due to the short working section of the limbs. So, on a short bow I’d suggest aiming for 3 layers of sinew.
Even though a short bow has less surface area to back when compared to a long bow, since you are adding an extra layer to a short bow, you will probably still want at least 3oz of dry sinew.
So, the general rule is aim for at least 3oz of fully processed sinew. That normally works out to be about the amount of sinew that you will remove from 8-10 red deer feet.
Step 6 – Reducing your sinew down to final thickness.
Once you have pulled apart all of your tendons you should have a fair pile of very coarsely separated sinew. Keep it dry and clean until you’re in a position to start the finer processing.
I usually save my fine sinew processing for a rainy day at home in front of the fire (AKA YouTube!). Put the kettle on and get yourself comfortable.
Grab a piece of sinew and find the middle of it. As you did before, insert your thumb nail or a blunt knife tip through the middle of the piece. Now tease it apart so that you have two roughly equal pieces. By now these two pieces will probably be about the thickness of baler twine.
Get comfortable, make a brew and take your sinew pieces to your work-station. Grab a piece of sinew and get to work splitting it in half.Find the middle and separate the piece into two halves.
Now take one of the two halves and do the same again. Find the middle, part it into two halves and separate them out into two pieces.
Take one of these pieces and do the same again.
Keep going like this until your sinew pieces get down to about the thickness of spaghetti. They will not all be especially round however so don’t be concerned if your sinew looks more like waxed nylon thread. Actually, it is worth mentioning here that white waxed nylon string/thread is a great fake sinew! B50 bow string material is also a good gauge of thickness to go for when splitting sinew.
Aim for about the thickness of spaghetti or B50 bow string material.You might find that your final sinew pieces are all curled up and difficult to lay flat and straight.
Step 7 – Straighten your sinew for easy storage and use.
Most of your final sinew pieces will have curled up a fair bit due to the pulling apart process. This makes them awkward to lay flat and pile up neatly. A simple solution to this is to pinch each final piece between your finger and thumb and scrap your thumb nail down the flat side of the sinew piece. Then spin it over and do the same on the other side. This will straighten each piece out nicely so that they will now lay together much flatter. This little tip will help you to arrange all of your finished sinew into nice tidy piles. This helps a lot latter when you come to apply your sinew.
So, there you have it! By now you should be able to take your dry deer leg tendons and process them down into a nice big pile of usable sinew.
In the next Sinew Series article, I will show you how to take all of the sinew/fascia scraps which you will now have, (or the tendon sheaths saved from the first article) and make a glue which you can use to stick your processed sinew to your next primitive archery project.
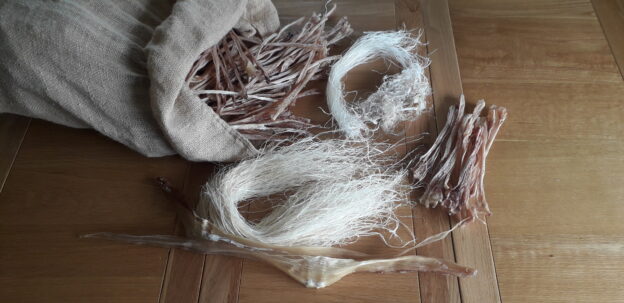
Top Left – Sinew/fascia scraps. Top Right – coarsely separated sinew. Bottom centre – finely processed sinew.
The very word sinew caries connotations of antiquity. A material of a long-forgotten time. This amazing material has so much use to anyone practicing primitive crafts.
Sinew is extremely strong in tension. It is also flexible in any state and quite elastic when wet, tightening as it dries. Even when sinew is in its completely cured dry state it still possesses an element of elasticity which is one of the reasons that sinew is so effective as a bow backing material.
In addition to backing bows, sinew can also be used for wrapping arrow fletchings, nocks etc, it can be used for making cabling, and unlike many plant fibres strings, sinew is also plenty strong enough to make a great natural bow string. And to top it all off, as wet sinew dries it adheres to itself and whatever it is wrapped around making it the original duct tape!
As well as providing all of these functional benefits, sinew can also be used simply as a decorative material in the same way that rawhide was often used in a lattice of bow limbs throughout the ages.
Sinew is one of those fundamental materials that any budding primitive archer should have knowledge and experience of. But the reality is that supply is very often limited making sinew one of those rarer materials which few have ready access to. (A bit like Osage here in the UK!)
Sinew it is also one of those materials which many are put off using because of fears of complexity, long cure times, or as far as the raw state is concerned, many wish to avoid a messy and time-consuming acquisition!
But the truth is that sinew is easy to source, easy to process and easy to apply once you have a bit of experience.
Our hominid ancestors probably enjoyed this incredibly useful material since we came down from the trees. Indeed, it has likely shaped our evolution. We may not have got as far as we have if it had not been for the discovery of this materials many uses. Just imagine the evolutionary jump that our species would have experienced upon the discovery of a material which has all the properties of self-adhesive baler twine!
There is no doubt that the progression of primitive technologies was aided by the diverse utility of sinew.
This article will be the first of several articles aimed at dispelling many of the myths and fears that surround the use of sinew.
It is my hope that this series of articles will enable anyone to source it, extract it, dry it, process it, apply it, cure it and finally enjoy the functional and aesthetic attributes of one of nature’s special gifts. So, lets break down the basics so that by the end of this series of articles you’ll be able to start incorporating this incredible material into your next primitive archery project.
This first Article will cover; what sinew is, where you can source it, how to remove raw sinew from its source and how to dry sinew.
So first, what is this sinew stuff and where does it come from?
Strictly for the benefit of those who are completely new to primitive archery, sinew is basically dried tendon tissue from a dead animal. It’s that simple. Are all tendons created equally? No. Well at least not in my experience.
Nowadays I almost exclusively use deer leg tendons for bow backing and cordage (including bow strings), and I use deer back strap sinew for lashings/wrappings etc. I’ve tried using tendons from other species such as farmed ostrich, domestic cow, farmed boar and truly wild boar and have concluded that large wild deer sinew is superior to sinew from all of these other animals. Ostrich leg sinew comes a close second however and is lovely and long but the sinews I’ve tried from farmed stock aren’t nearly as strong or elastic as those from a truly wild deer.
Pig/boar feet are not long enough to produce usable tendons which only leaves the back sinew as an option. Personally, I find both domesticated pig and wild/feral boar back sinew to be rather greasy. Wild deer back sinew however rarely has this problem. In fact, I just use deer sinew for everything which requires sinew these days. It needs mentioning though that some deer are just a bit too small to produce the kind of fibre lengths which are useful to us primitive archery folk.
Here in the UK, I’d suggest using nothing other than Red deer, Fallow Deer or Sika stag sinew. The smaller deer such as sika hinds, plus all roe and muntjac are just a bit too small to be worth messing about with however if that’s all you can get, then by all means give them a try. Fibres from smaller wild deer will still have all the other great qualities we’ve already talked about. They’ll just produce shorter fibres.
In the USA Mule/whitetail deer and of course Elk/Moose would all produce excellent tendons of suitable length which will produce lovely long strong sinew fibres. Basically, any wild ungulate with a live body weight over say 50kg/110lb will produce excellent sinew for the purposes of primitive archery.
So where can I get sinew from?
My own home dried wild Red Deer leg tendons.
Dry sinew
Dry Sinew can at times be difficult to find. Outside of Ebay there are a few craft shops here in the UK which sometimes stock odd amounts however most of these shops are out of stock for 9/10ths of the year. Ebay is your best bet and there are usually several sellers who can provide you with enough sinew for at least a single sinew backing project. Just search for “deer sinew” on Ebay to see if there is anyone selling sinew in your part of the world.
I myself typically have quite a good year-round stock of dried Red Deer leg sinew available for people to purchase here in the UK all year round. I sell dried sinew on a weight basis. If you would like to buy some sinew directly from me then please use the contacts page to get in touch.
Raw sinew
Raw deer leg tendon/sinew
Raw trimmed sinew is as rare as hen’s teeth as no one in their right mind would go through the process of stripping out leg tendons or trimming and cleaning off back strap tendon unless they were intending on drying them immediately.
Like most bits of dead things, sinew spoils quickly unless it is dried as soon as possible. So, the only place you’re likely to find raw unprocessed sinew is on the animal, or parts of the animal, which grew it in the first place!
All of my sinew comes from Red Deer which have been culled in my local area. Fortunately, I am a deer stalker (and also know lots of other deer stalkers) so I’m very lucky to have access to lots of deer legs. By legs I mean the bottom section of the leg below the ankle joint. Deer foot is probably a better description of the body part of use to us. This is the bit that your average deer stalker/hunter will throw in the bin as there is nothing worth eating on the foot of a deer!
Back Strap Sinew
Wild Red Deer back strap sinew.
Back strap sinew only ever comes my way if I’ve shot a deer myself for my own consumption, as the back strap sinew lies directly on top of the back straps (AKA the sirloins). Since no one ever gives up the sirloins of a venison carcass you’ll be doing well to acquire the back sinew unless you shoot/hunt deer yourself.
Even if someone is generous enough to offer you a whole back strap then the silvery sinew sheet which lies across the length of the back straps upper surface will likely have been cut off during the filleting and trimming process.
So, my advice is to find some local deer stalkers/hunters and offer to take their unwanted deer feet away for them. You may have to buy them a beer (or more likely a coffee these days!) but as long as you’re willing to do the processing yourself then this will be the cheapest way to acquire the highest quality sinew material. And possibly for free! In the UK you may be able to locate a deer stalker near you through the forum: The Stalking Directory
Removing tendons.
For now, I shall focus on removing tendons from deer feet. I will do an article on removing, drying and processing back strap sinew in the future.
Here I will show a sequence of photos demonstrating the safe and efficient removal of all of the usable tendons which you will find on the foot of a deer. First things first, here’s a quick list of the tools and equipment you will need to get started:
Easy clean work surface
Sharp knife
Knife sharpener
Disposable gloves
Kevlar/chainmail gloves
Dehydrator (only really necessary in the colder more humid months)
Cup of tea/coffee (optional!)
All you need to get started making your own sinew.
Step 1- Remove Skin.
The first step is to remove the skin from the cut end all the way down to the dew claws. This will require cutting away the skin from the bone/tendons/fascia which you will be holding in your free hand.
I’d strongly recommend wearing either a Kevlar or chainmail glove as you will be cutting towards your hand and wrist at times. I prefer to use Kevlar gloves which extend beyond my wrists for extra protection. I wear kevlar gloves on both hands as they also help a great deal in gripping the otherwise slippery skin and bone when it comes to the pulling phase of the skinning process.
In the interest of hygiene, under my Kevlar gloves I wear a pair of disposable gloves.
PPE is a must. I prefer Kevlar over chainmail
With the back side of the foot facing up towards you, start the skinning process by pinching the skin away from the large tendon running down the back side of the foot. Begin to slice away a strip of skin that sits directly on top of the tendon. (See pic below)
Make the job easier by pulling the skin taught and away from the direction of cut.Cut an approx. 1” wide strip of skin away from the tendon all the way down to the dew claws. You may either cut this strip off where it meets the dew claws or just leave it on.
Next peel away the skin from around the top and front of the foot to expose the whole top of the bone. Be careful here not to cut the front tendon away onto the skin which runs down the front/shin of the leg bone.
Once you have cut a large enough flap of skin free to take a firm grip of the skin, hold the bone in one hand and the skin in your other hand and pull down hard on the skin to free it from the rest of the bone. (See pics below)
The extra grip from the kevlar glove is very helpful at this point.
Step 2 – Remove tendons.
Once the skin has been pulled down to the same level as the dew claws at the back of the foot, find the thin tendon which runs all the way down the front of the bone. Find a spot about 3” up from the bottom of the skinned section of bone and pinch up this tendon away from the bone. Now insert the end of your knife under the tendon between the tendon and the bone. (See pic below)
Now whilst pulling the tendon upwards and away from the bone, draw the knife under the tendon all the way to the end severing it away from the bone where it terminates. (See pics below)
Now do the same thing to the bottom end of the tendon cutting down about an inch past where the tendon forks across towards the toes. (See pics below)
Some might say that cutting the tendon off at the first fork instead of trimming it out all the way down to the toes wastes a couple of inches of usable sinew. To some extent they would be right. That said though, the sinew beyond the initial fork is intertwined within itself making it difficult to separate out after drying.
Personally, I’m more than happy to make do with the 7-9inches of untangled sinew which is obtainable from tendons removed as per the picture above. I usually revert to using back strap sinew when I need fibres to be longer than 9 inches.
Now flip the deer foot over and repeat the same process to remove the larger thicker tendon located on the back of the foot. (See pics below.)
Step 3 – Remove tendon sheaths.
At this point you will now have two whole tendons, one of which will be skinny and floppy, the other one will be thicker and stiffer. The thin floppy one needs no further attention and can be put to one side ready for drying.
The thicker, stiffer tendon now needs to be separated out into individual tendons after first separating them from the tendon sheath. The removal of the tendon sheath surrounding the inner tendons speeds up drying and also makes the pounding and separating process much easier at a later stage.
To remove the tendon sheath first insert the tip of your knife into the thinner end of the tendon sheath and slip the blade tip between the outer layer of the sheath and the largest of the visible tendons within the sheath. Now cut up towards the thicker end of the tendon. You’re basically trying to cut the sheath open end to end without cutting the tendon on the inside.
Step 4 – Separate the tendons.
Now take your fingers and separate out the tendons from the sheath. On front feet there is one round thick tendon plus two thin tendons. On back feet there will be one thick round tendon plus one thin tendon. Grip the individual tendons one at a time and rip them away from the tendon sheath.
The Kevlar gloves help a lot to provide enough grip to get them all separated out easily. (See pics below.)
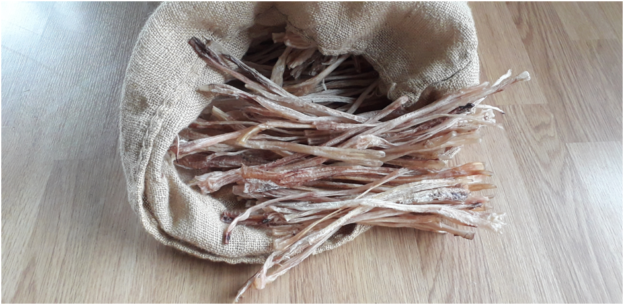
Back foot – All three tendons separated out ready to be pulled free from the sheath.Thick tendon separated out.Top – Tendon from front of the foot, Middle – one thick tendon plus two thin tendons from the back of the foot. Bottom – The tendon sheath.Top left – four feet all usable tendons removed, bottom middle – four tendon sheaths, bottom right – fourteen clean tendons ready for drying.14 Tendons laid out on the drying rack ready to go in the dehydrator. Tendon sheaths boxed up ready for freezing until needed for glue.
Whilst the tendon sheaths do contain some tendon material, processing it away from all the other fascia is a great deal of work so nowadays I save all my tendon sheaths up until I have a bunch of them and then I cook them up into sinew glue.
Sinew glue that I use for backing my bows. I’ll do an article on sinew glue at some point in the future. Until then just remember to keep your tendon sheaths either dried or frozen because they really do make excellent sinew glue!
Dries Tendon sheaths. Perfect for cooking up into sinew glue! Keep away from hounds!!
Step 5 – Dry your tendons.
A quick word about using a dehydrator to dry tendons/sheaths. Dehydrators are only really necessary when temperatures are low and/or humidity is high.
Most of my deer feet become available to me in the winter months. The winter months in the UK are notoriously wet and cold. Not ideal for drying anything! As such I’ve found a small dehydrator to be extremely useful for drying all my tendons quickly and efficiently.
Being a highly perishable item, tendon needs to be thoroughly dried as quickly as possible. Failure to dry quickly will result in a rotting stinking useless mess. Letting your tendons get even a tiny bit high will result in weakened sinew and a permanent whiff which will win you zero credibility!
If you live somewhere like Arizona however, you’ll likely air dry your tendons adequately by simple hanging then somewhere airy, out of the sun and away from dogs, rats and flies.
Deer tendons are fairly thin so should be dry in good air-drying conditions within a couple of days. A good place to air-dry your tendons in colder climes would be up high above a stove. Make sure you don’t cook your tendons though (see comments below re dehydrating).
If you do choose to air dry your tendons, then avoid letting them get fly blown. Maggots will quickly render your efforts useless.
If using a dehydrator makes more sense to you then heed this warning before embarking on dehydrating your precious tendons! It is very easy to be tempted to crank the thermostat up on the dehydrator to speed the drying process. Whilst this will certainly speed up the drying time it will also cook your tendons rendering them useless for all but glue.
You’ll know when you’ve accidentally cooked a tendon because when you come to pound it and separate out the fibres, your sinew will break apart into short stiff lengths of brittle useless splintery chaff instead of nice long, soft, fluffy, white, stringy lengths of sinew. Too high heat damages the proteins which make up your sinew and maintain the structural integrity of your end product.
You’ll want to dry your tendons using the lowest temp that you can get away with. I set my dehydrator to 130℉/55℃. No higher and no lower. At 130℉/55℃ my tendons are completely dry in 12 hours. No damage, no smell. Just beautiful, dry, stiff, odourless sinew ready to be pounded into wonderful soft fluffy white fibres.
14 Dehydrated tendons ready to be processed into usable sinew. (See pic below)
In the next article we will run through the processing of dried tendon into sinew fibres ready for use in your next sinew bow building project. Until then I suppose you’re now wondering what to do with a bucket full of skinned out deer feet.