Tag Archives: Snake Skin

Sinew Backed Yew Primitive 46# @ 27″ (bow no: 19)

Since gaining a bit of a reputation locally for being the guy who makes “Character bows”, I’ve been “gifted” rather a lot of “character staves”! And not wanting to appear ungrateful, I’ve become prone to accepting these staves, rather than politely declining the “generous” offer of yet more firewood!

Actually, once in a while, some of these typically low diameter branch staves don’t look too bad, (at least upon initial inspection) and the bow featured in this post was built from one such branch stave which was donated to me in 2022.

Despite the low diameter and general knottiness of this particular branch stave, there was one face which looked quite nice and could make for a sound back. So other than a couple of branch whirls to deal with on the belly side, I could easily envisage making a simple but effective primitive bow from this stave. So in the spring of 2024 I set to work on it.

Roughing out was straight forward enough and I was pleased to get past all the pith without running low on heart wood material. I decided to keep the face profile fairly narrow so as to minimise the amount of sapwood which was curling around the edges towards the belly due to the low diameter and high crown on the back.

The stave was fairly straight other than a tiny amount of deflex right in the middle where I’d lay out a stiff handle with fades. I decided to leave this deflex alone since I only had 62″ of overall length to work with, and really hoped to get 27″ of draw length out of this bow. I figured that lightly flicked tips could possibly work since the deflex in the handle would help cushion the extra strain that any reflex might place on the relatively short working sections of the limbs. Flicking the tips would help reduce any stack experienced which might result from the short length.

A stiff 4″ handle with 3″ fades, and 5″ stiff tips would reduce the overall working sections of both limbs down to around 20″, which isn’t a great deal to support the load that a 27″ draw would place on a bow as short as this one. So after roughing out and steaming the tips into a light reflex, I decided to sinew back this stave and leave her to cure out over the summer of 2024.

By early autumn the sinew backing appeared to be thoroughly cured and a little bit of overall reflex had been drawn into the stave as the sinew had shrunk down tight. This often happens when enough sinew is used, which is why I typically apply my sinew backings by weight to ensure enough (but not too much) sinew is applied.

I find that a total of 3 ounces of sinew (an ounce and a half of dry processed sinew per limb) is the perfect amount for a bow in the 58 – 64″ range. 3 oz is plenty enough sinew to add significant extra power and resistance to set, but not so much sinew that the added weight of the sinew starts to add power robbing mass to the limbs.

I find that more than 3oz of sinew on a bow this length crosses the point of diminishing returns, and the extra weight the additional sinew gives to the limbs can actually start to decrease arrow speed and create a fair bit of limb vibration too. This vibration post string release is typically felt as an uncomfortable form of hand shock. So when it comes to sinew backing a bow, more is not necessarily better!

So 3oz of dry sinew is about perfect, so long as the bulk of its distribution is along the working sections of the limbs, as opposed to the handle section or the last 6″ of the tips, which will not be improved one bit by the added weight of a full thickness layer of sinew. In fact the tips really only want as thin a layer of sinew as is possible. Just enough to cover the visible surface of the back. Enough to add structural integrity but not weight.

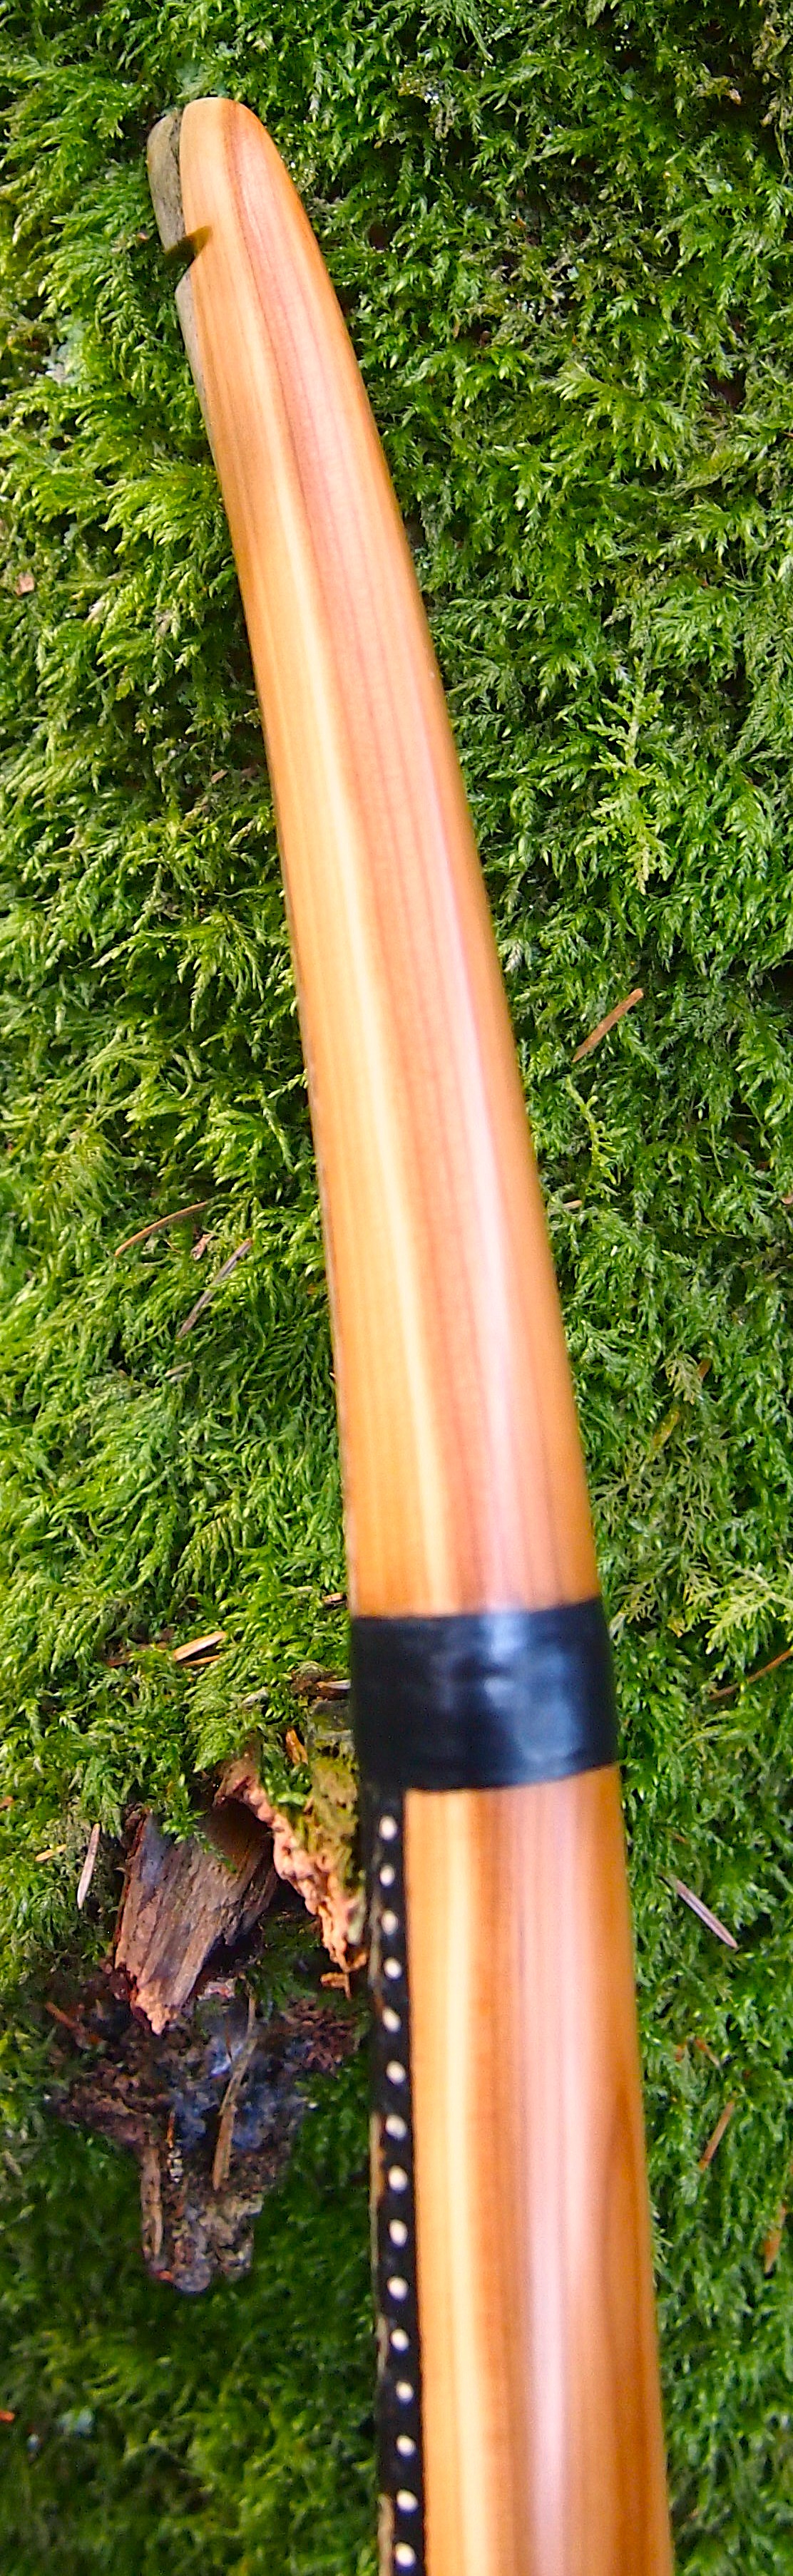
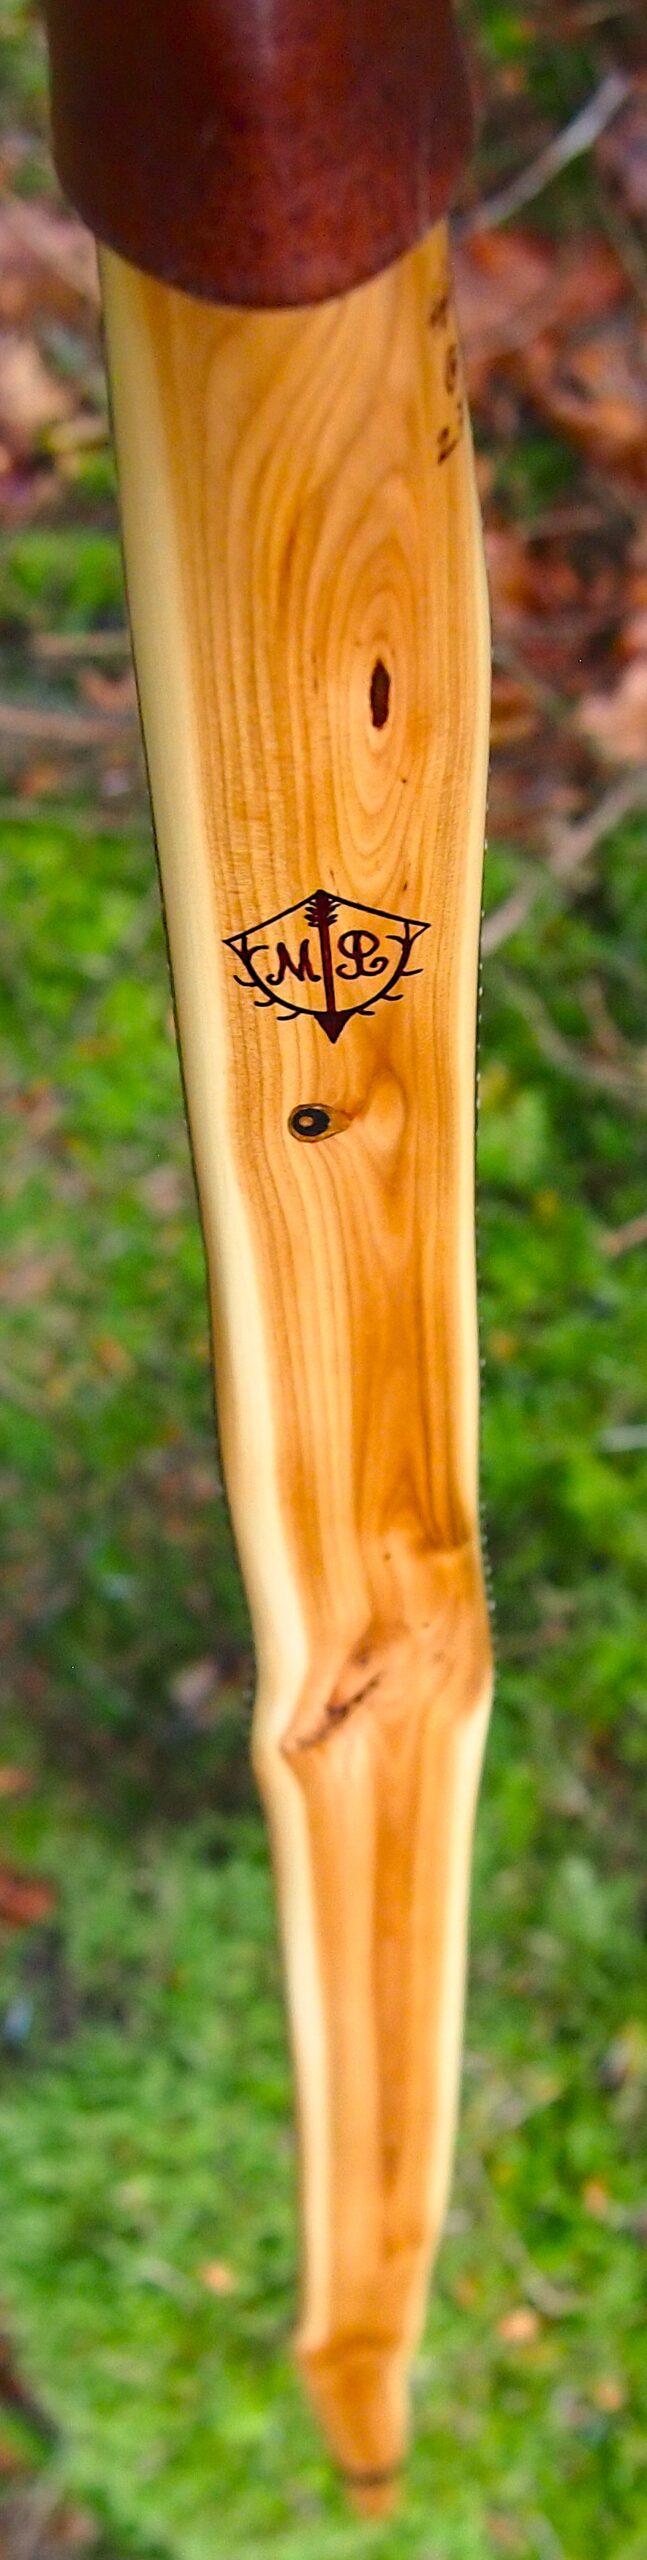
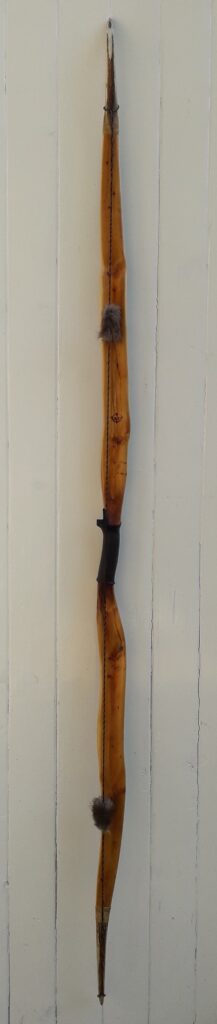
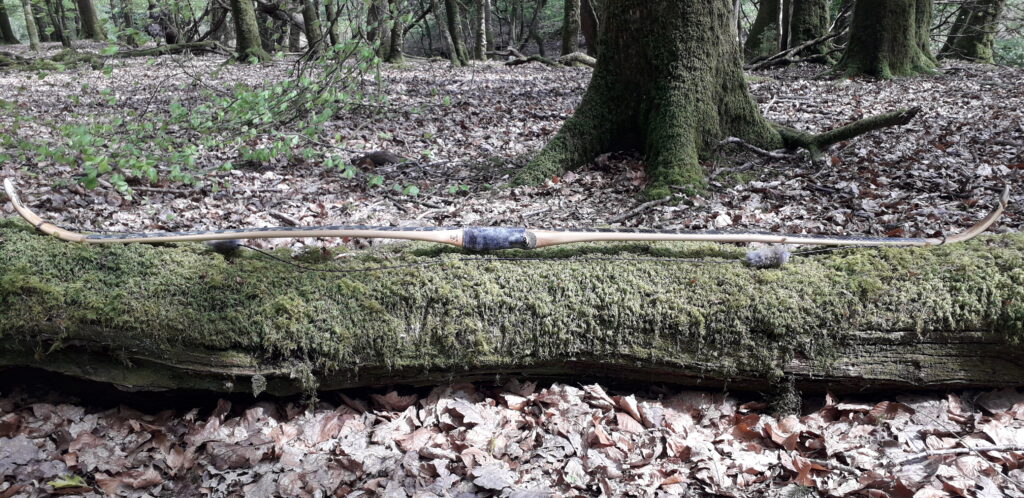
The stave was brought into shape and a rounded D shaped belly was chosen so as to get as much sap wood off the belly corners as possible. This allowed for the retention of as much heart wood as possible and resulted in an overall ratio of around 50/50 sapwood/heartwood. Which was pretty good for a low diameter branch stave.

Three of the small knots presenting on the belly were a bit weak looking so I opted to dig them out and fill them with a mixture of epoxy and yew dust so as to add back some strength whilst retaining as best a natural look as possible.

Before putting the long string on for the first few pulls the stave held about 2″ of overall reflex, but I new that a fair bit of that overall reflex would disappear once the tillering got well underway. And as expected, by the time 26″ had been reached the overall reflex had reduced to about an inch. My expectation was for it to drop another inch by the time full draw was reached and the bow had been properly shot in, and my expectation was spot on.

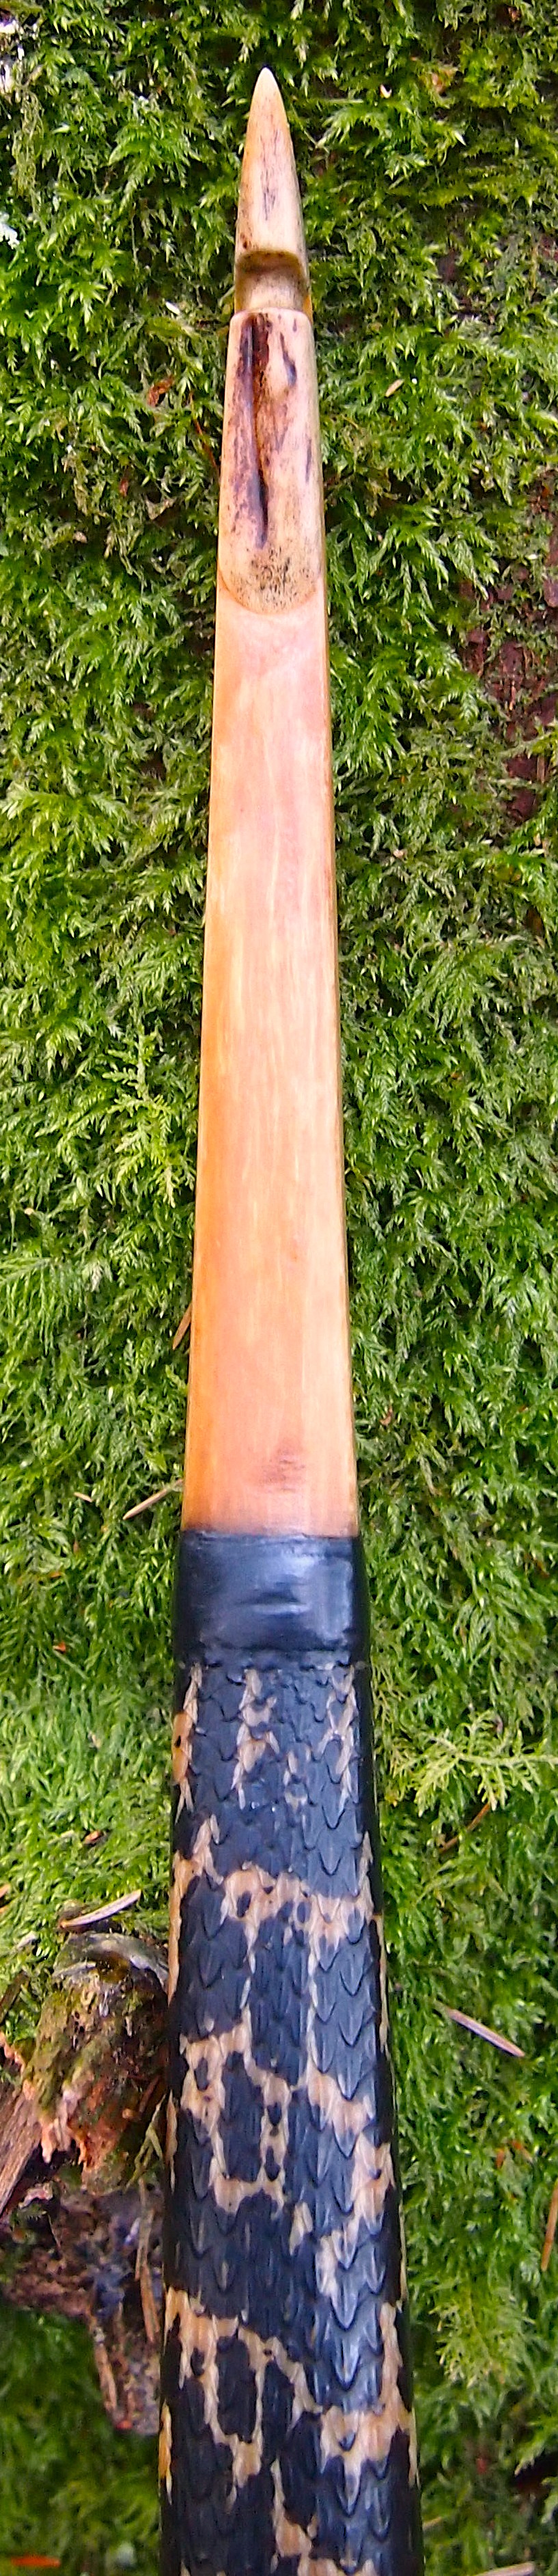
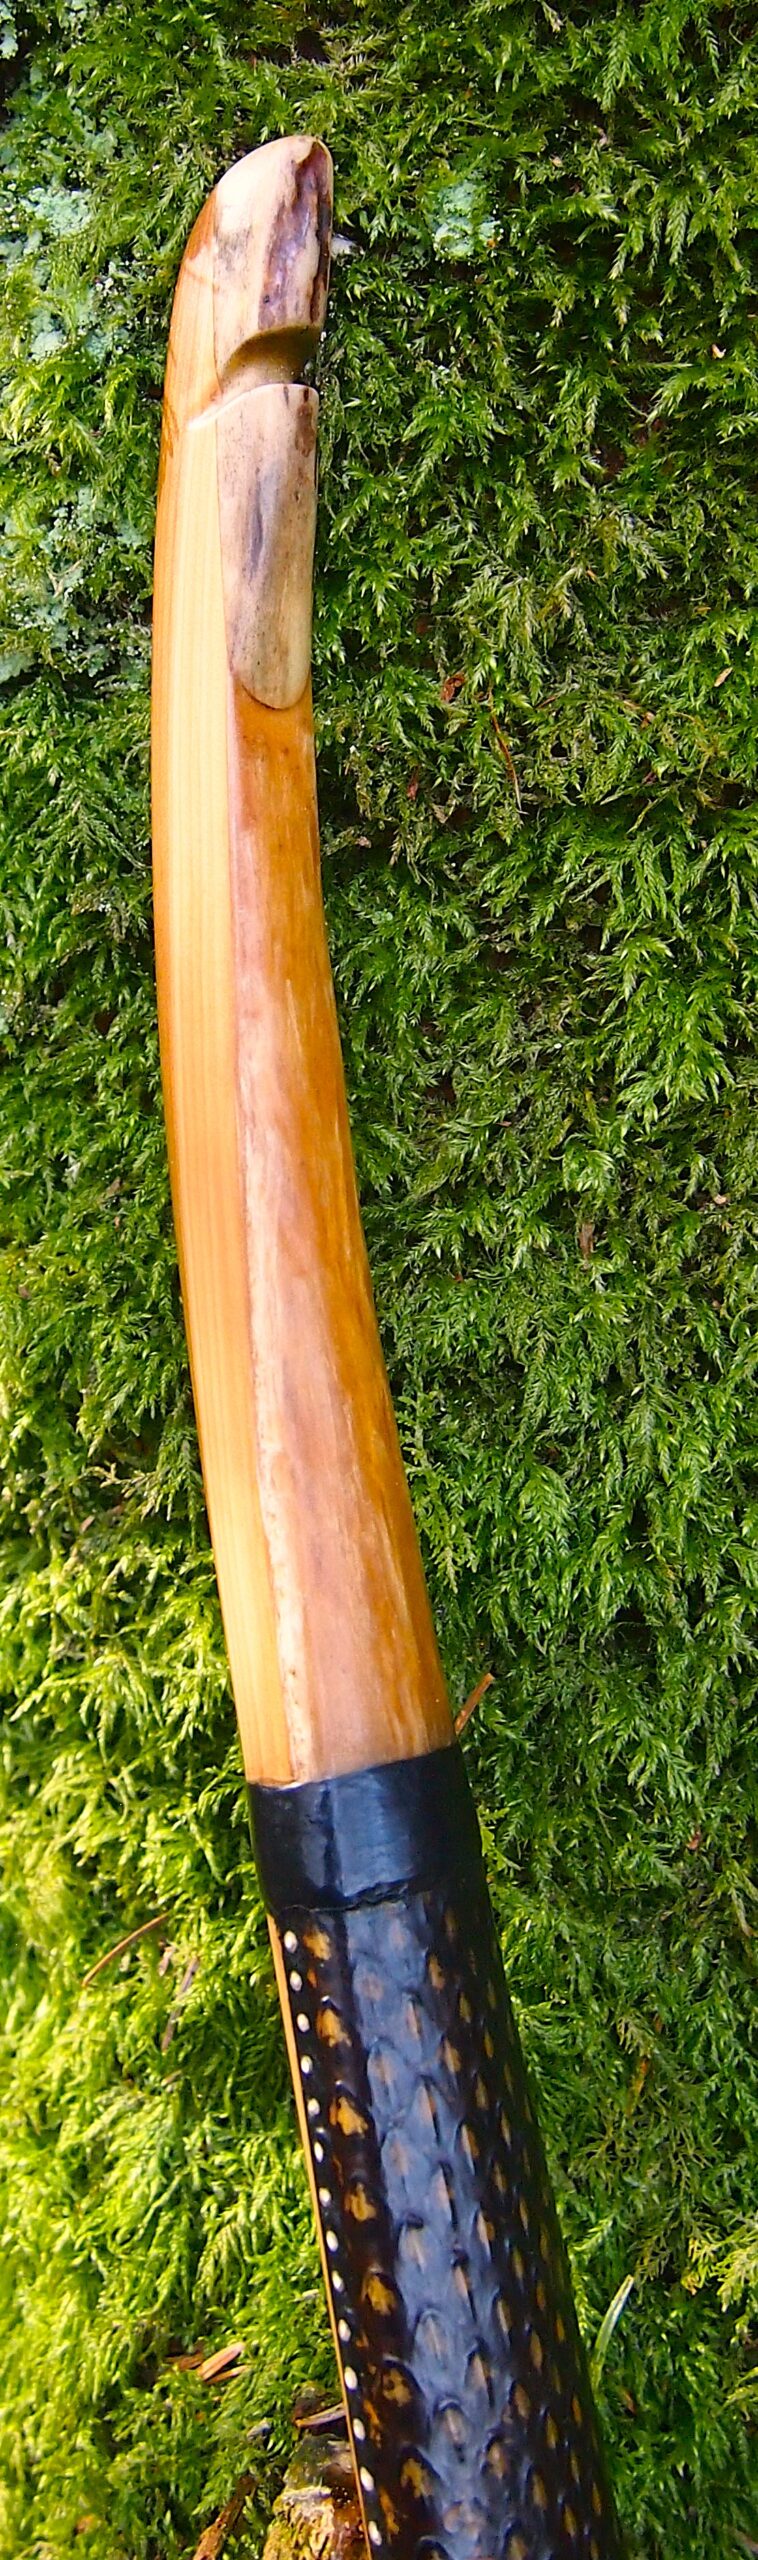
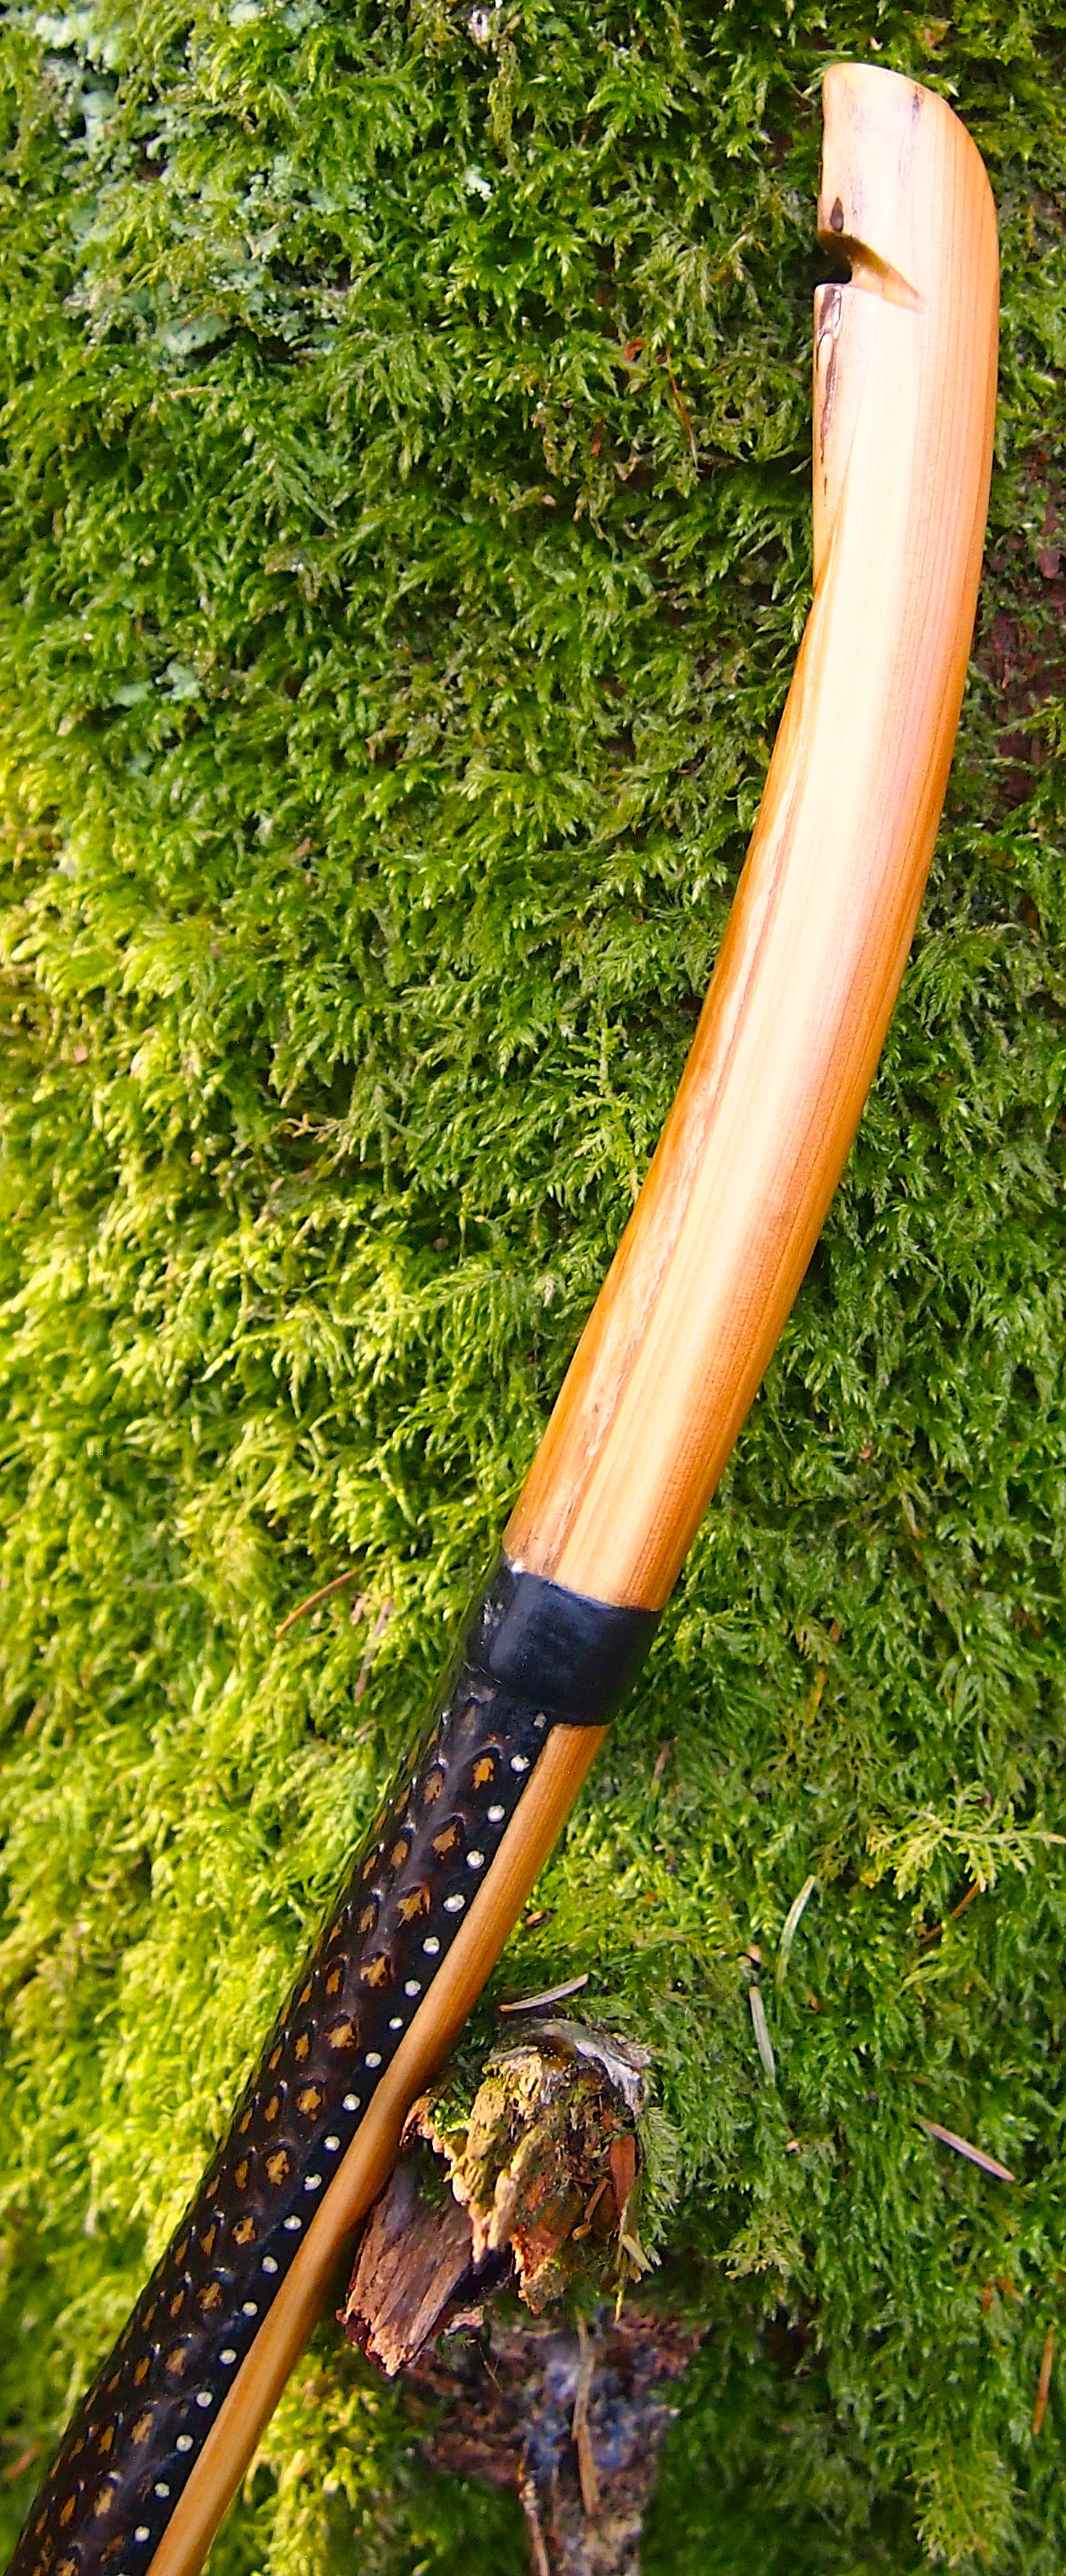
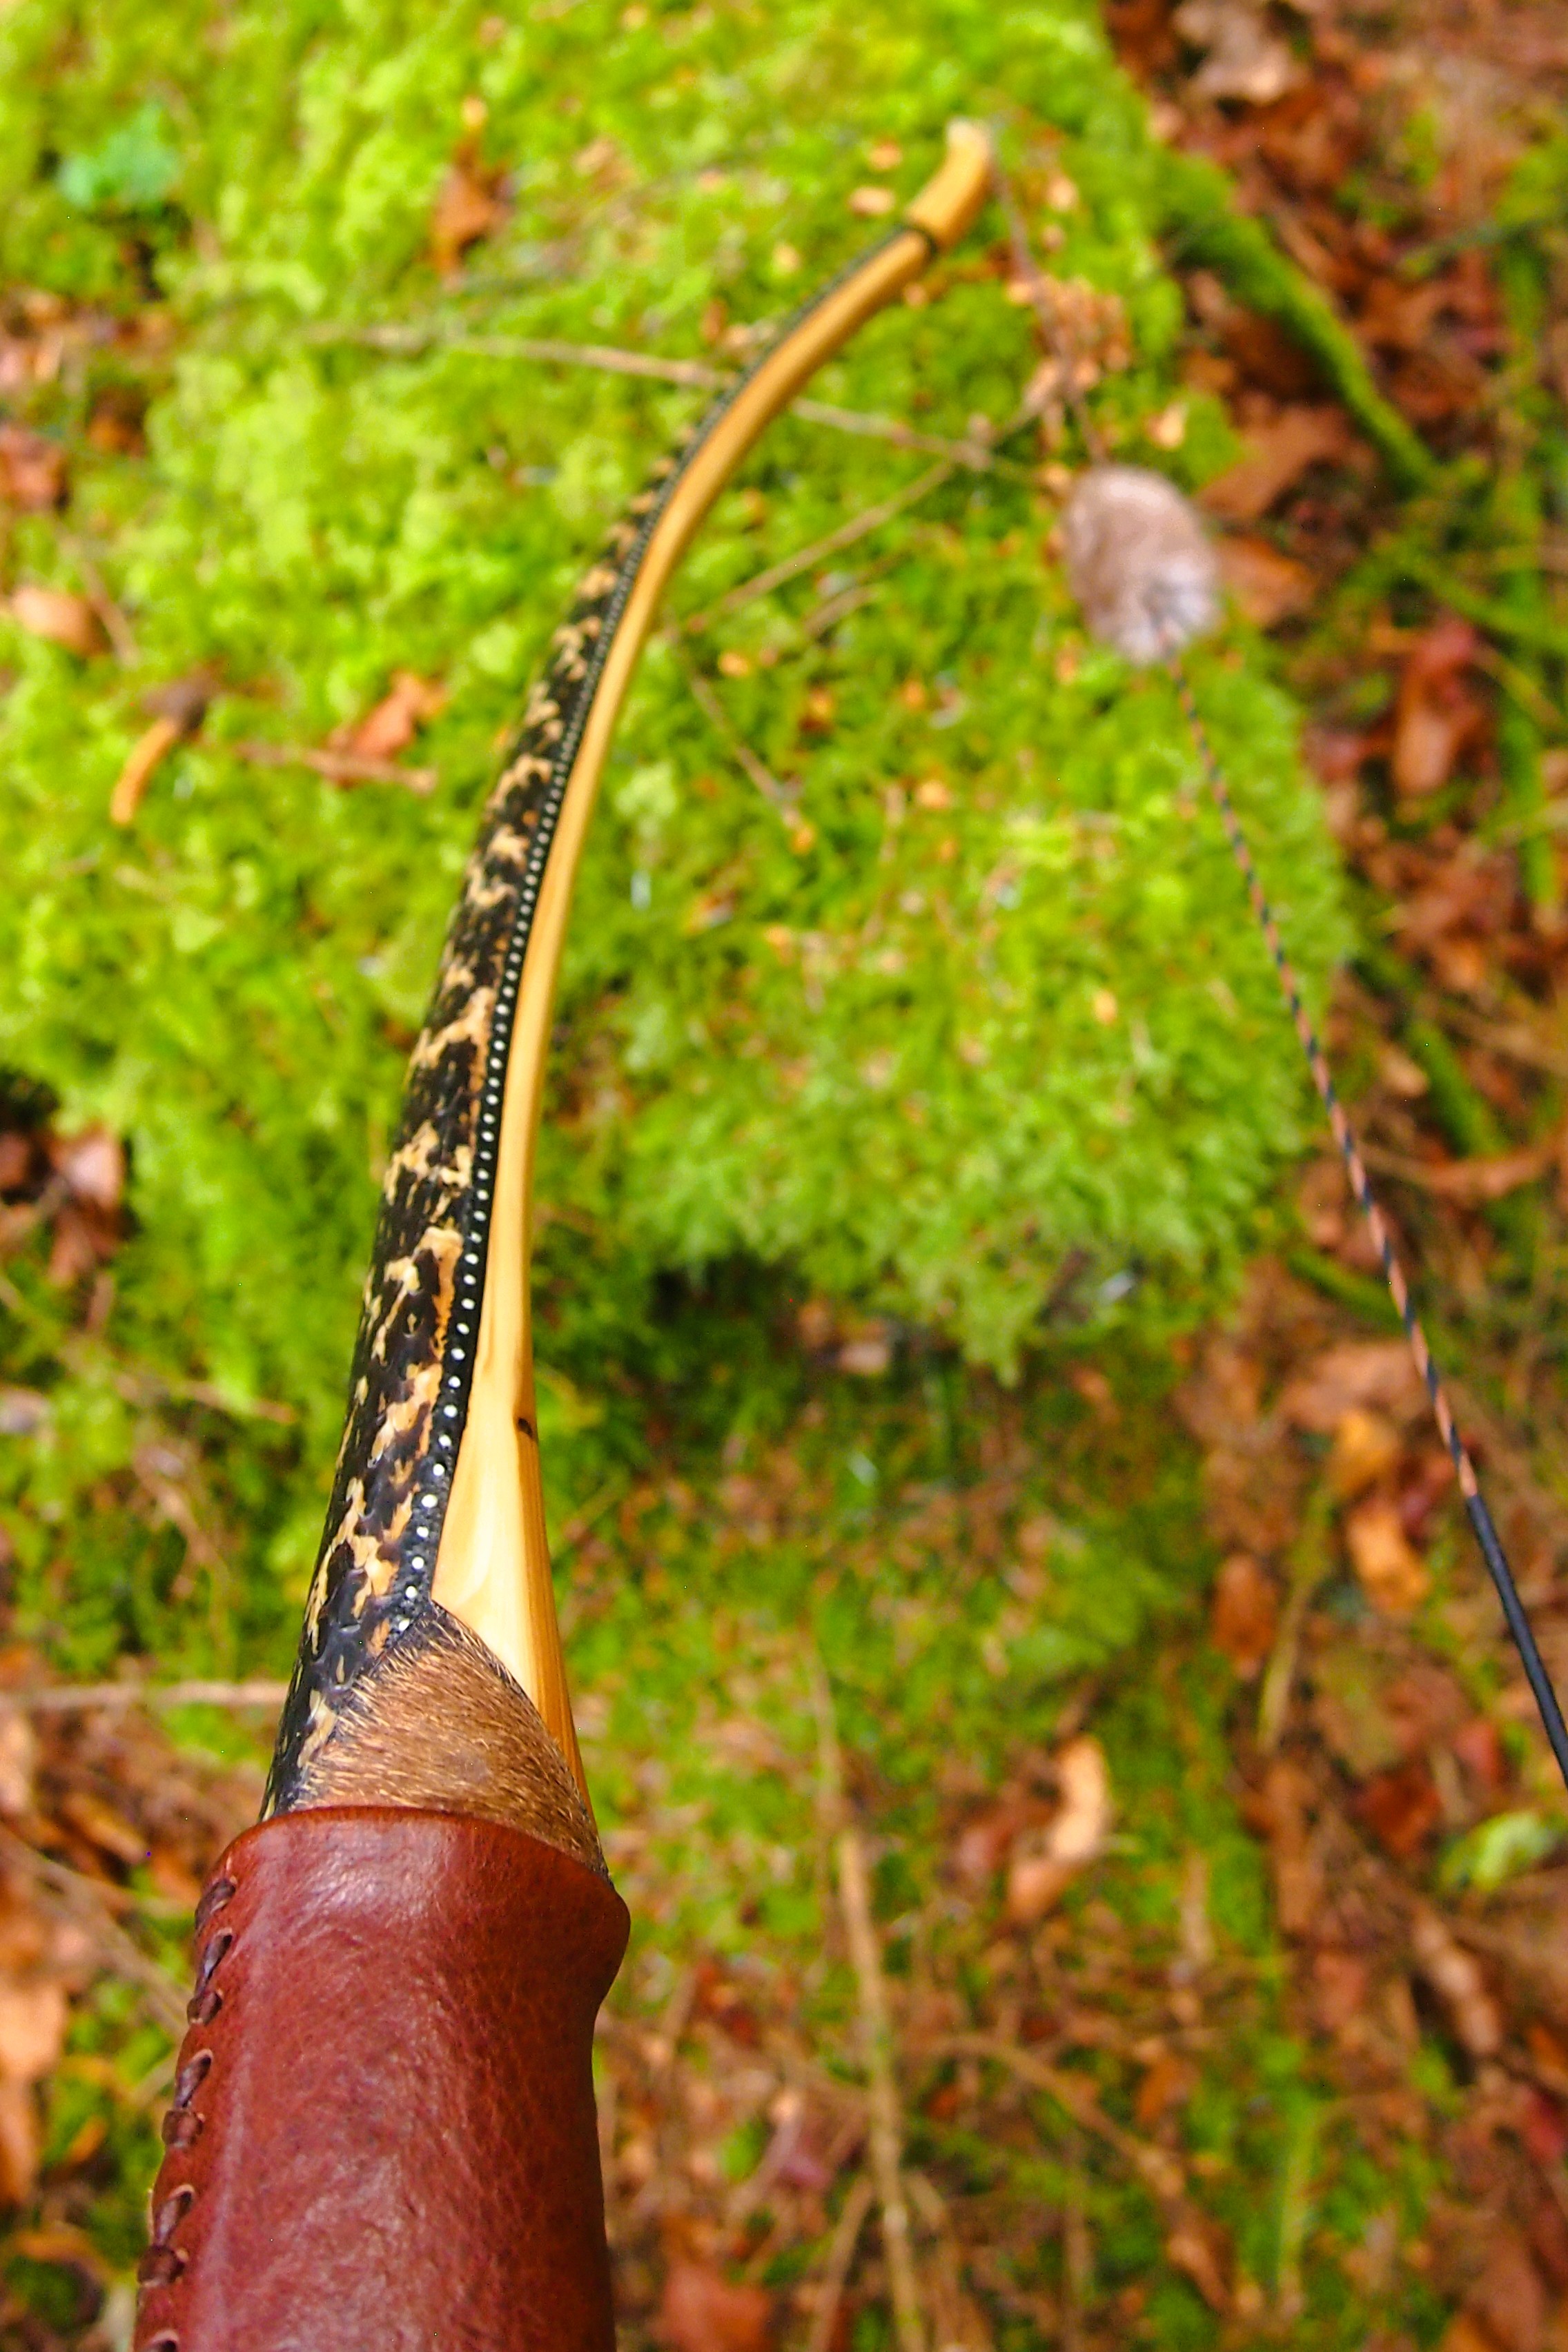
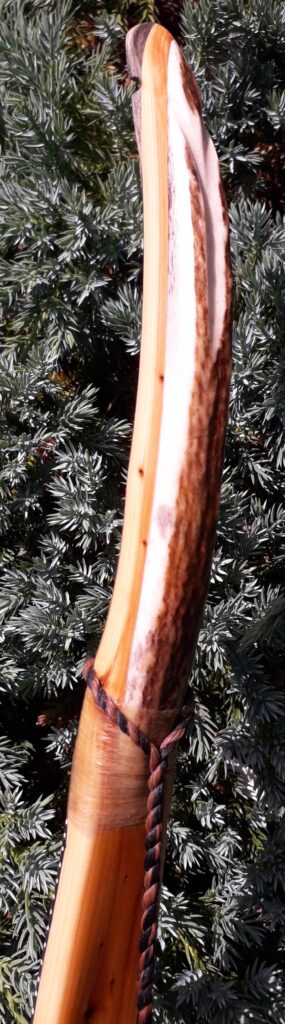
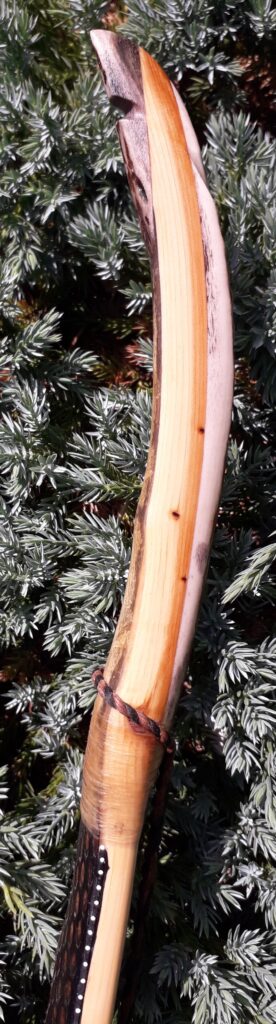
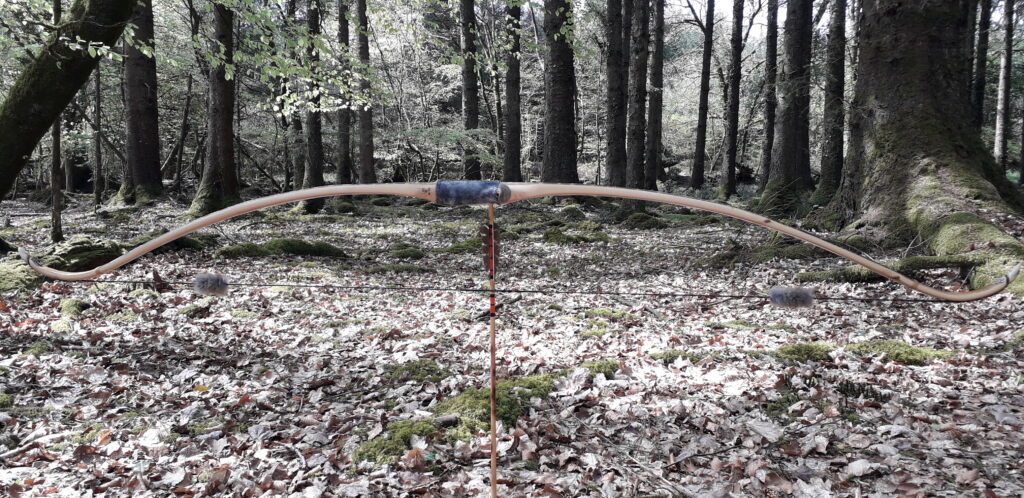
So after a thorough shooting in period, the overall reflex/deflex reduce to about neutral, which was ideal for a bow which was going to end up only 60″ nock to nock. The light reflex in the tips had held it’s shape, even with their relatively low diameter, and the 1/4″ positive tiller had stayed true throughout the shooting in period.

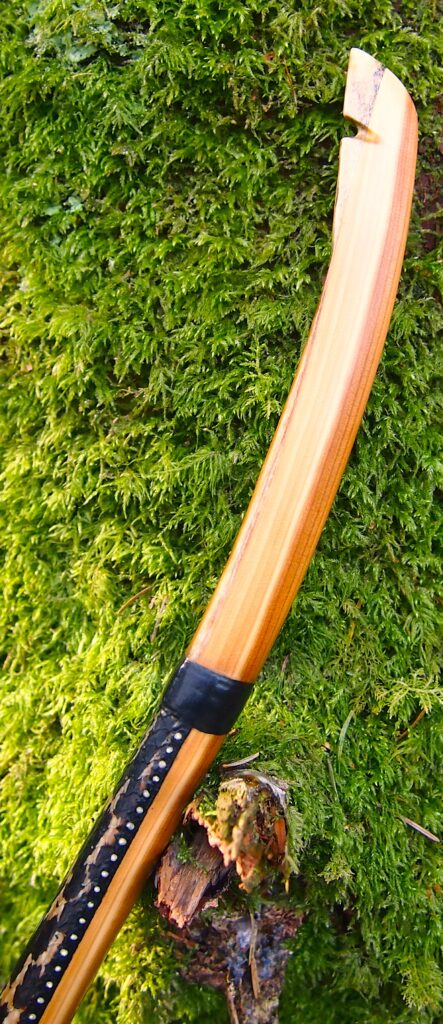
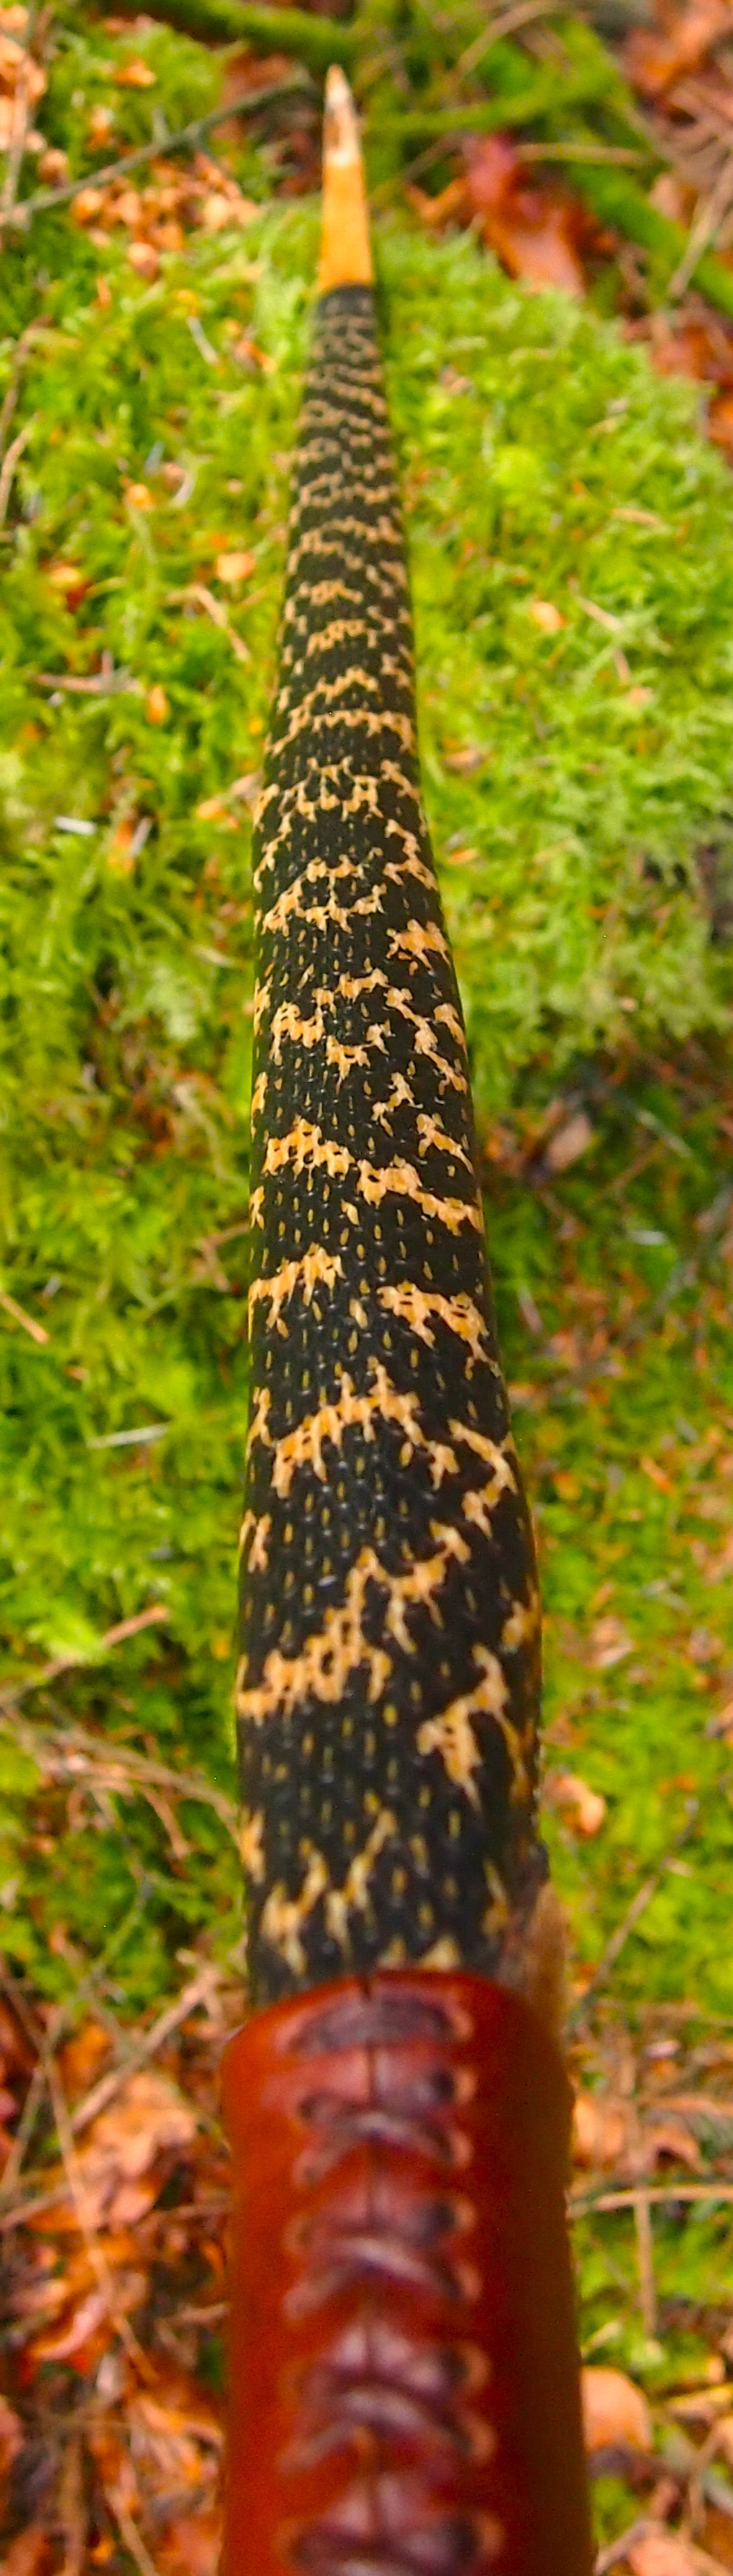
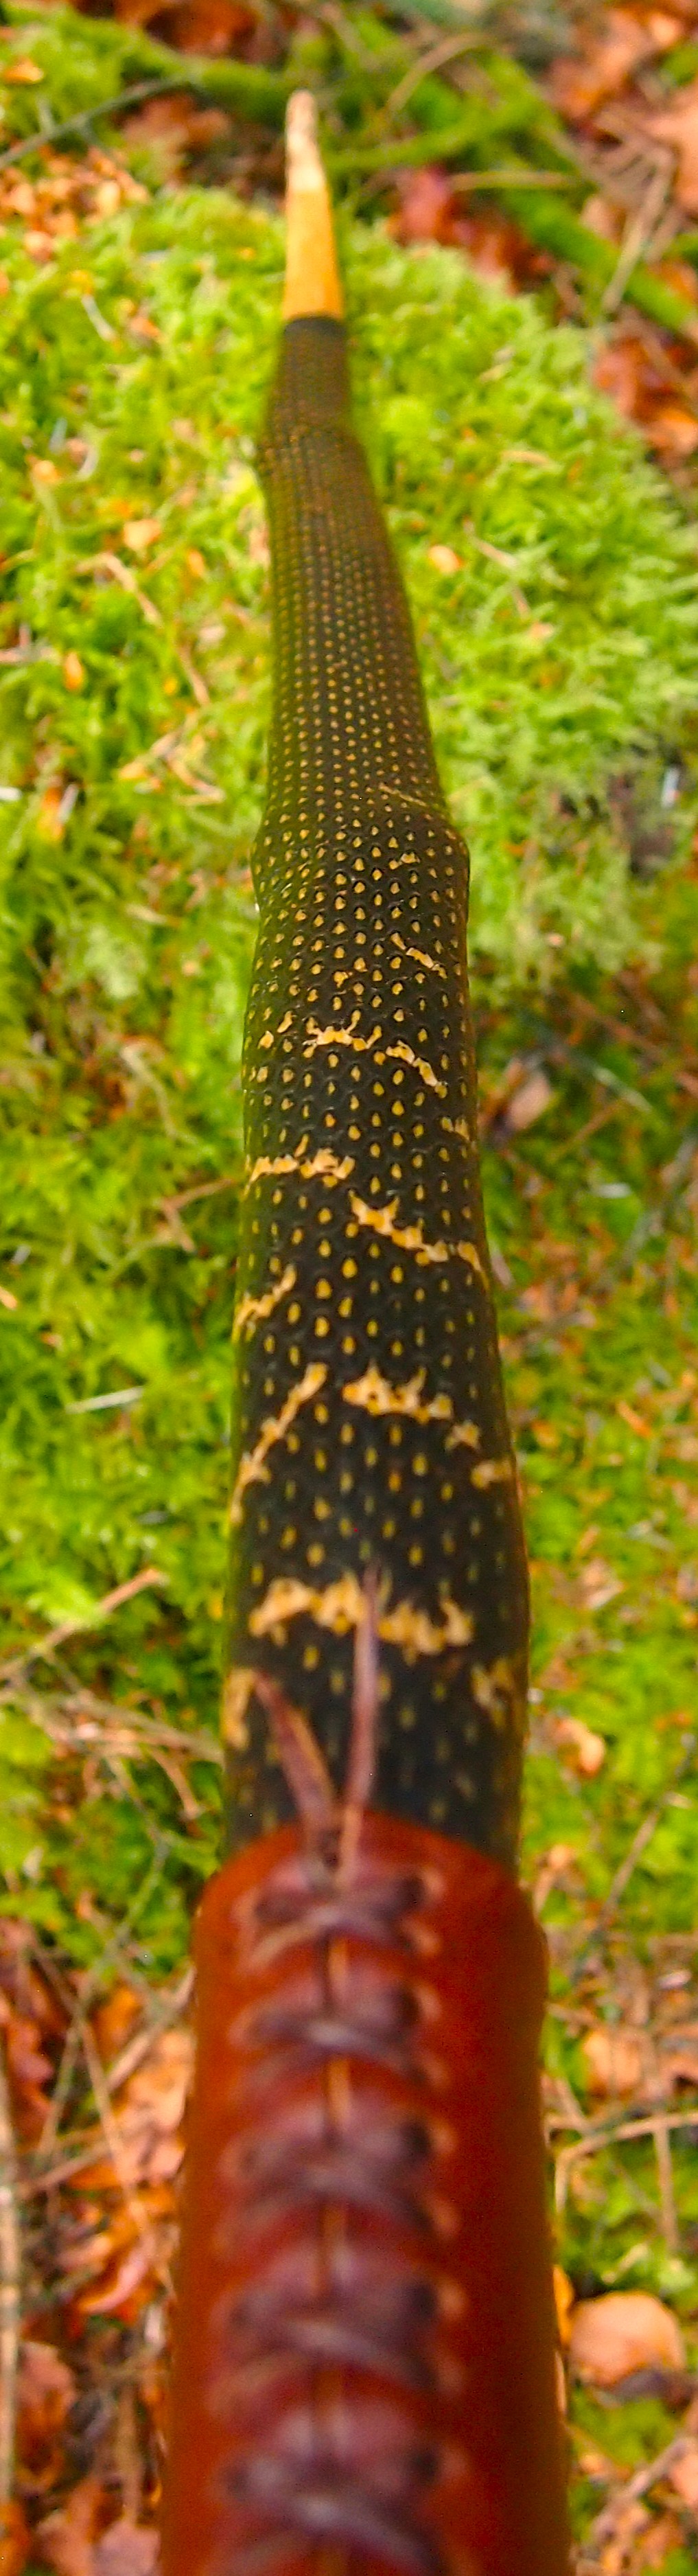
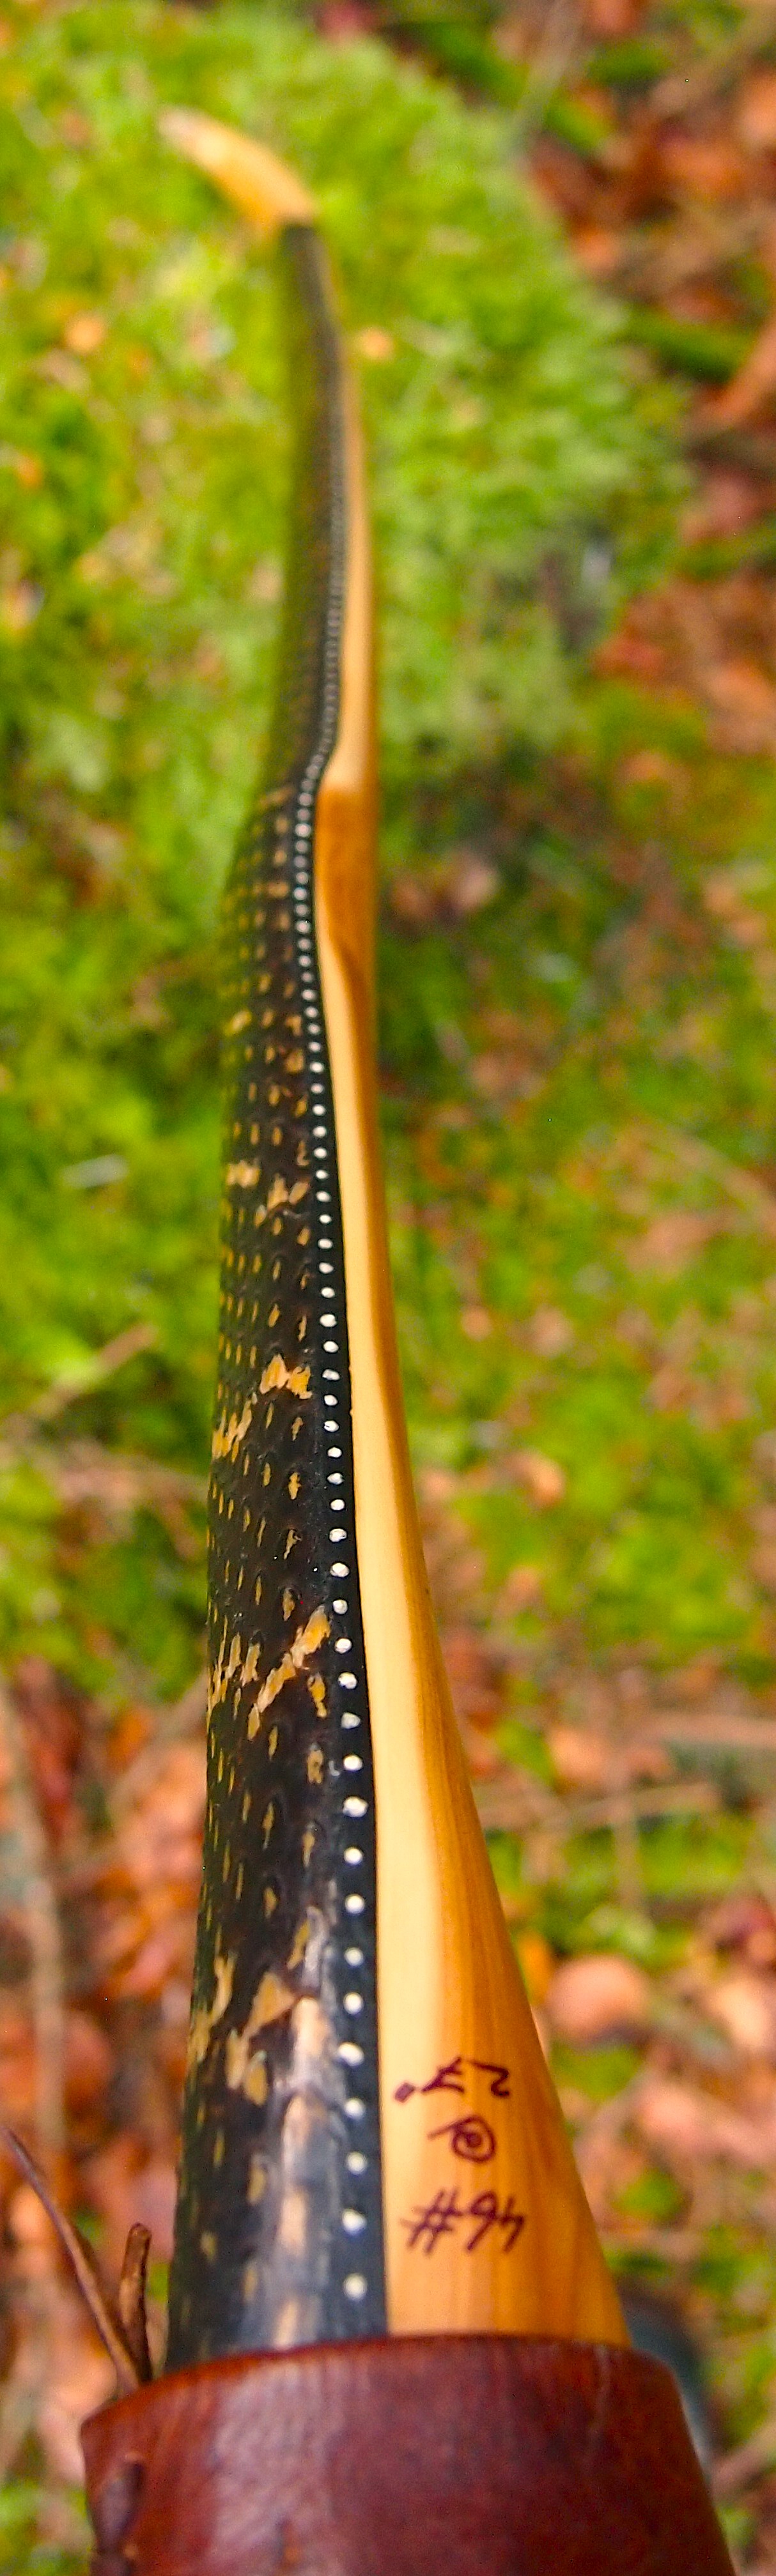
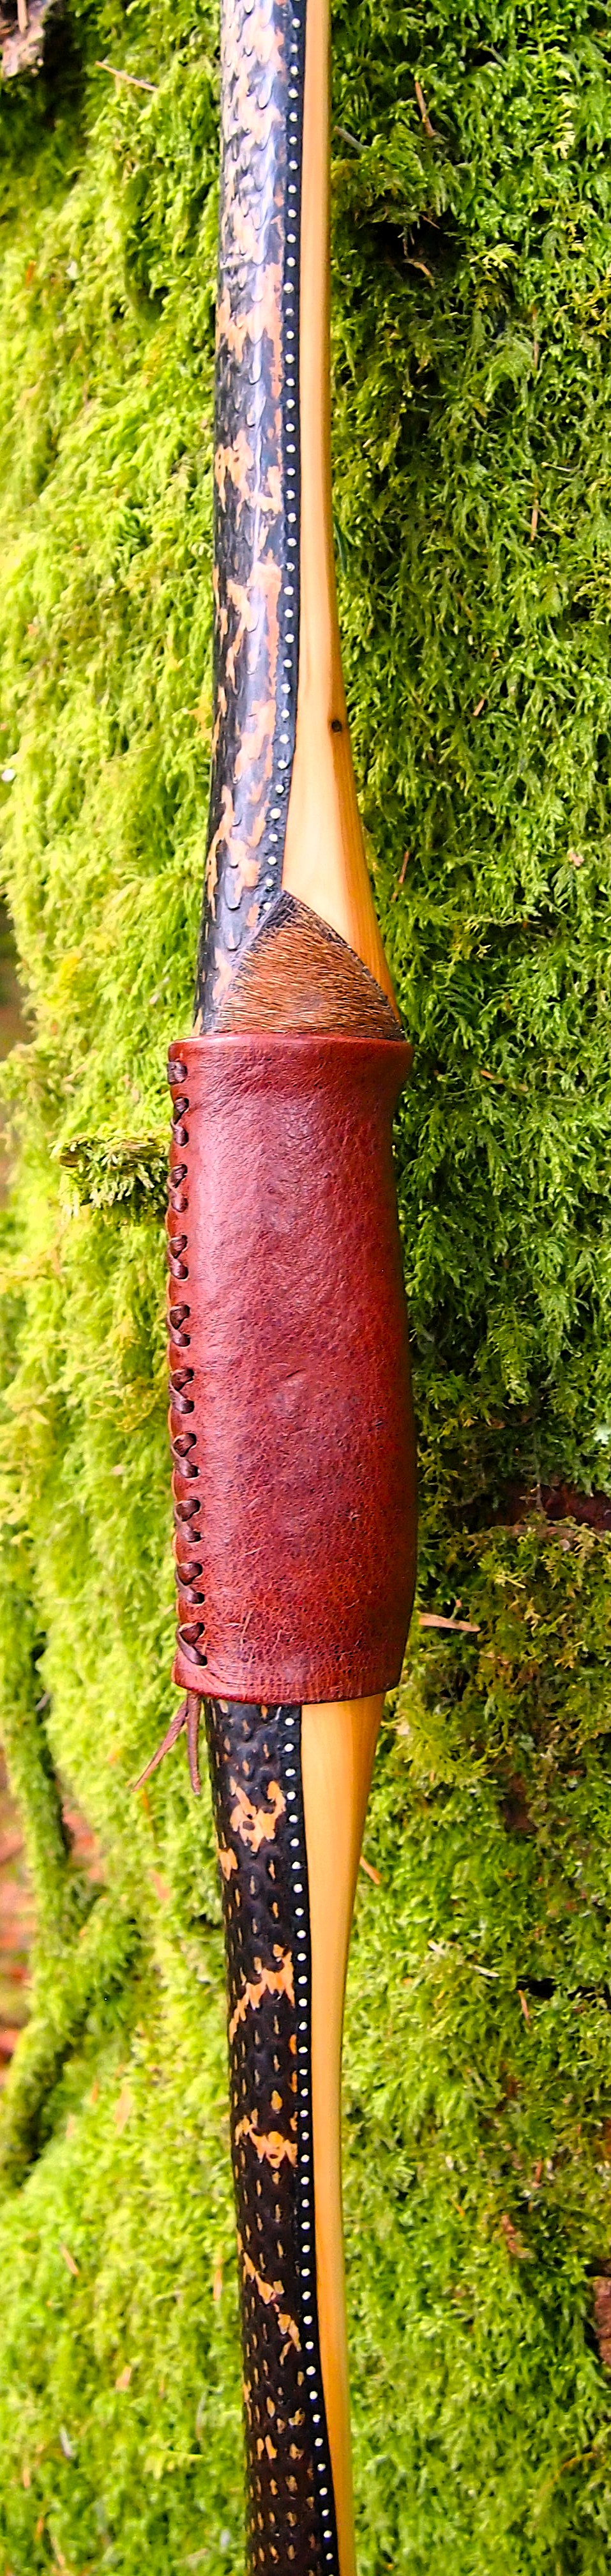
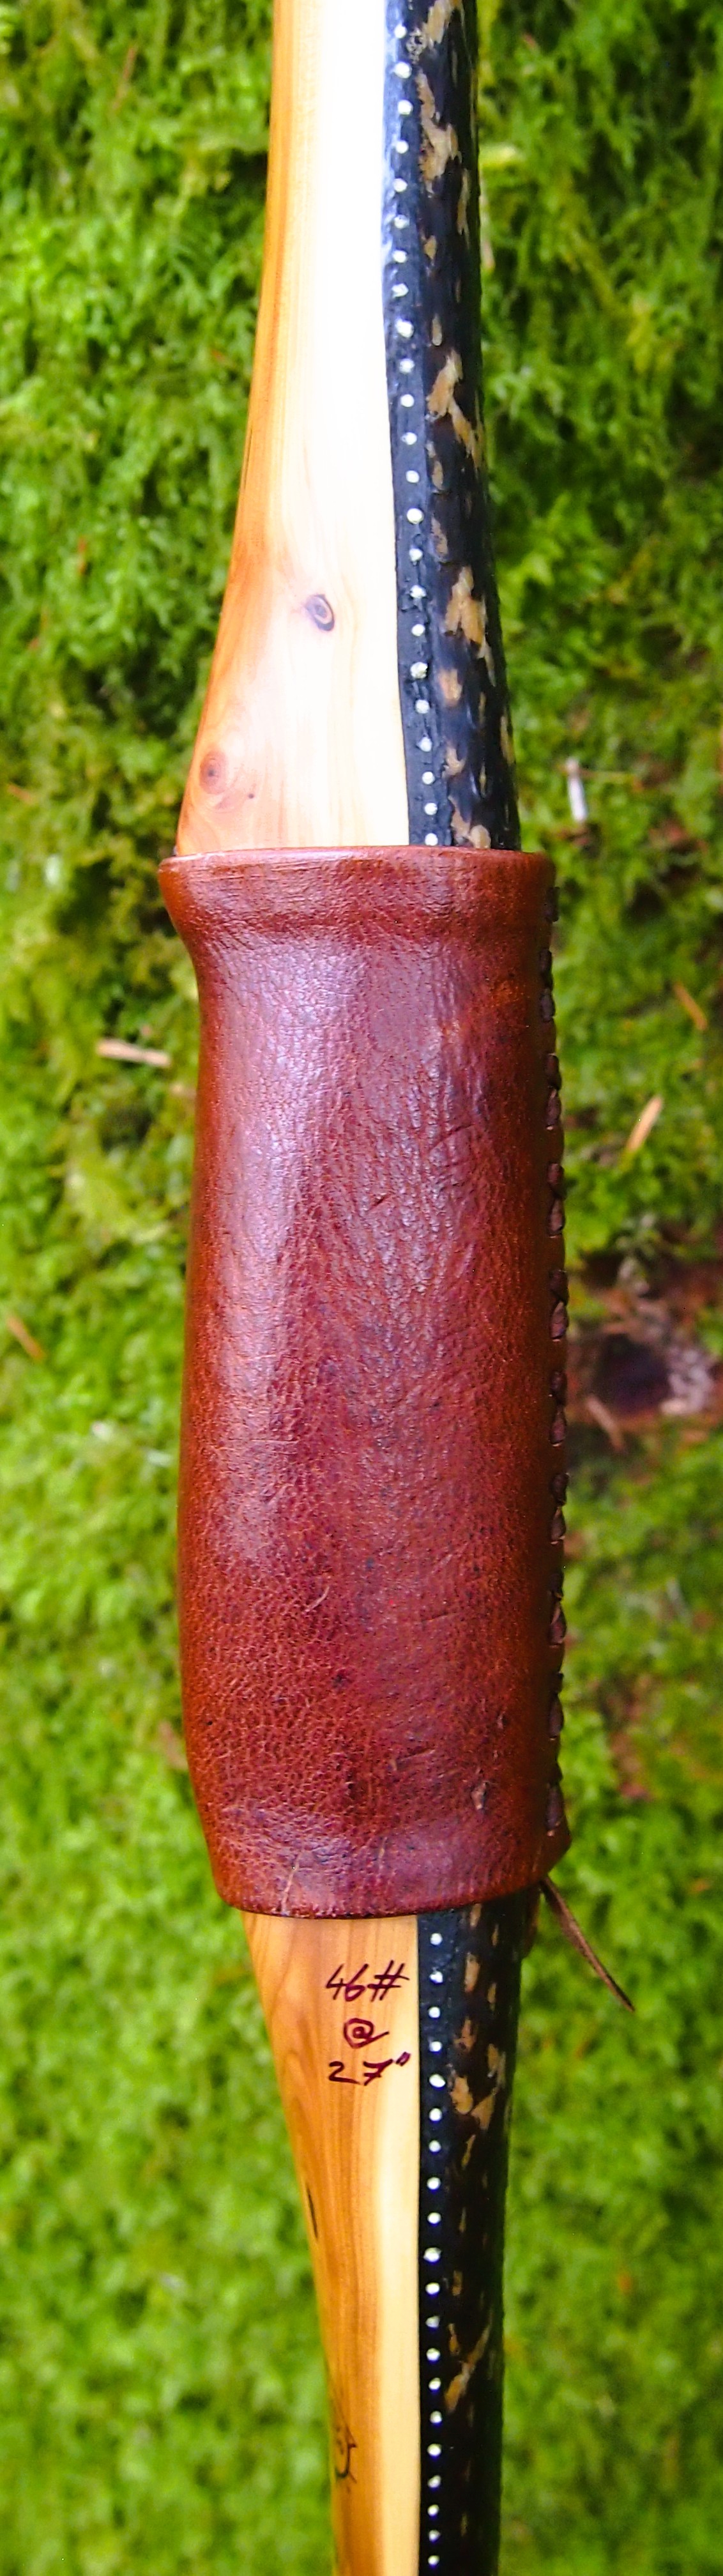
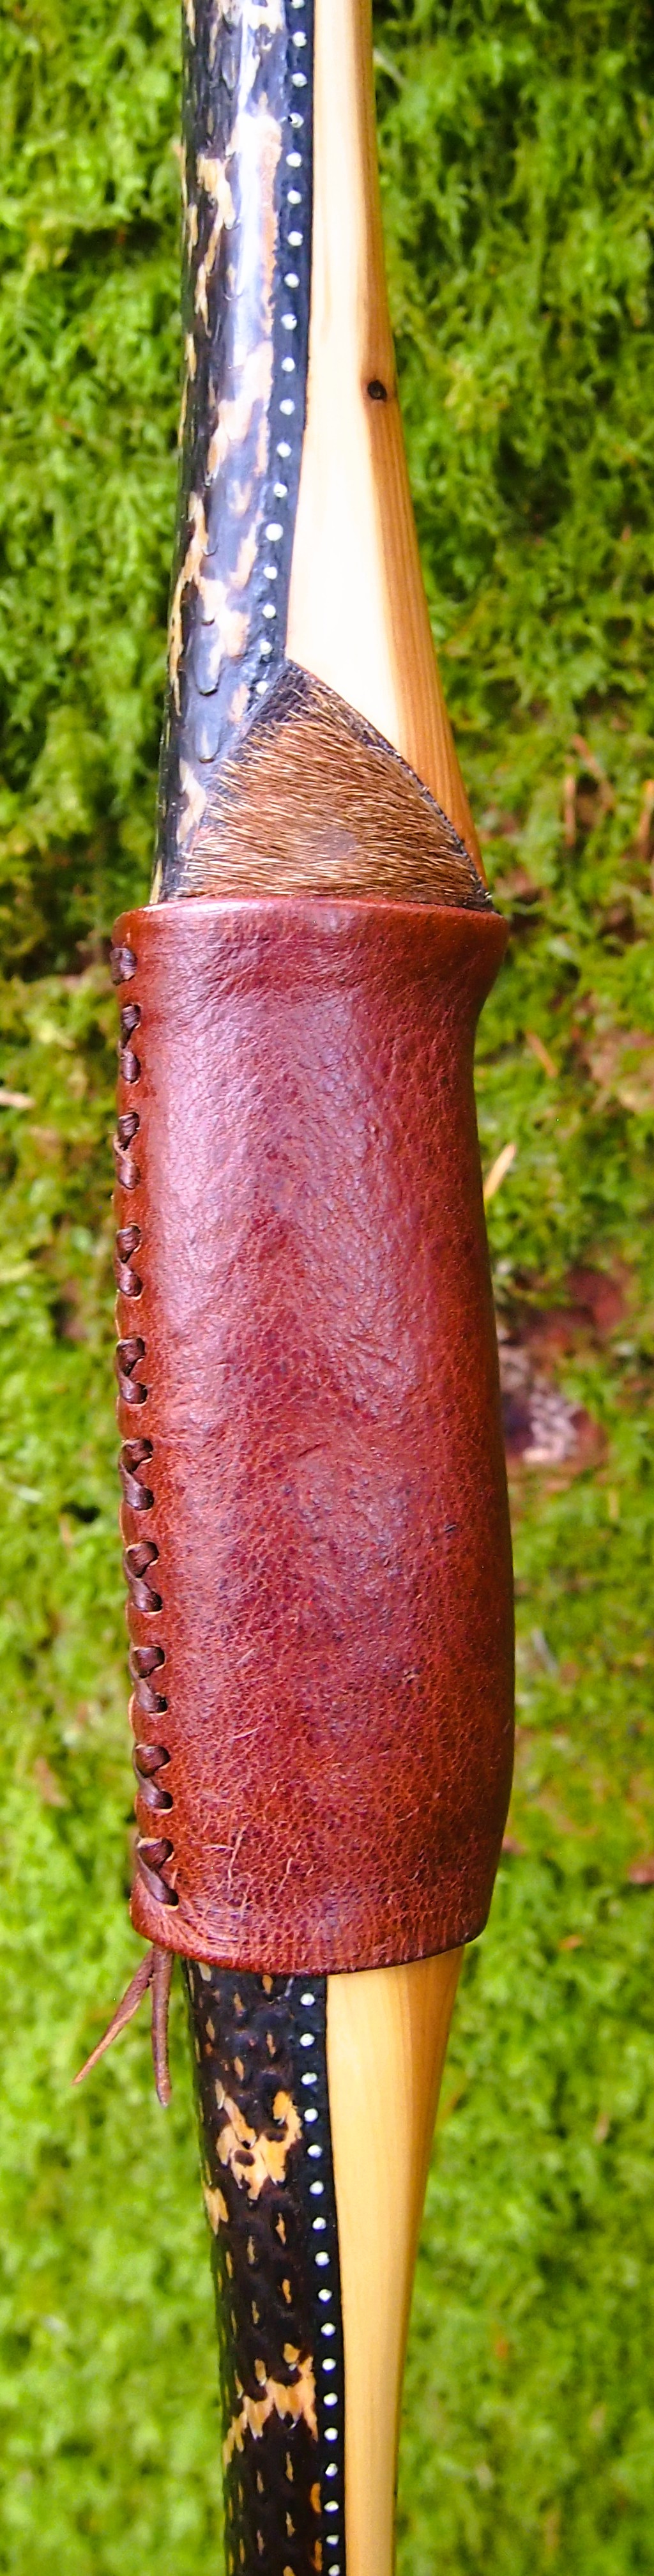
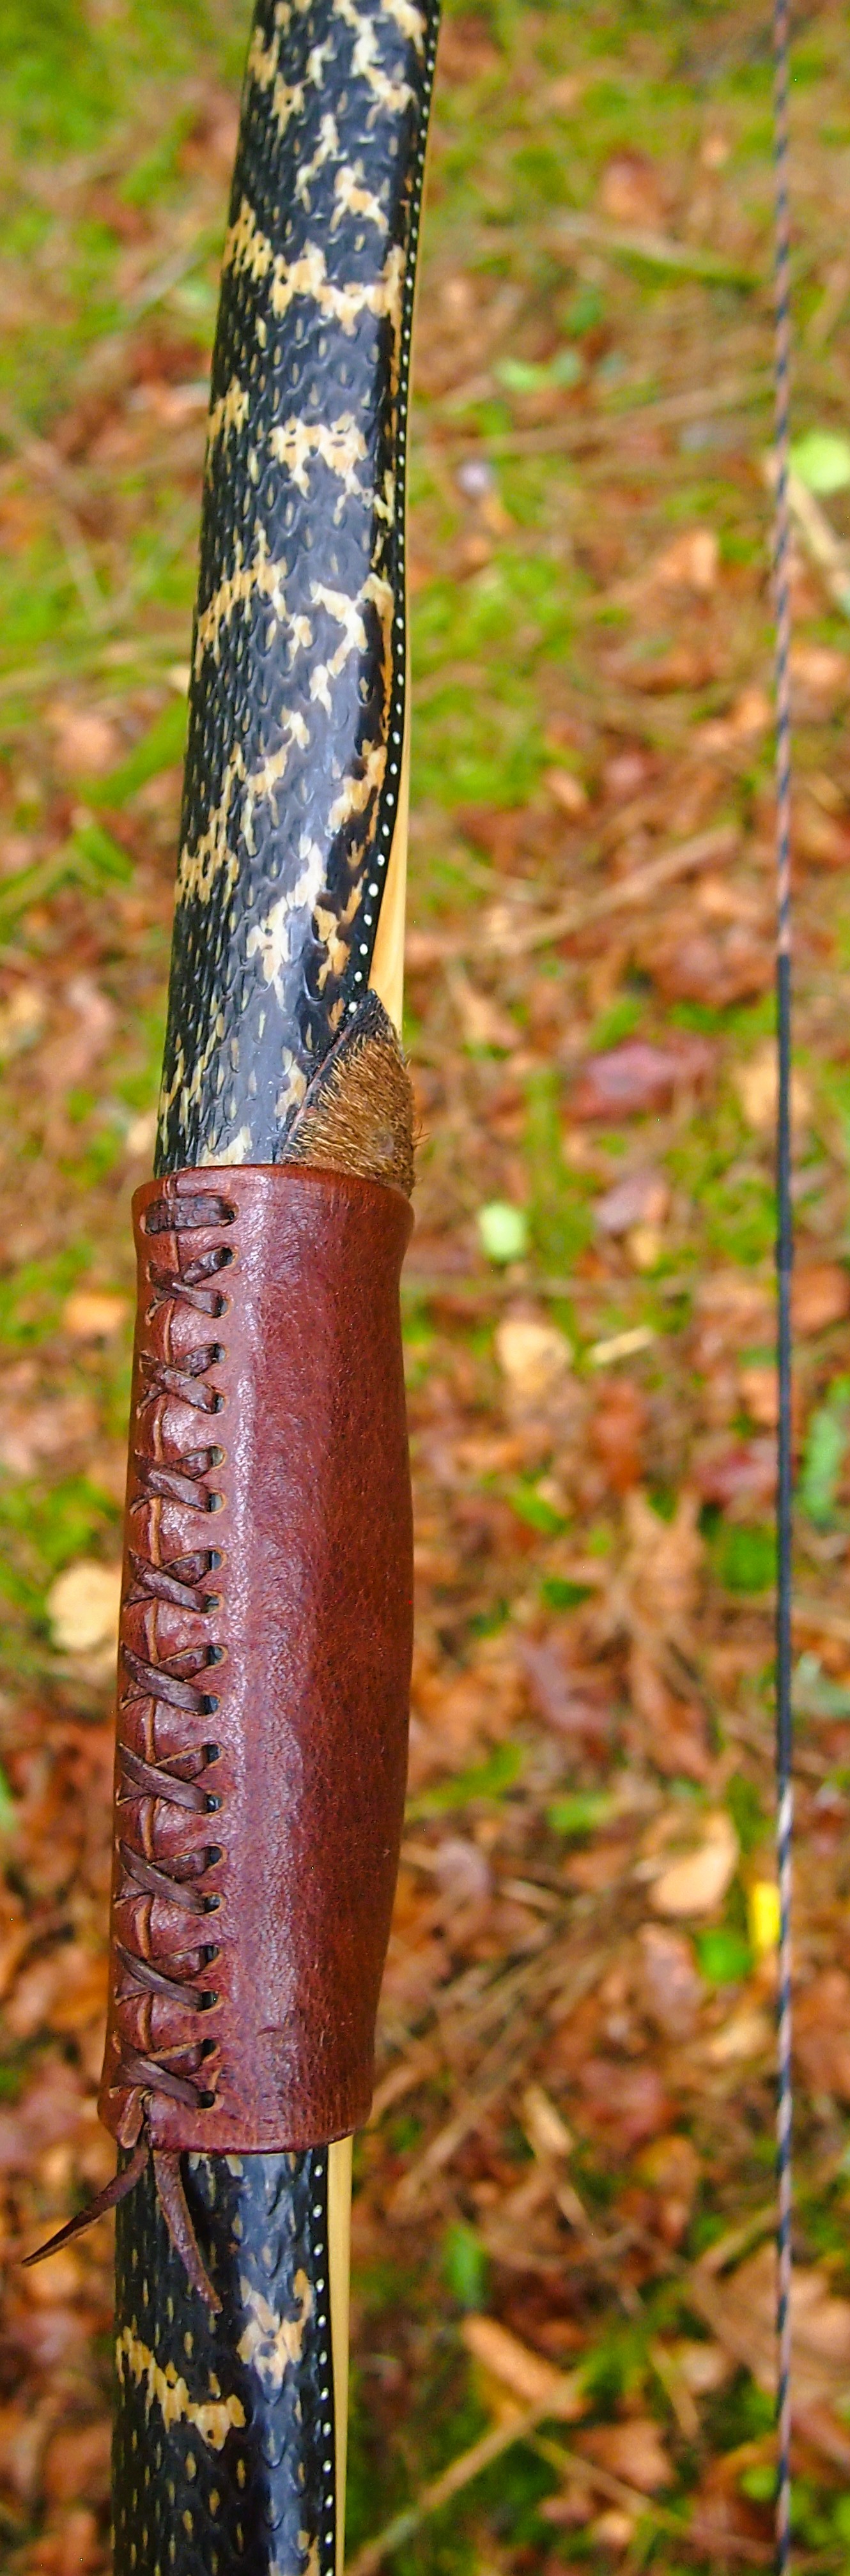
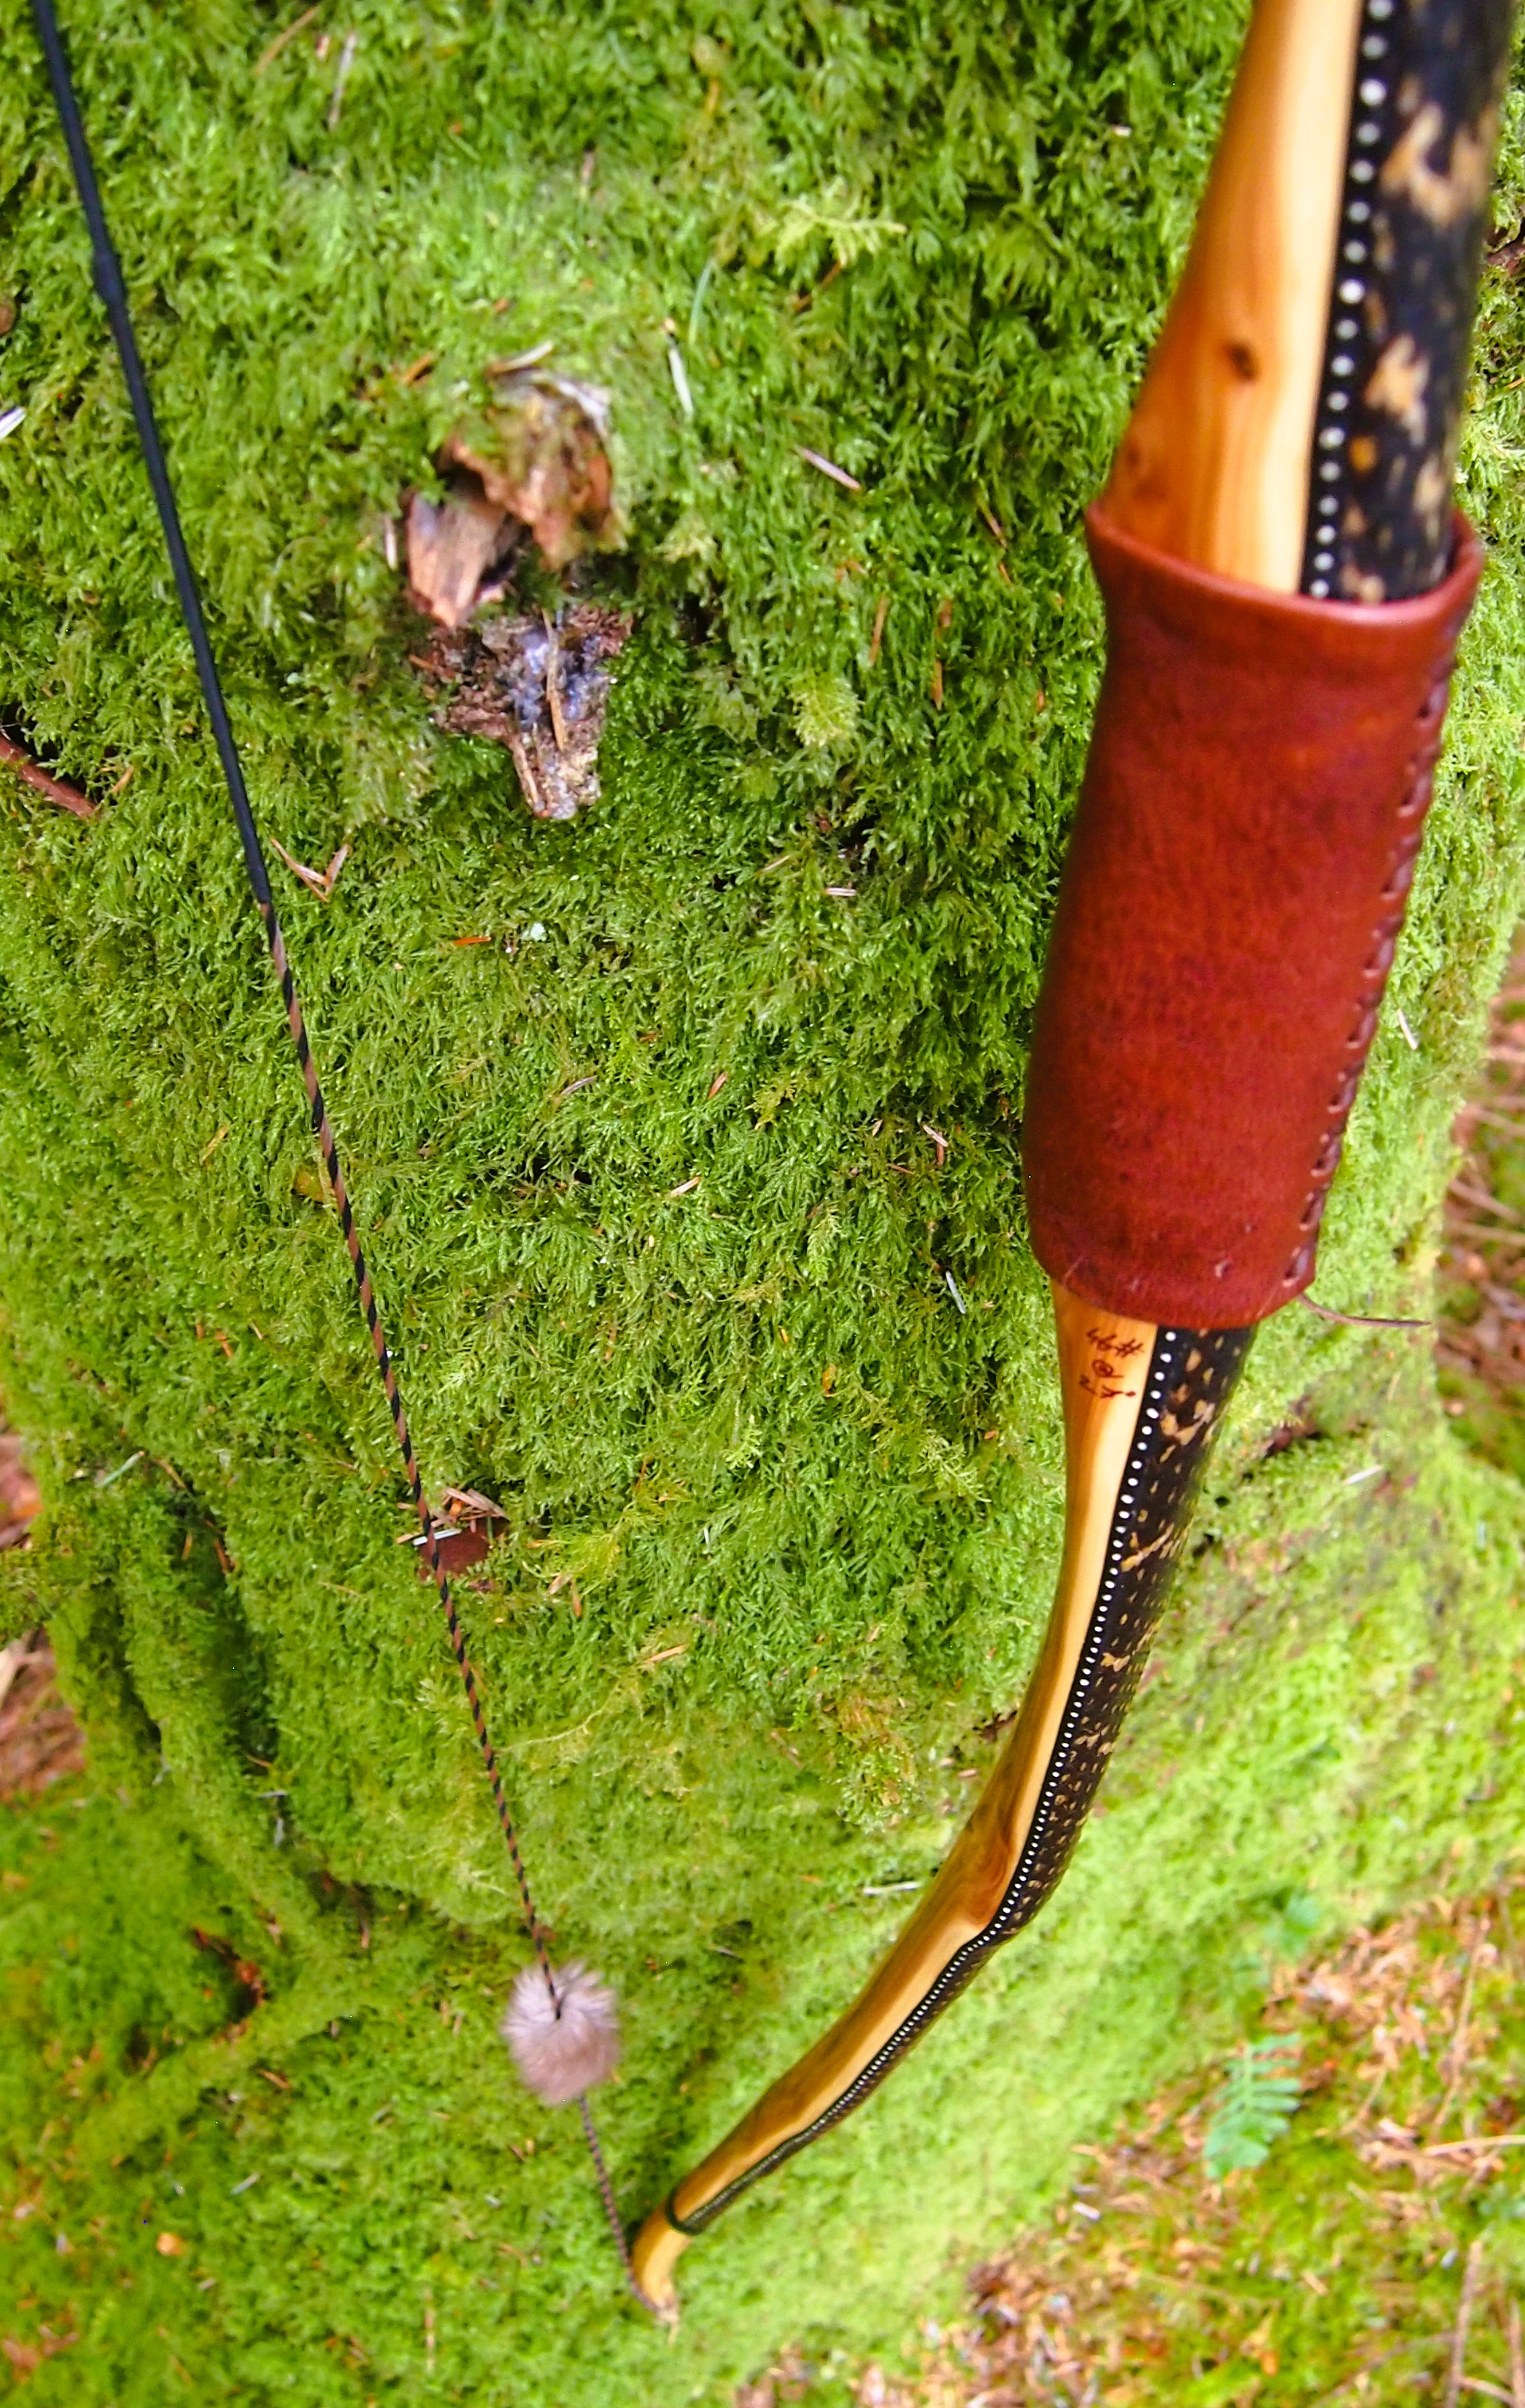
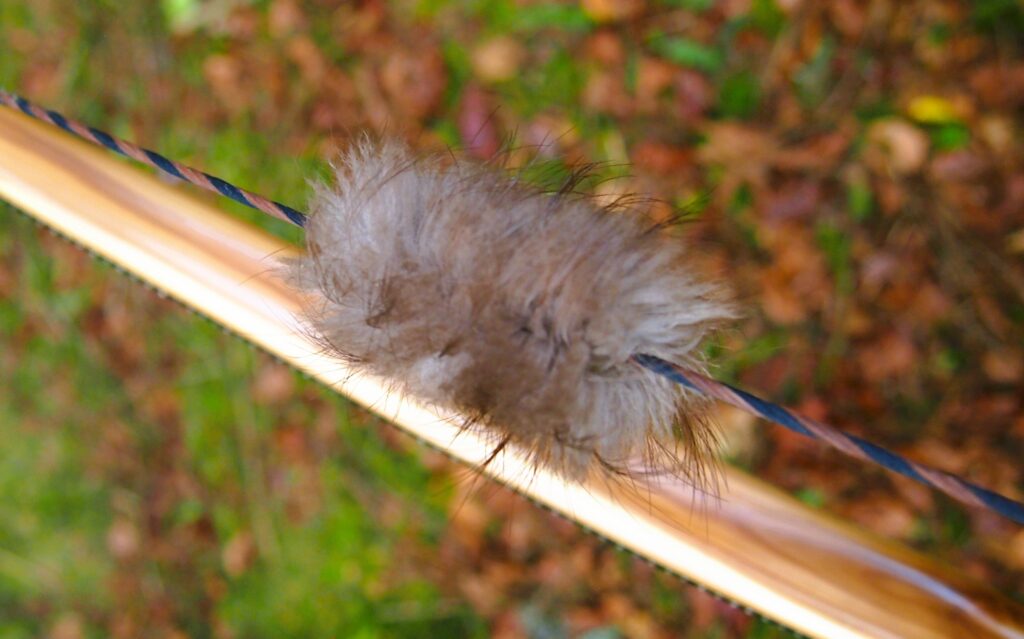
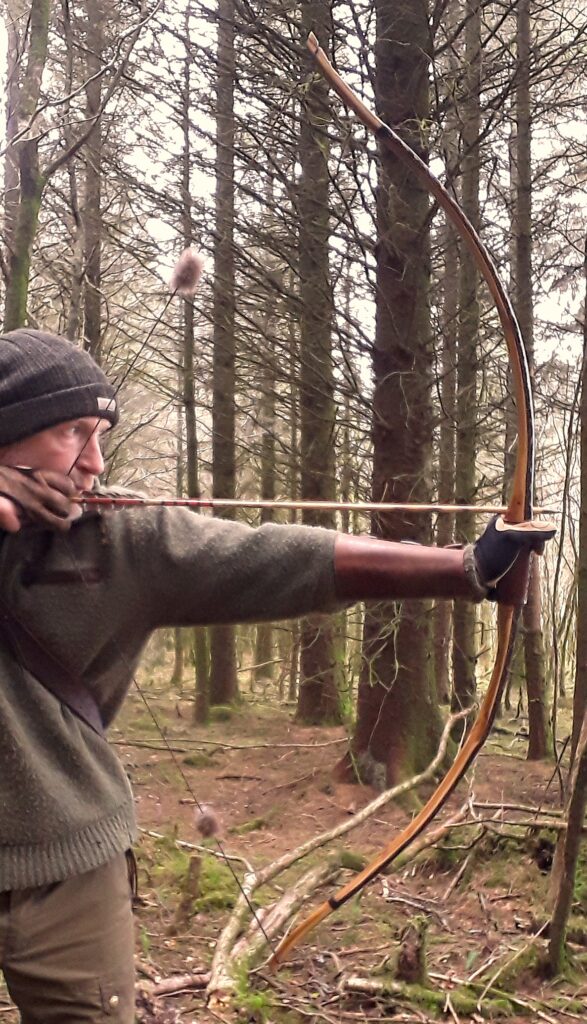
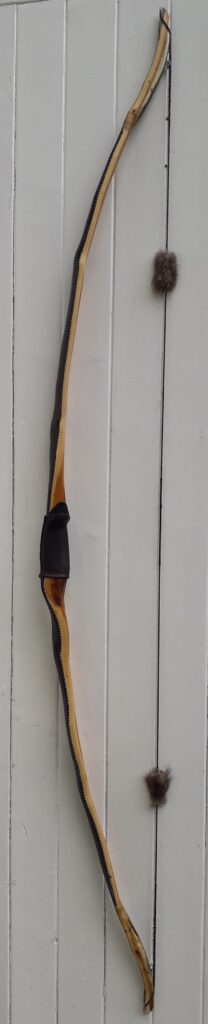
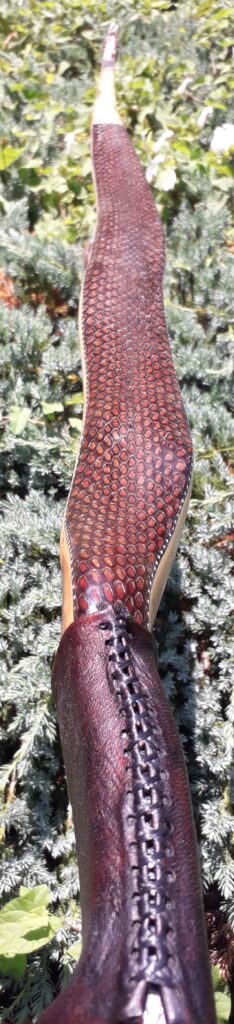
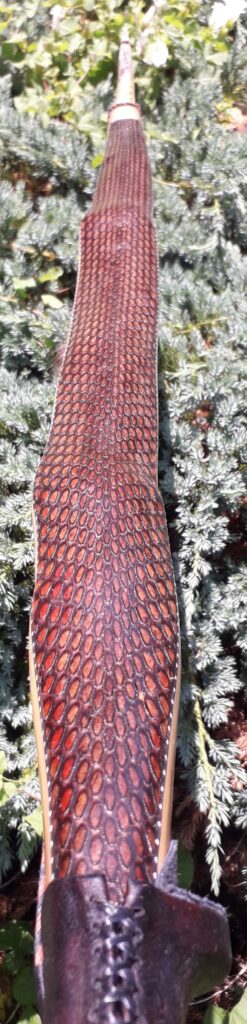
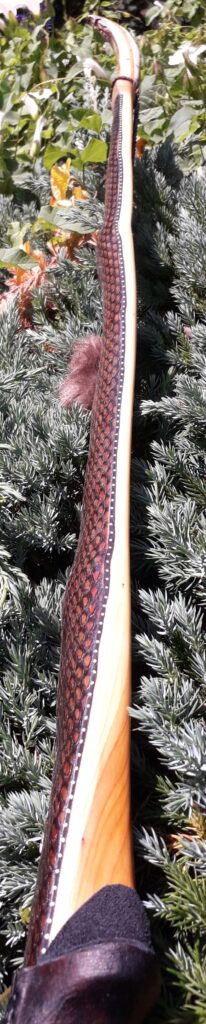
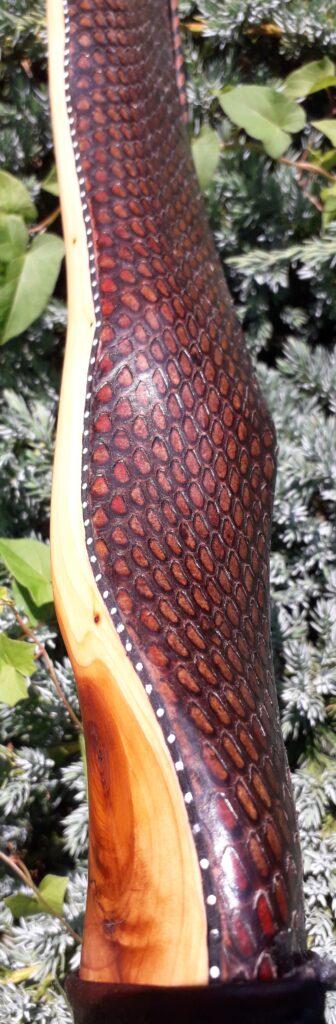
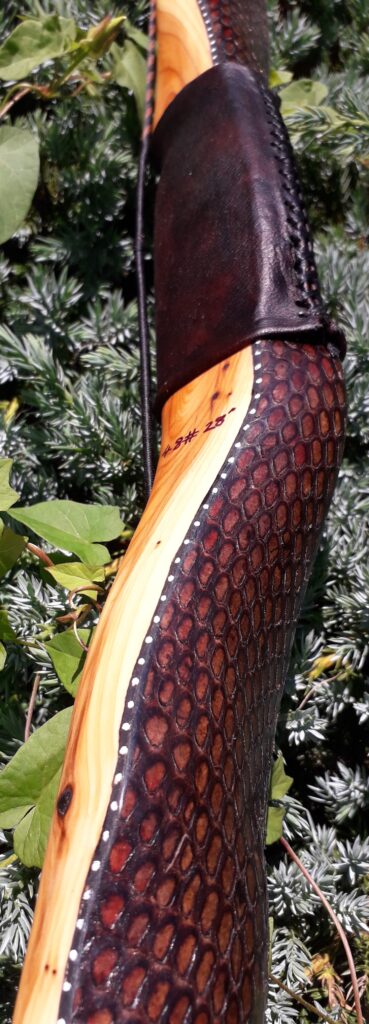
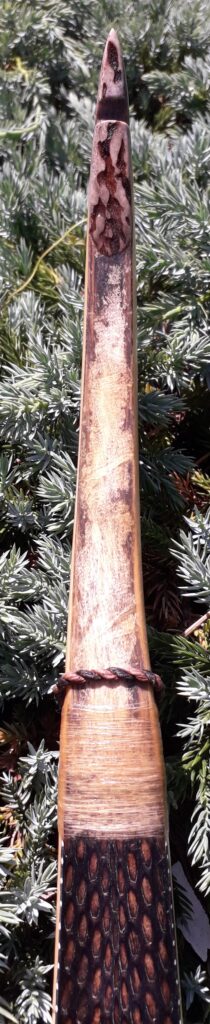
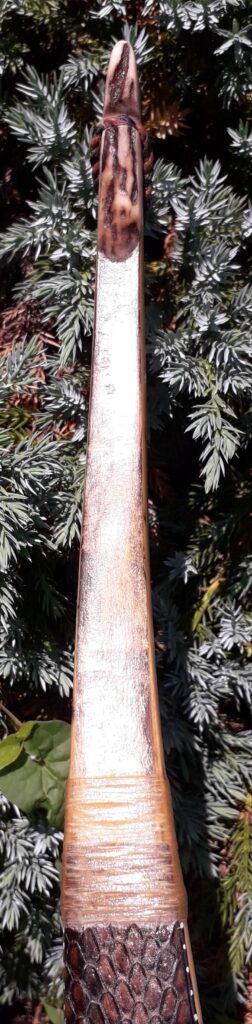
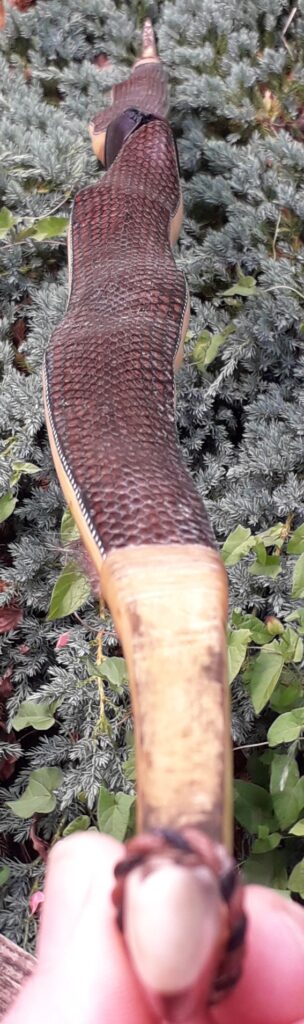
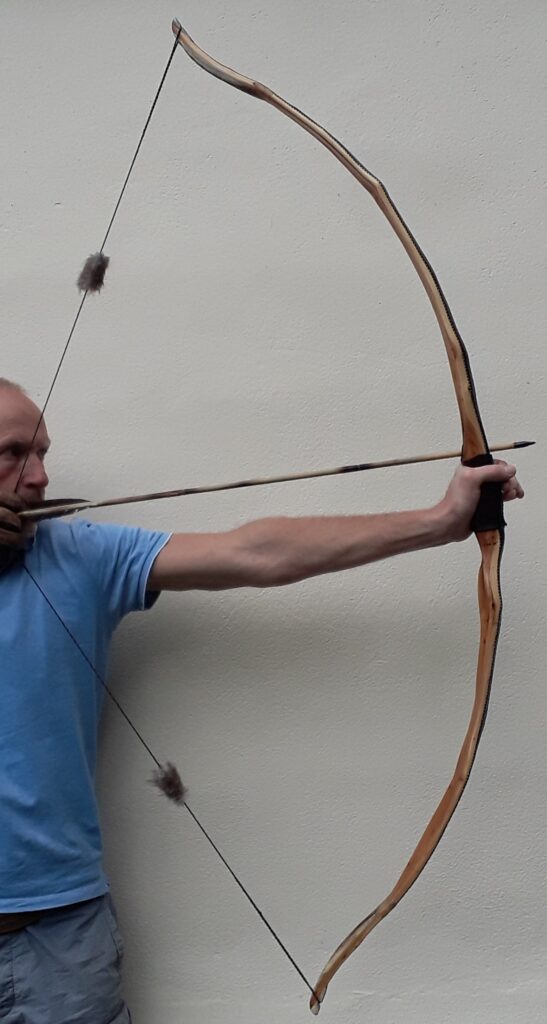
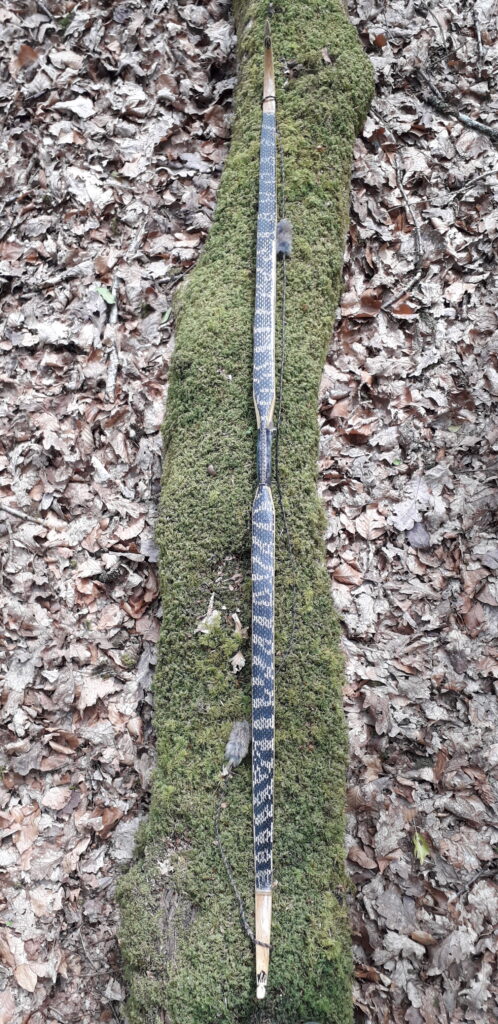
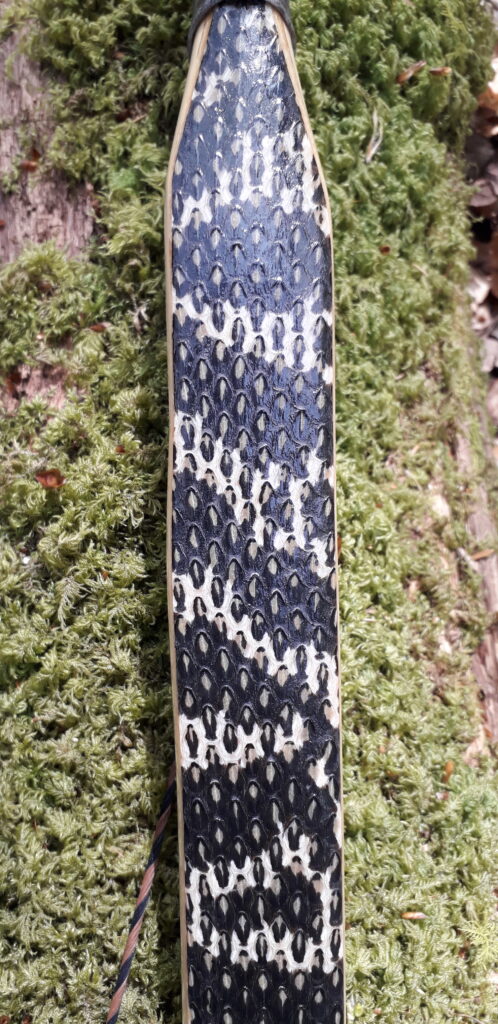
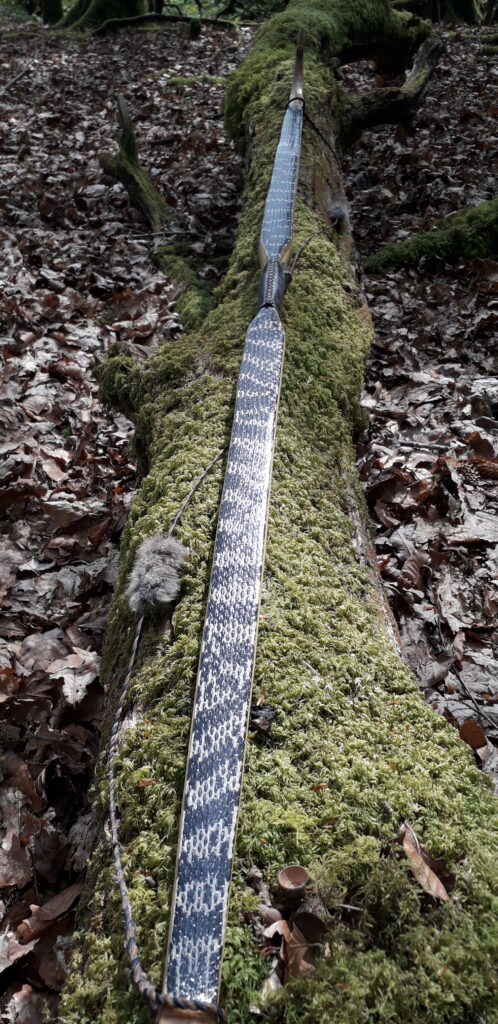
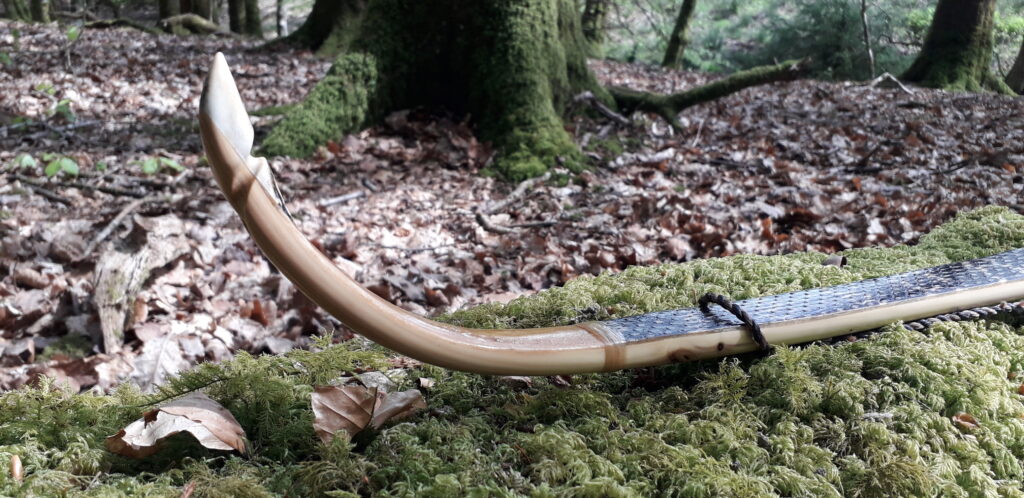
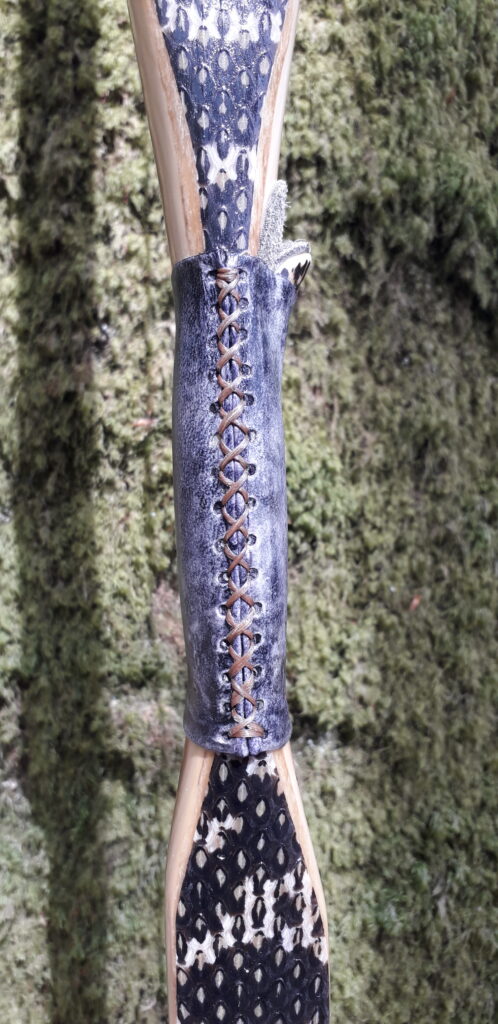
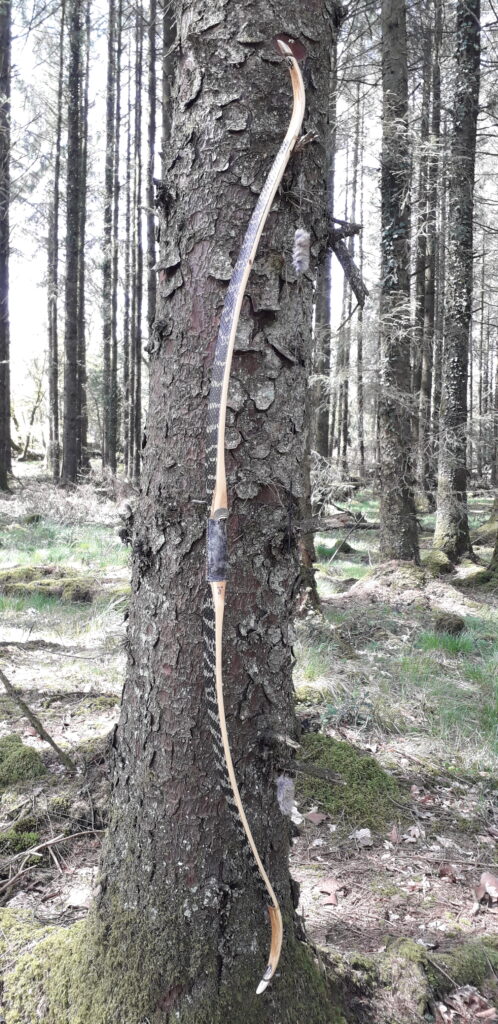
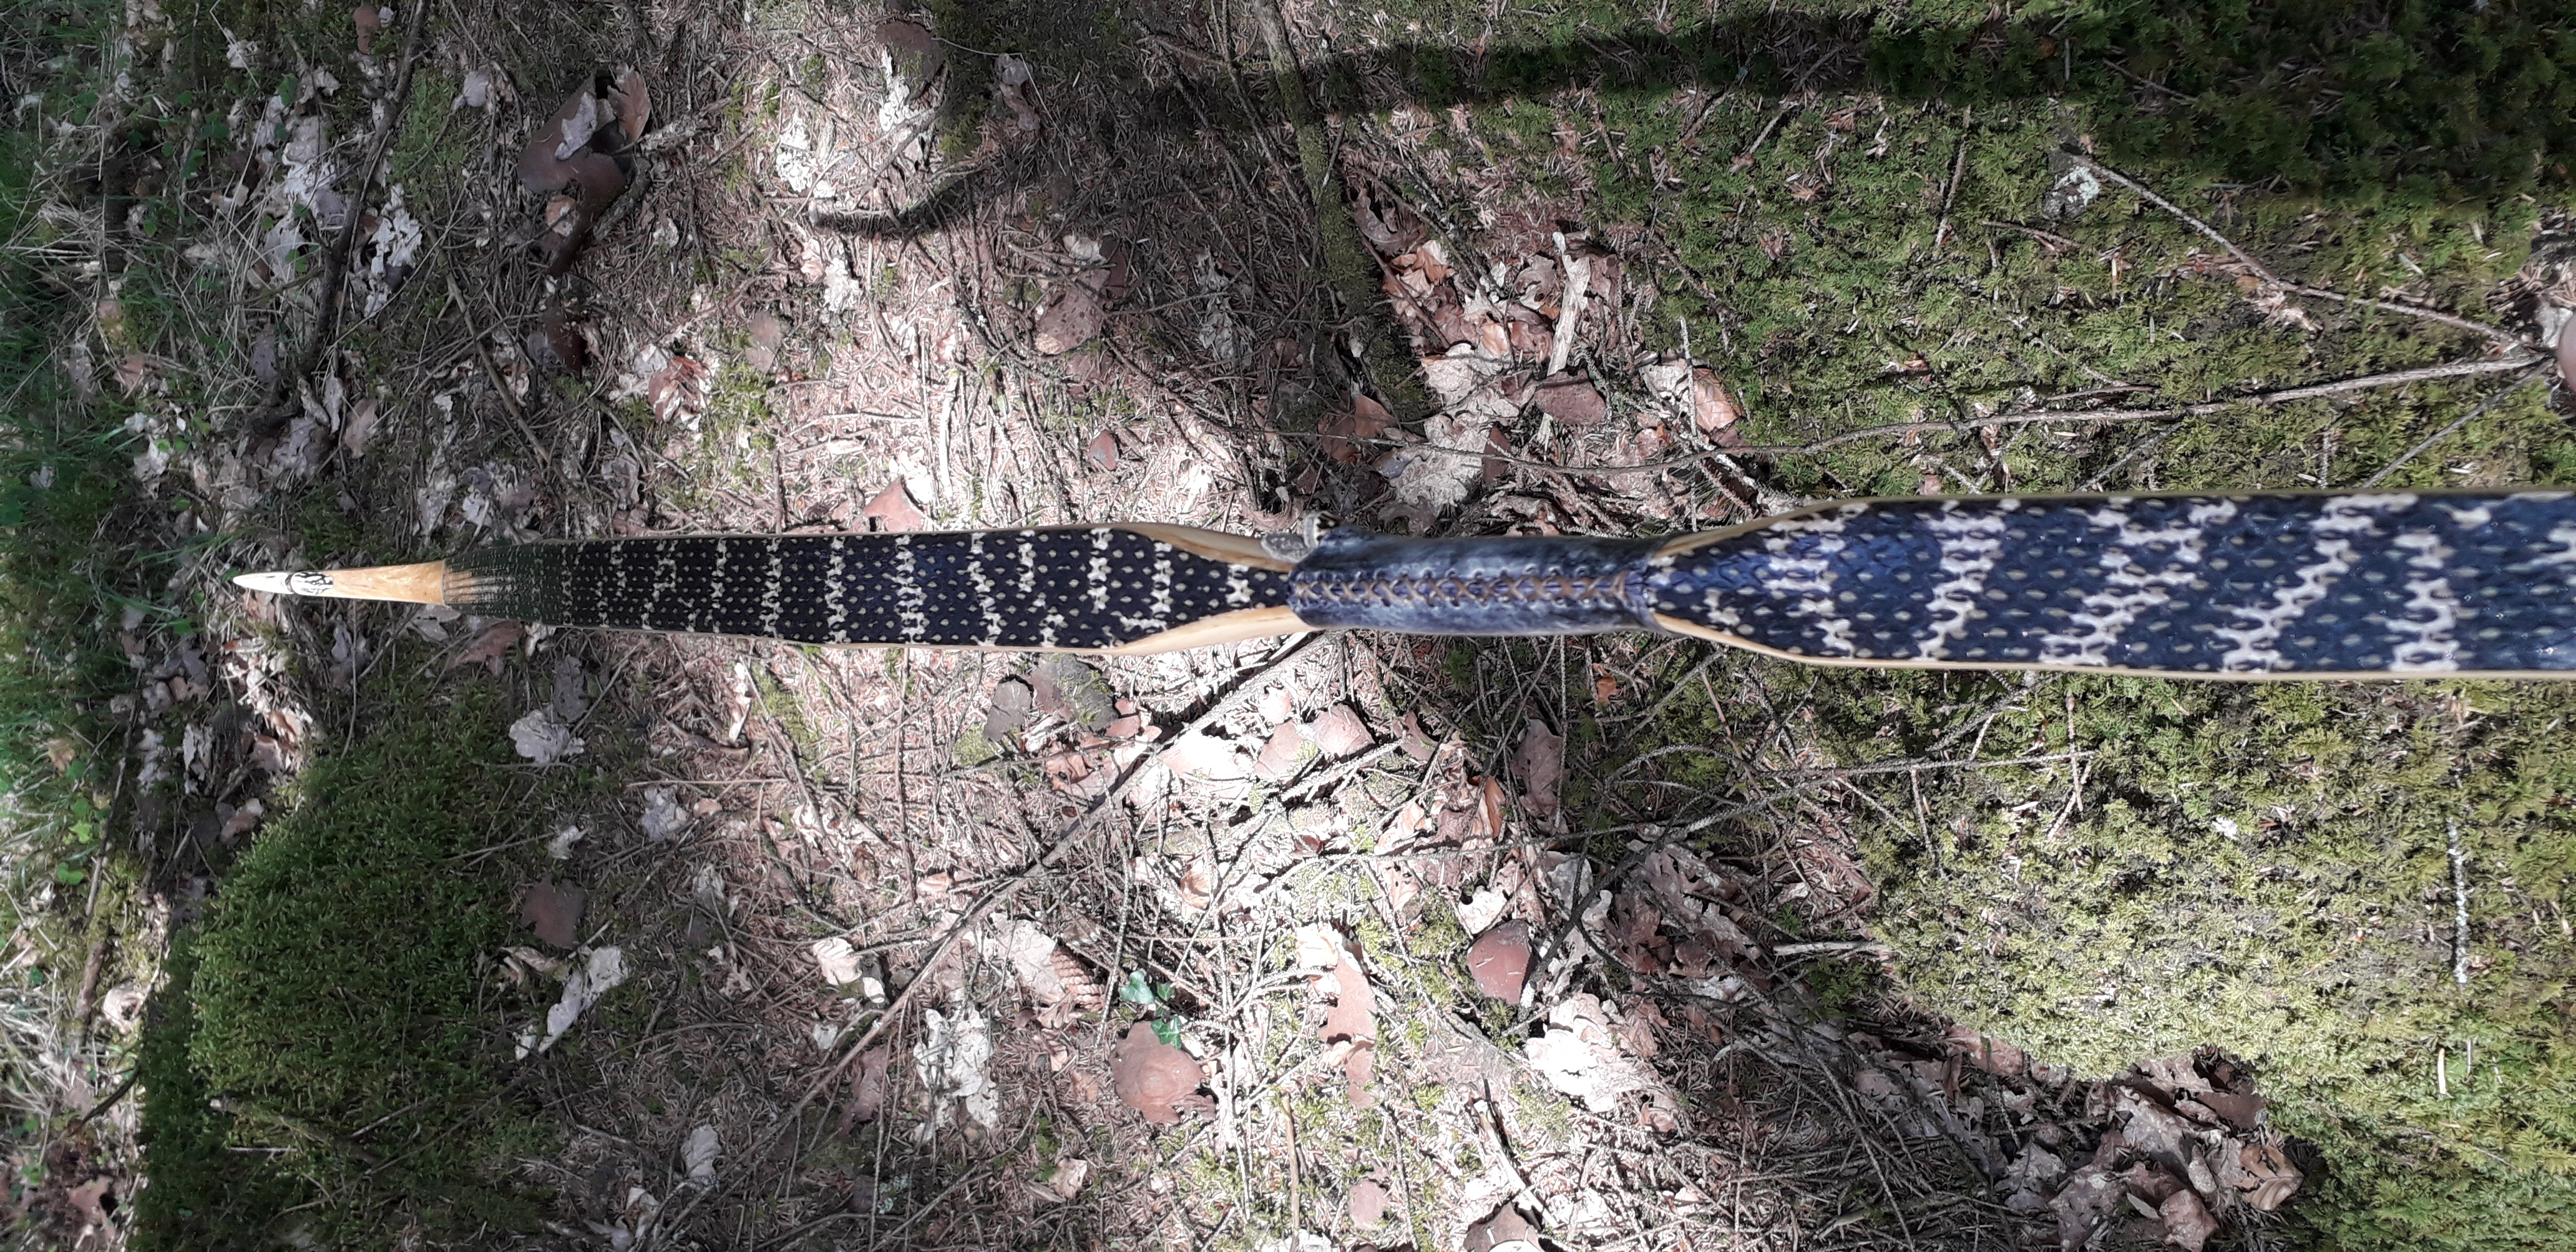
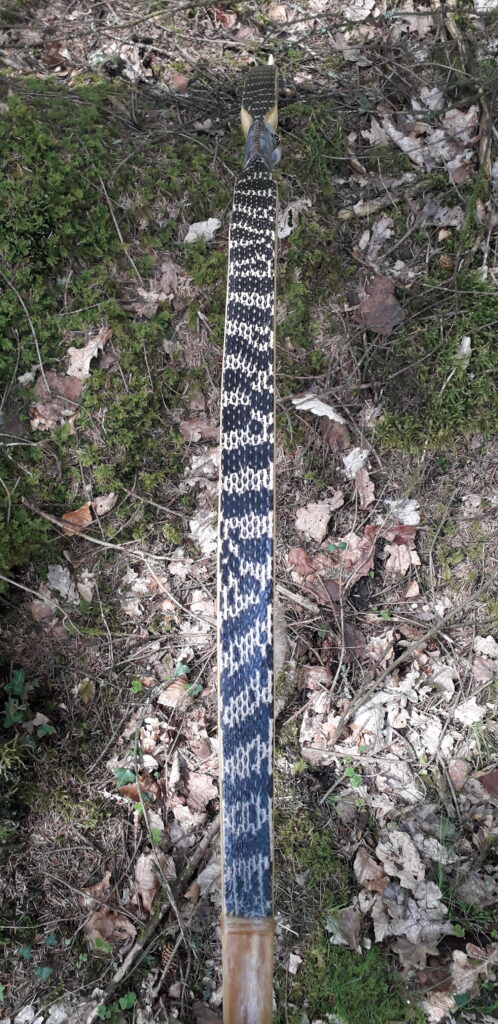
46# at 27″ was about right for a stave of this nature and she was pleasant to shoot too. So to finish her up I fitted her up with a pair of red deer antler tip overlays. To decorate the back I fitted a nice King Rat snake skin which I had squirreled away. As well as looking quite cool, I also like that snake skins are pretty water resistant and afford a sinew backing quite a bit of extra protection from water/humidity ingress, which is always a bonus in a humid country like ours!

This snake skin wasn’t long enough to run tip to tip so I left the tips bare to show off the sinew backing. The transition from the snake skin to the sinew at the tips was wrapped with deer back strap sinew to tidy up the termination of the snake skin. The snake skin and the sinew wrappings were then edged with a black paint made from my local black earth pigment (Bideblack) mixed with hide glue. And the cream coloured dots added to the black painted boarder were made from mixing hide glue with deer bone dust.

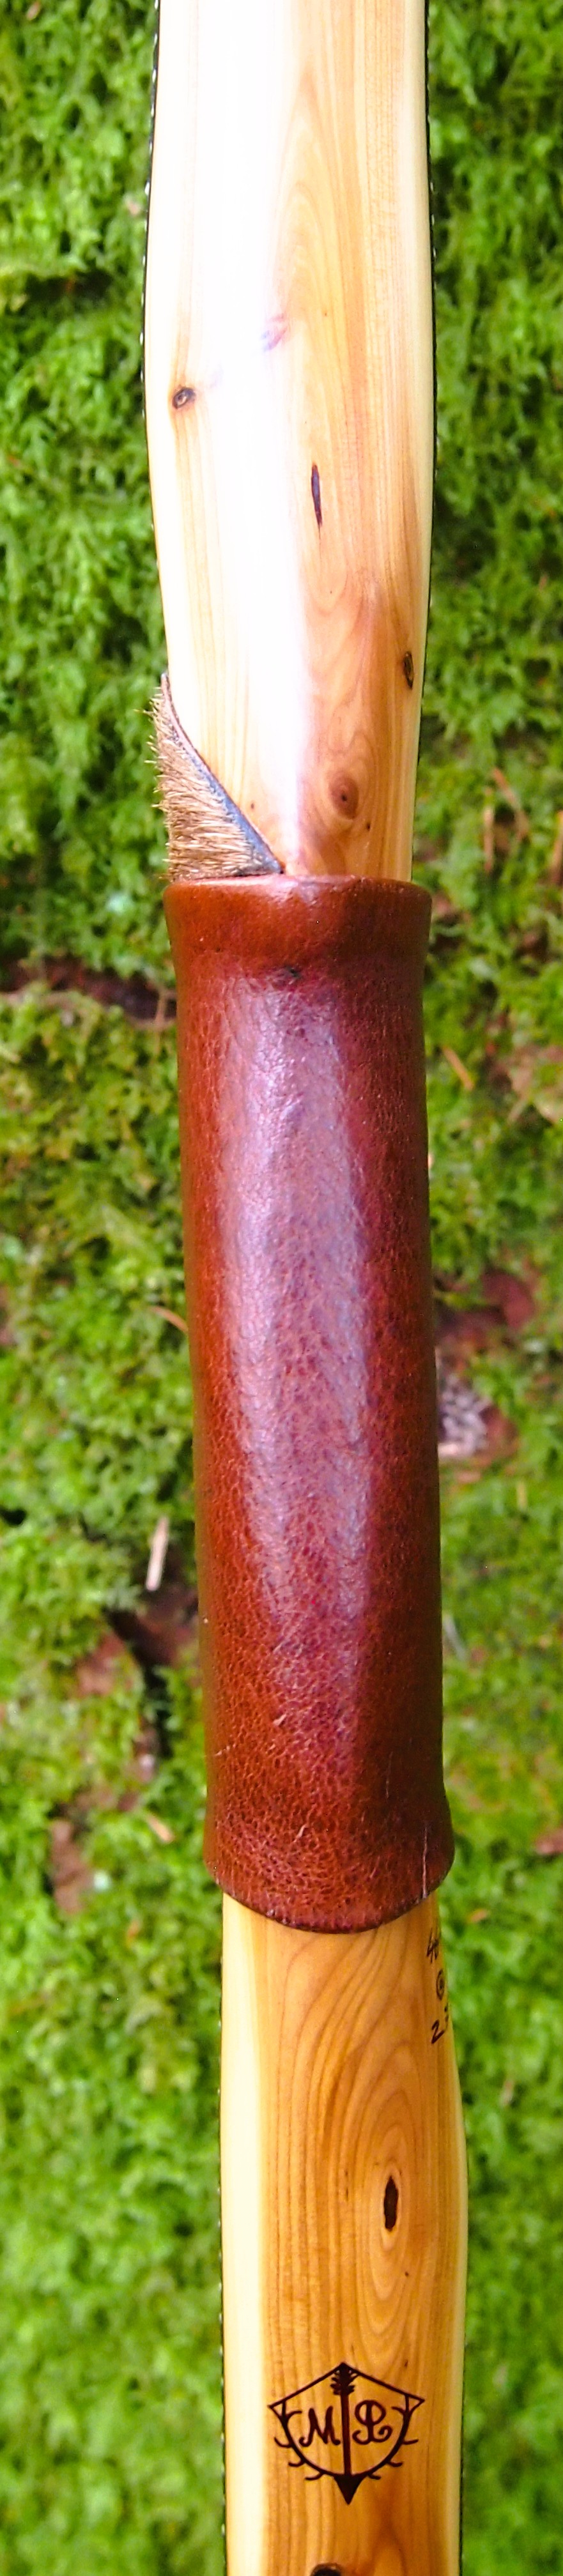
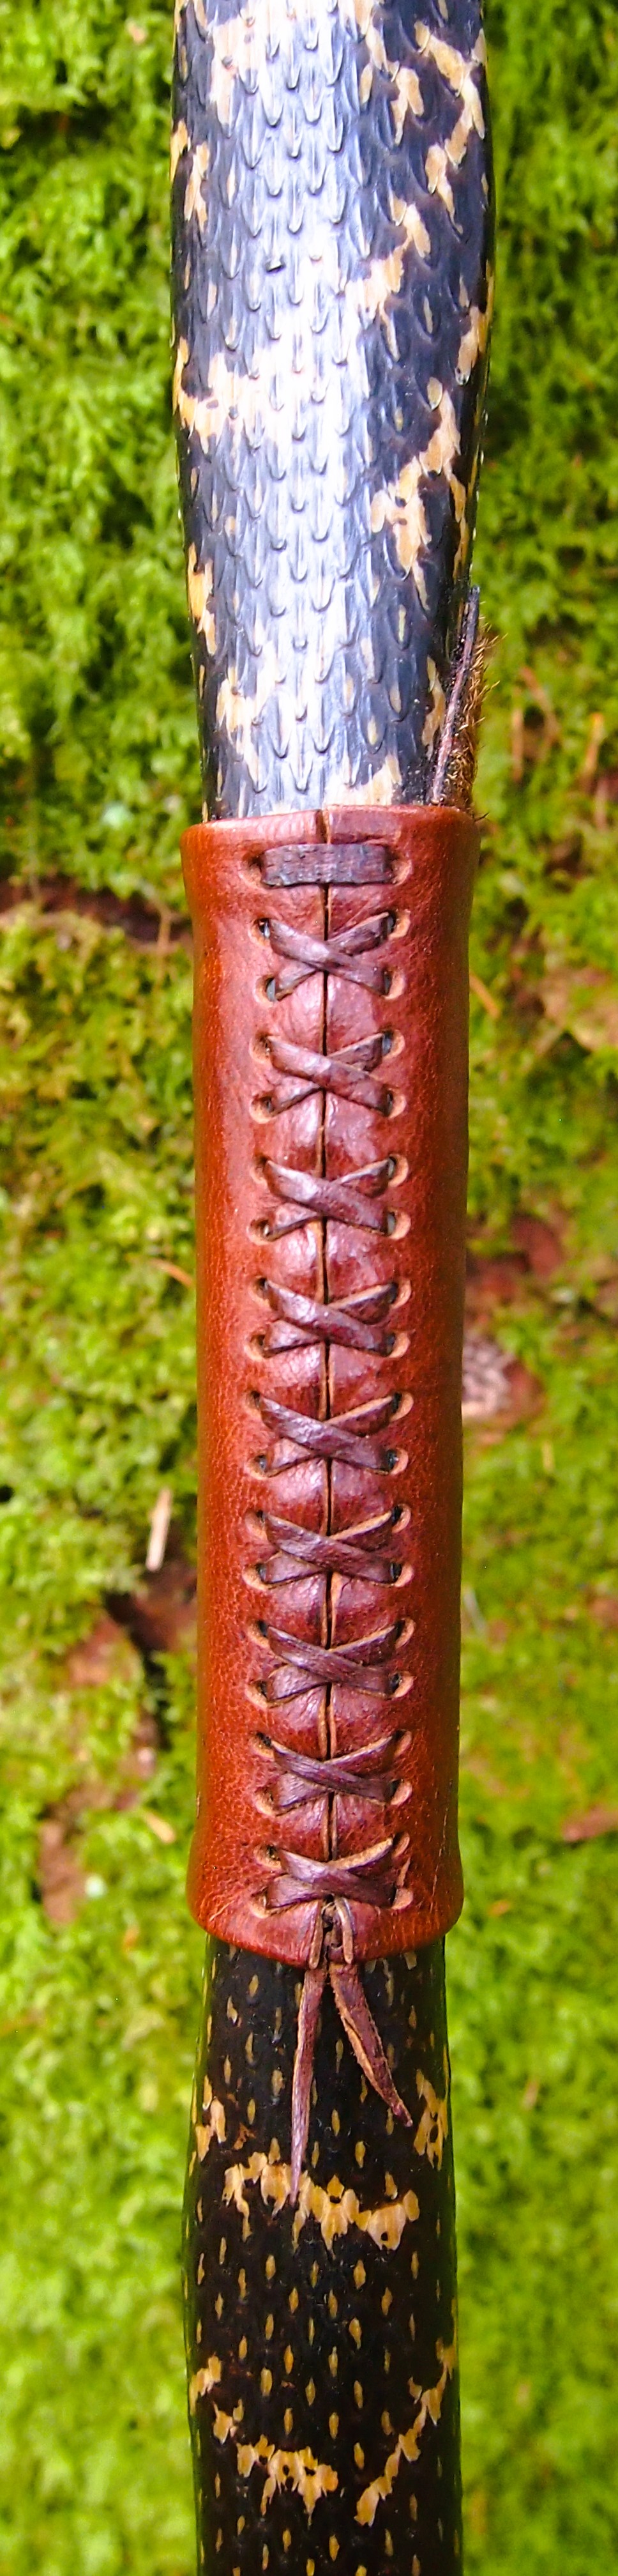
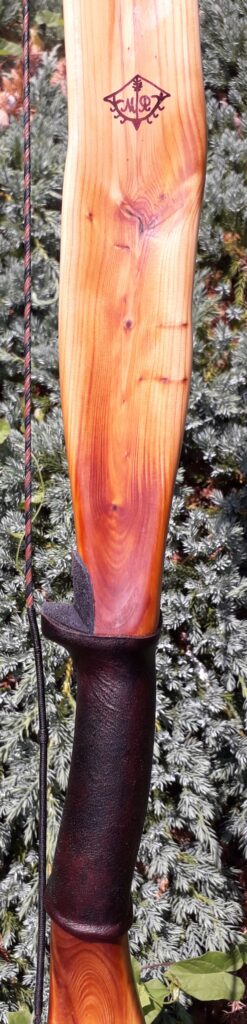
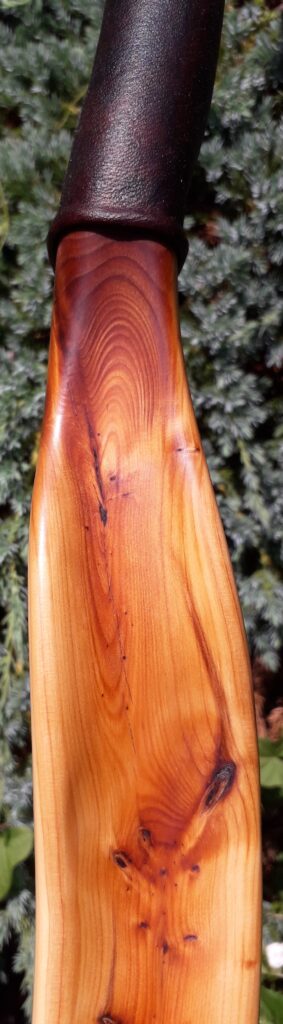
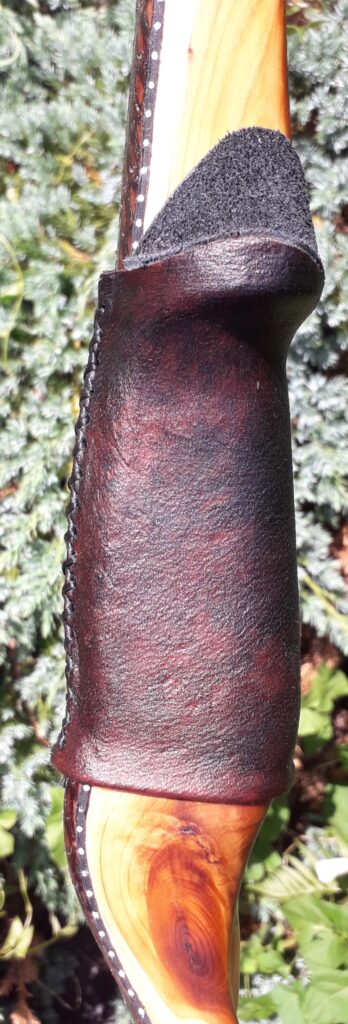
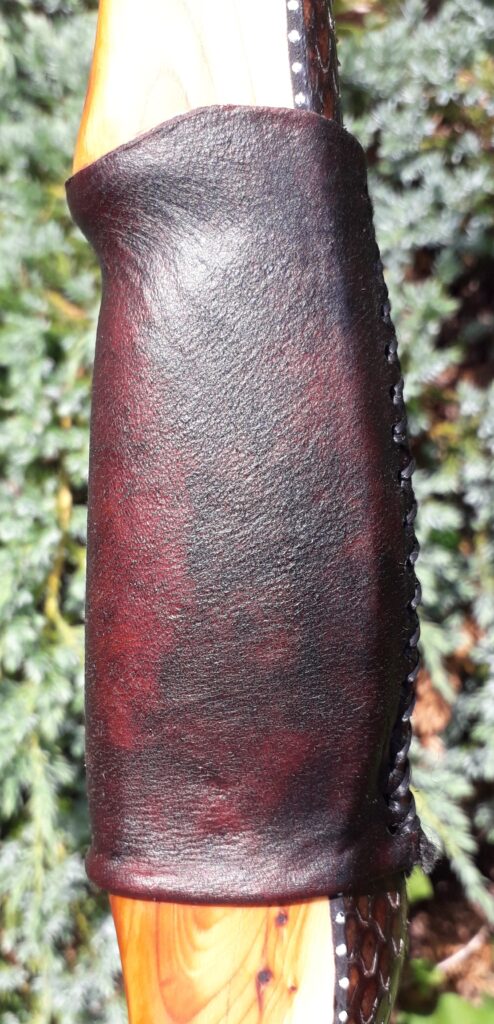
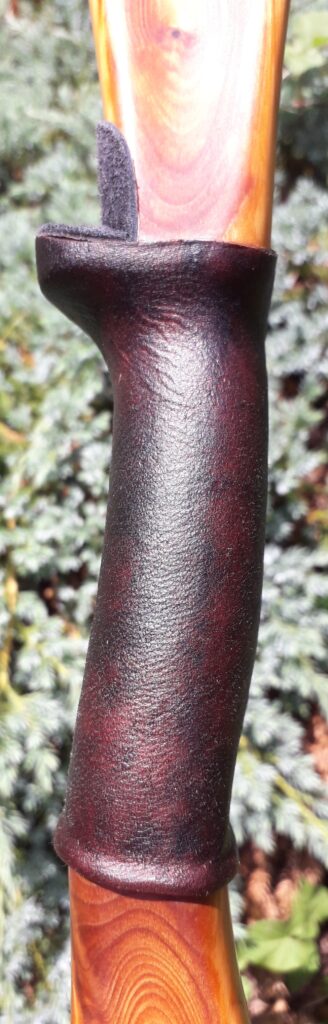
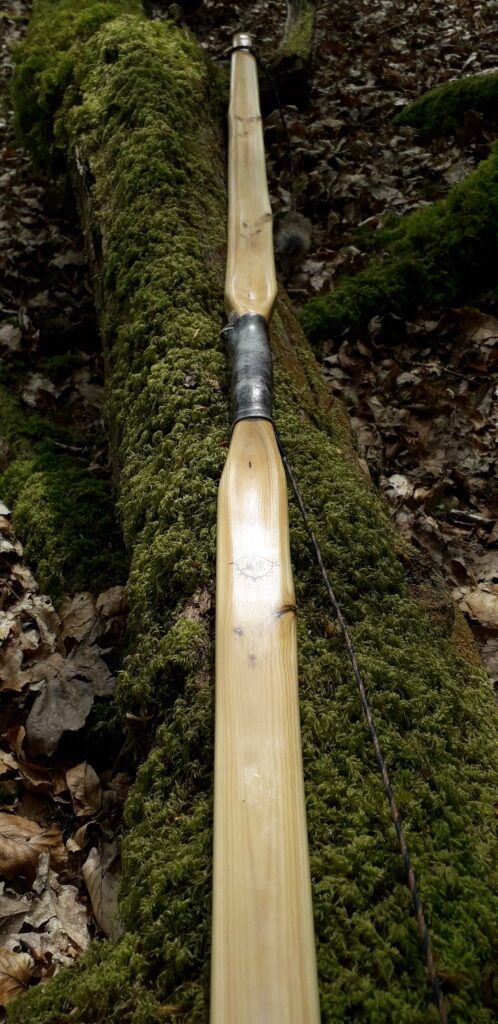
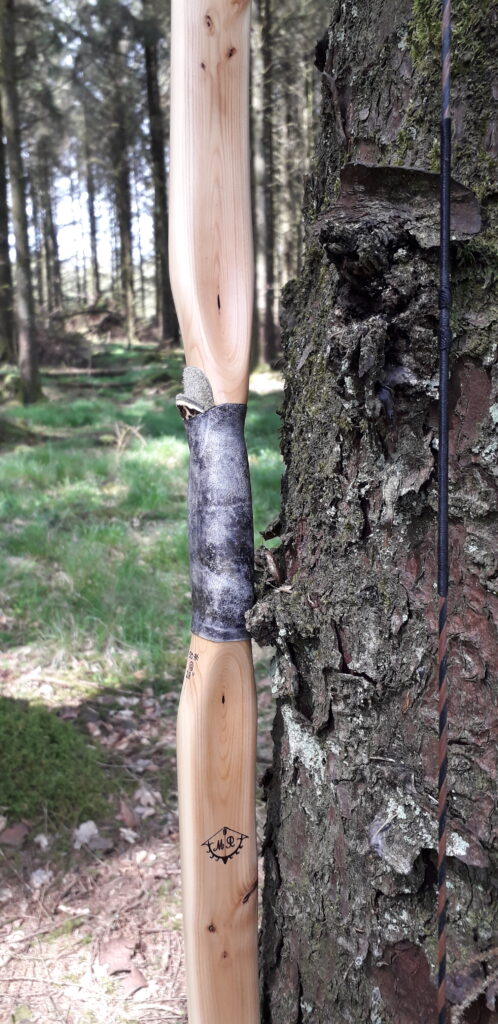
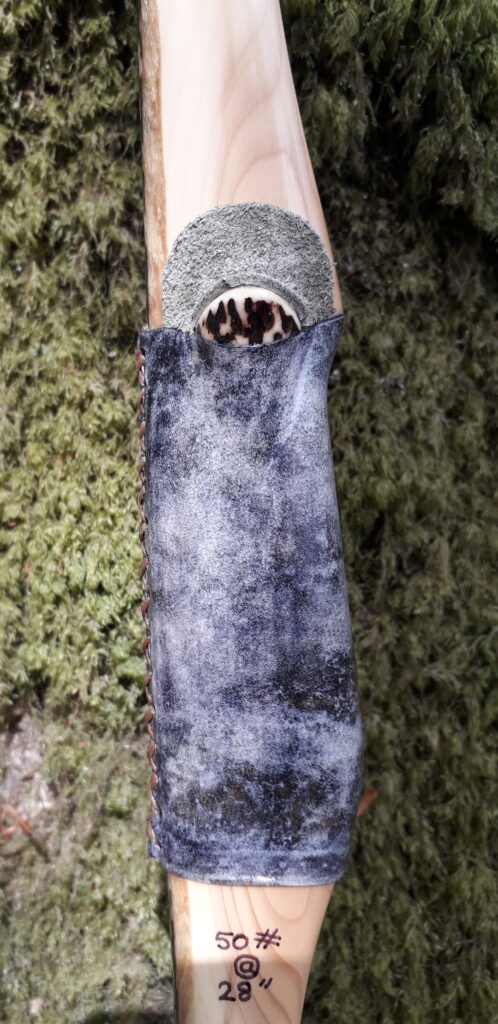
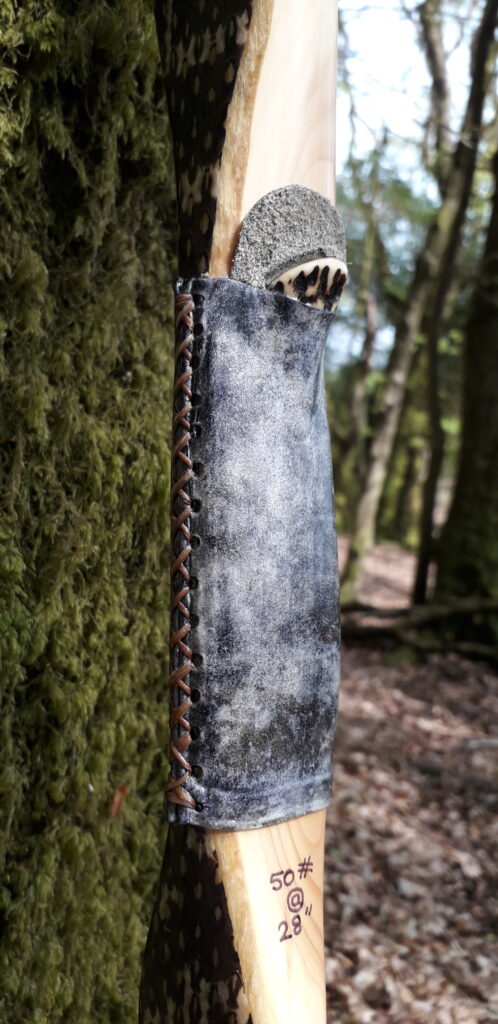
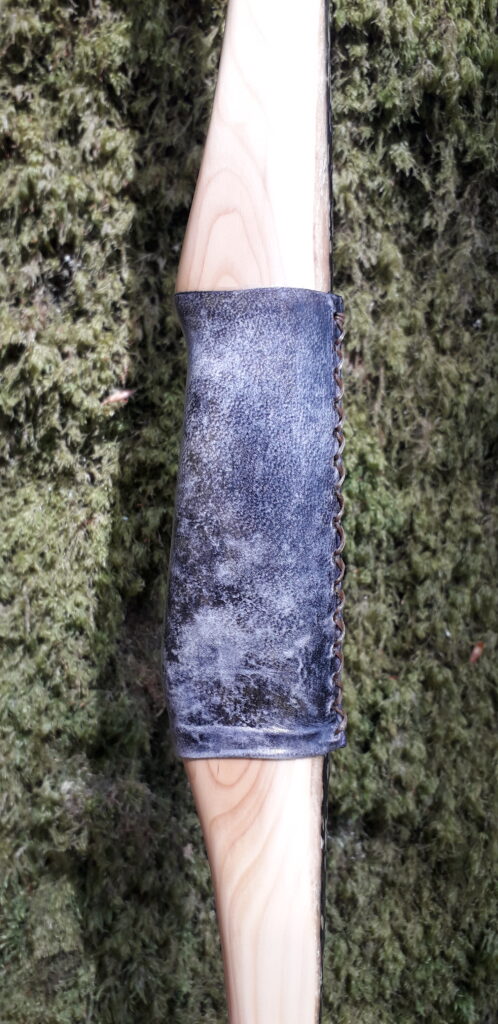
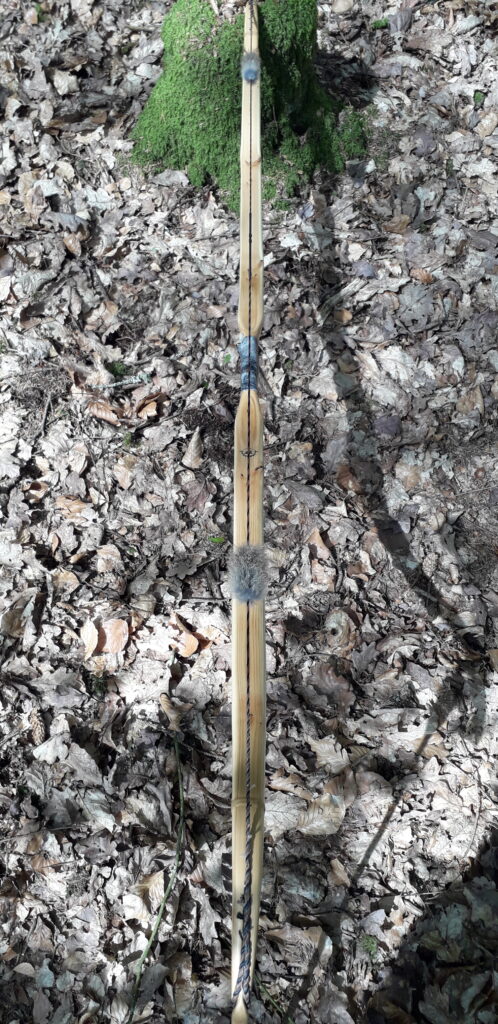
The bow was finish and sealed thoroughly with 8 coats of danish oil made satin in appearance through a final pumice polish buffed down with wax paste. I opted to cover the slightly contoured handle with a nice piece of my home bark tanned red deer leather in a nice natural red tan colour, laced up with some leather lace cut from a roe deer hide I bark tanned last year.

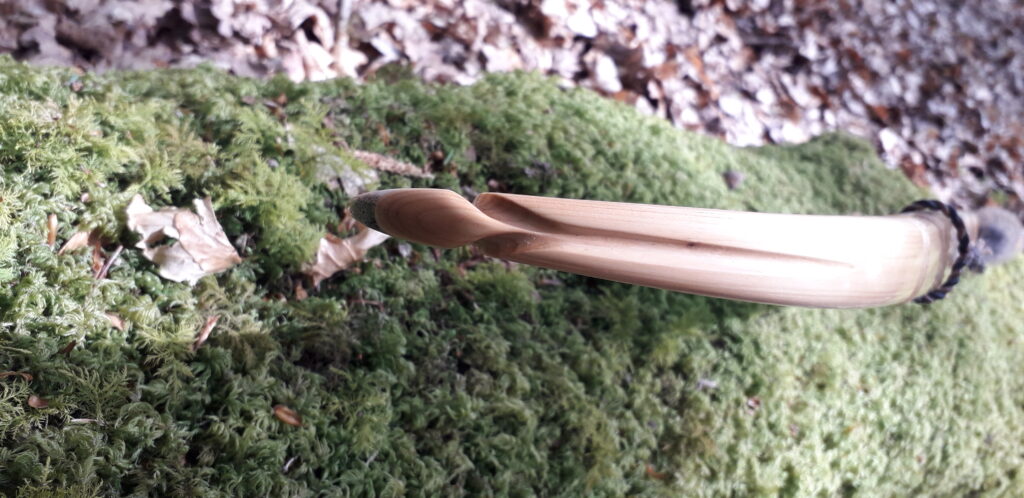
The arrow pass is a piece of red deer shin leather which I tanned with some of the hair still on. It’s a bit like a rustic primitive version of the calves hair leather pieces you can buy from archery shops, only cooler!

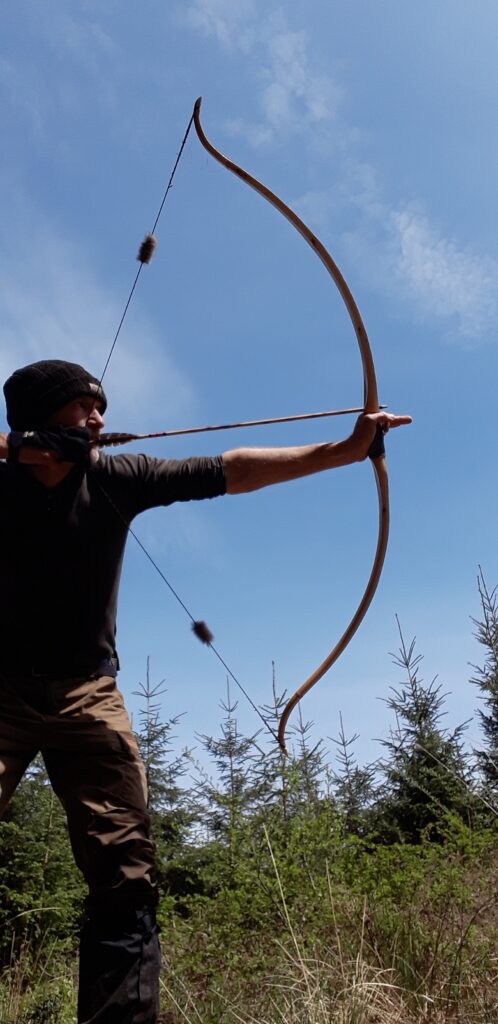
I really enjoyed building this bow and found her to be really pleasurable to shoot. The chrono consistently recorded speeds of around 150ft/sec from a 400 grain arrow which is quite reasonable for a character branch stave.

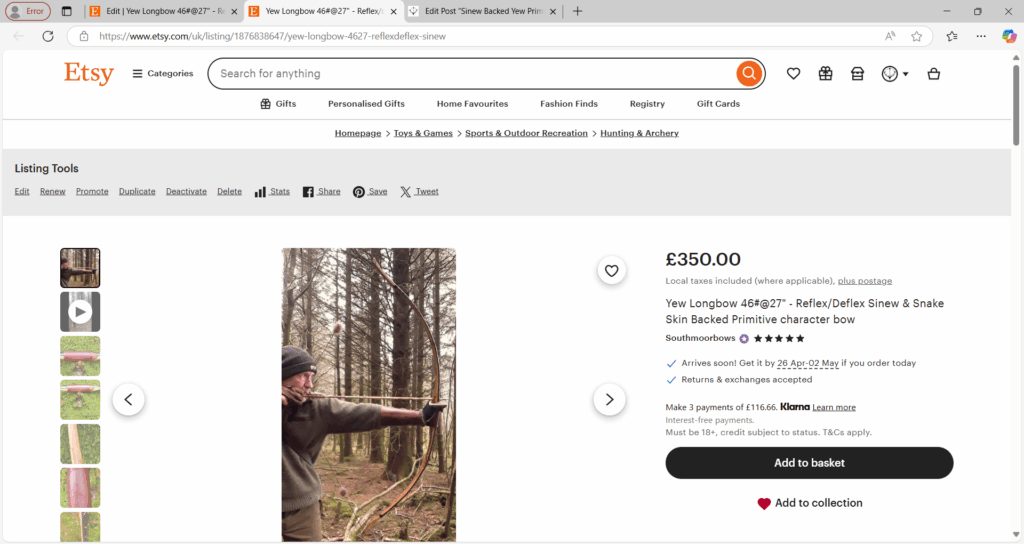
The balanced tiller and flicked low mass tips helped mitigate any hand shock and the slightly contoured handle made for a nice comfortable grip. I can imagine this bow giving someone many years of enjoyable and reliable shooting so will be offering this bow for sale in my Southmoor Bows Etsy shop, the listing can be found here: Sinew and Snake Skin Backed Primitive Yew R&D Longbow 4627 – Etsy UK

Specifics are as follows:
Draw Weight: 46lbs at 27”
Mass: 725 grams
Length NTN: 60”
Width: 1 3/8” at widest part
Tips: 5” working 3/8” wide at the nocks.
Back: Moderately crowned with undulations with a pyramidal face profile.
Belly Profile: Working limb sections D shaped, transitioning at the tips to ridged shaped cross section.
Tiller: Elliptical. 1/8” positive
Brace height: 5 1/2″

Here she is, hope you enjoy!

Snake Skin Rawhide Backed Yew Character Longbow 48#@28″ (Bow No. 12)

A mate of mine gave me this stave ages ago and said ” I bet you cant make a bow out of that!” To be honest, on first inspections I agreed with him!! But on closer examination, in principle, this 4-5″ diameter yew branch had plenty of potential. For a start, the best face (which had been the top of the branch as it grew of the tree) was fairly clean of knots, bar a few wispy bits of epicormic growth. With this face showing promise I inspected the cut ends of this 74″ branch. The sapwood/heartwood ratio looked good with about 8mm of sapwood showing. The heartwood was a beautiful dark orange and densely ringed. The pith was clearly biased towards the face I could use, which was to be expected given that the top of a branch typically has the thinner growth rings, and this was certainly the case with this particular branch.

The thinner end of the branch had a big drying split extending several inches into the usable part of the branch so it was obvious that this section would end up as an offcut. That would leave me with around 65″ of decent stave to work with. The branch was certainly undulating along it’s entire length and very slightly reflexed along what would be both limb sections, however the section which would make for the handle had a significant roll in it due to a massive knot on the belly side. This knot was going to require some thought to deal with. The large roll that this knot had produced was also presenting some deflex in what would be one of the handle fade areas, but only on one side. This would need to be either excepted as character and incorporated into the bow design, or possibly heated out to some extent.

This knot was presenting another problem too as it was causing a significant side bend which would throw the string alignment out of centre by a good couple of inches. The likely hood of this misalignment being removed completely was low since I could see that this large knotted section would only bend through substantial steam heating. To over cook an already cracked knot like this would invariable result in a massive crack right in the lower fade/handle so I was forced to except that the best I could hope for in relation to fixing the string mis-alignment was to end up with a bow with the string slightly favouring the side which it naturally wanted to. This was a shame as I’d sooner the branch was bent the opposite way as the limb which would have to be the lower limb was nice and snakey, and therefore the limb which was carrying the most character. I’d much sooner that this limb had made the top limb since it’s always better to have the most characterful limb as the top limb, or at least in my opinion!

Despite the branch being 4″ wide at the thin end (closer to 5″ at the fat end) the face which was usable was quite crowned. In my mind a bow made from a branch like this one would benefit from having hollowed out limbs. Digging the limbs out would also ensure that all of the pith was removed since the pith was running close to the back of the stave in the thinner end.

So after getting the bark of so i could see exactly what i had to work with, I cut the branch back to 65″. I then began reducing the belly material with the axe. Once an approximate limb orientation and thickness had been established I set about working down the edges to create and approximate face profile. The branch was starting to look something like a roughed out bow now so I set about working out exactly where the handle and fades would sit. My idea was to turn this stick into a 50lb ish, asymmetrical, pyramidal longbow with a four inch handle and 3-4″ fades. I also liked the idea of flicking the tips very slightly, and on a yew HLD this long, the tips could easily be static.

I decided to go for a contoured handle with a shelf. The large knot was going to be located in the bottom of the handle where the fade transition was going to be. This unfortunately put the large roll which was previously mentioned right in the bottom fade too. due to the shape of this roll, it was becoming apparent that I was going to have to except a thicker bottom fade. Had I tried to keep the fade thickness the same for both the top and the bottom, I’d have ended up with a handle which would have been shaped in a way which was uncomfortable to hold. So I decided to accept the thicker lower fade and use it as an opportunity to act as a canvas for the rather beautiful, albeit inconvinient knot.

With everything now roughed out I got the handle over a pan of boiling water and set the timer for 45 mins. Whilst she was steaming away, I said a quiet prayer the the bow gods and asked that they would see that the knot did not split through the handle and fade. My prayers where obviously heard as the thin seasoning check which was there already did not get any worse. So with the handle and fade nice and hot I put the stave into my bending jig and gently eased the string alignment back to centre. After cooling for several hours the clamps came off and further inspection confirmed that the string alignment was now just a tad off centre and favouring the correct side for a righty. Hopefully it would stick!

Next I flicked the tips with the heat gun whilst the limb thickness was still excessive. At least that way, if one of the small pin knots popped during bending I might have some extra material I could remove to take out the cracked pin. I didn’t go mad with the recurve jig so the tips survived the modest amount of flick. At this point I was thinking back to a post I’d seen on PA years ago where a seasoned bowyer had used antler main beam to reinforce and make static recurves on a beautiful osage primitive. I’d put aside a few bits of Red Deer main beam with the intention of trying this strategy for my self some time. So I decided that now was the time to give antler reinforced static tips a go!

After matching the antler pieces to the shape of the recurved tips, I glued and clamped them in situ with TBIII. This would now mean that the tips were set in place so if the tips needed alignment work later on then I would have to apply heat and bend from within the working section of the limbs, fades or the handle. Since the tips actually lined up reasonably well already, I didn’t envisage having to do much tweaking except maybe for some very minor twist. This small amount of twist came out quite easily with some dry heat later on.

Now the tips were set up I proceeded to hollow out both limbs. First with the gouge and then the goose neck scraper I mirrored the various undulations found on the back and projected those same contours onto the belly in reverse. Where there was a hump on the back, the belly would get dug out deep. Where there was a flatter spot on the back, I would shallow out the digging. By aiming for any even 14mm thickness at every spot between the handle fades and the fades of the static tips, it was pretty easy to get a good floor tiller.

Temporary nocks were cut into the tips which, at this point, were still oversized in terms of width. Then onto the tillering tree she went for some first pulls with the long string. The bottom limb looked very stiff so that was dealt with first. Next the inner third of the top limb was let off a touch until the elliptical tiller I was gunning for was achieved. With both limbs bending evenly, albeit with a slightly stronger bottom limb, I got her braced. At this point she was still very heavy so after working down to 50lbs at 22″ I decided to stop and get a rawhide backing on her.

After hide gluing on a couple of nice, thin, strong, home produced red deer rawhide strips, I considered decorating the rawhide with artwork, or maybe a stain. But then I remembered that I had a really beautiful full length cobra rawhide begging to be used somewhere in the workshop. On the cobra skin went along with a pair of red deer antler tip overlays and some deer back strap sinew to secure the antler static tip reinforcements. This sinew wrapping would also double as a means to cover the transition between the end of the cobra skins and the underlying rawhide.

After a week of drying she went back on the tillering tree for the last part of the journey. She was in need of a bit of rebalancing since the backings had moved the tiller a bit but in pretty short time she was back to an nice elliptical 1/8″ positive, pulling around 48# at 26″. I took her our stump shooting for a week to shoot in the last couple of inches as I always do. Final assessment (post shooting in) was that the tips needed just a fraction of twisting in opposite directions to get some better string alignment. Other than that she was holding the positive tiller and after a couple of hundred arrows had settled into 48lb at 28″.

Final touches where a nice thick piece of red stag neck rawhide for a handle covering, and a touch of black stain on the section of exposed rawhide visible at the tip sections. This stain was then wire wool scrubbed to create an aged look. I deliberately left the tips unbacked with the cobra skin as in my experience, snake skin will often end up getting very worn and tatty towards the tip of the upper limb due to the constant rubbing brought about by stringing the bow.

I painted the edges of the snake skin with a thin black boarder line overlayed with white dots to make the contrast between the tan snake skin and the yew sapwood really pop. And the whole bow including the rawhide handle was finished with 6 coats of tung oil applied over a couple of weeks to let it really soak in. I find that this type of satin oil finish really draws out the grain of yew heartwood really well.

I really like how this bow came out even though she is a big heavy girl. I think she’s a real looker with lots of character. And she can sling an arrow too! The obvious advantage of having a bow like this one with string alignment which clearly favours the left side, is that arrow fussiness is not an issue. I shot 40#, 50# and even 60# arrows through this bow and they were all achieving acceptable arrow flight. I was a bit concerned that the weight of the antler reinforcements in the static tips would create a bit of hand shock but by keeping the mass down to a minimum, hand shock is not an issue.

As much as I love the look and performance of this bow, I’ve not got the space for her and would love to see her end up getting shot with the degree of regularity which she desires, so this bow will be made available to buy through my shop. If you would like to become her proud owner then please visit my Esty shop here: Snake Skin Rawhide Backed Primitive Yew Longbow 4828 – Etsy UK

Here are the stats:

Mass: 858 grams with string

Length NTN: 64”

Width: 1 7/8” at widest

Tips: 8” static 7/16” wide

Back: Marginally crowned with undulations. Face profile pyramidal.

Belly Profile: Working limb sections concaved to mirror back, transitioning at the tips to D shapes cross section.

Tiller: Elliptical 1/8” positive.

Draw Weight: 48lbs at 28”

Sinew and Snake Skin Backed Yew Recurve 50# @ 28″

After a break spanning a few years, I’ve been experimenting with snake skins again recently. I love snake skins as a backing material as, in my opinion, they look amazing and are fairly simple to apply if you know what you’re doing. Admittedly my first couple of attempts to apply snake skins to a bow where less than perfect. But I’ve got a system in place now which is simple and effective and seems to work very well for me. At some point in the future I’ll do an article on my own quick and simple way of applying snakes skins.

The only trouble I find with snake skins is trying to source them here in the UK. I once paid an absolute arm and a leg to import a pair of Western Diamondback skins from the USA. As beautiful as those skins were, I simply can’t justify the cost of getting skins from traditional species of North American snakes into the UK these days. So I’ve started to use skins from Asiatic snake species instead.

The skins shown in the pics below are imported from Asia and are from a very common species of snake loosely referred to as the Asian King Ratsnake – Elaphe carinata. In terms of their conservation status these snakes are currently ranked (LC-least Concern) by the IUCN- See here: Elaphe carinata – Wikipedia. Whilst there is no doubt that these skins are not as pretty as skins from something like a North American rattle snake or even a Boa, I still think they look pretty amazing! And these Asian skins cost a mere fraction of the price of a pair of rattler or Boa skins!!

The bow featured in this post is one of my older sinew backed Yew recurves. A friend of mine asked me a while back if I had a hunting weight primitive bow which a mate of his could buy from me to hunt deer with. (Not here I hasten to add!!) This particular bow was one of my favourite stumping bows. It’s compact enough to be woven through the scrub and it certainly packs plenty enough punch to deliver appropriately weighted arrows for a lethal shot on a deer sized target.

Since this particular bow has seen many hundreds, if not thousands of arrows through it I can reliably say with certainty that this bow will withstand a lot of use and abuse, so I offered this bow to the avid hunter after re finishing it for the guy with the addition of a snake skin backing to provide an aesthetic upgrade, as well as a modest camo effect.

I also replaced the fairly battered old leather handle with my new favourite cover material – home processed and prepared deer rawhide. What an amazing handle cover material deer rawhide is! Not only does it look great after staining (note the marbled like effect from using a dark leather stain wiped off with pure isopropyl alcohol), but it’s also an incredibly hard wearing material. Deer rawhide must be sealed though else it will absorb water, but that’s no problem as raw hide will also take an oil finish like Truoil or Tung oil really well so you can oil finish/waterproof the handle at the same time as you oil finish/waterproof the bow wood.

Here are a few photos of the re-finished bow. Hope you like!: